- Joined
- Mar 25, 2014
- Messages
- 2,010
I am a traditional 18th - 19th century American gunsmith and have built guns from scratch, without store bought parts, or electricity since 1974. Check out my website if you wish. Quite often my rifles have inlays on them made from brass, German silver, Sterling silver (and coins), and gold. Once in a blue moon, steel or iron.
There are a few Himalayan Imports knives in various styles that have inlays on the handles and many of you'd like to do something similar. Here, in a nut shell, is a brief treatise on how to do this at home, at low cost (no Bawanna, you don't have to pawn your first born male child to do this!) and with minimal tools. The photos were taken this afternoon. This is my final rifle, #400, and is being made for myself.
Step one: Make or buy the inlay you wish to install. Then drill and countersink holes for the brads that secure it. OR! Use Acraglas gunsmith grade epoxy to affix the inlay if you don't want to use nails.
Step two: Position the inlay and secure it with brads or good tape. Do not trust your pudgy fingers to hold the inlay still. Ain'ta gonna happen, bucko.
Step three: Take ye trusty X-acto knife (so sue me for not being politically correct by using a trade name) and cut around the inlay RIGHT NEXT TO THE INLAY.
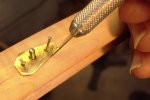
Step four: Once you have the inlay shape cut into the wood, remove the inlay. Take your little knife and recut the design in the wood to try and make it as deep as the inlay is thick. Back trench the cuts ON THE INSIDE OF THE DESIGN!! I know that sounds like a given, but there are people out there who fail to concentrate on what they're doing....in the following pic, you will see the far half of the inlay has been recut and deepened. The near side has been "back trenched". Back trenching is removing a sliver of wood, cut at about a 45 degree angle to the cut to provide relief for your gouge--so you don't bugger up the edges.
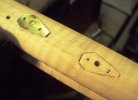
Step five: Carefully gouge out the wood inside the outline of the inlay. The take a sharp chisel/knife and smooth the roughness out of the inlay mortise.
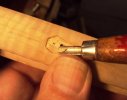
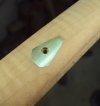
Step six: Once the inlay fits snugly and very close to the surface and contour of the wood, brad the inlay to the wood to hold it for the next two hundred years. In the photo, I have made two brass brads and made the heads match the countersunk holes in the inlays--much like a machine screw.
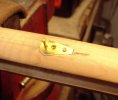
Step seven: File the inlay flush to the surface of the wood and dress it off with various grades of sand paper. Wipe it clean and then use water or alcohol to wet the wood surrounding the inlay. This swells the wood, closing up any tiny gaps between the wood and inlay, and allows the wood to "grip" the inlay thus making it even more secure. When dry, re-sand to your satisfaction and you're done!
The inlays can be as simple or as complex as your skill and perseverance allows. For you Mason brothers, here's a final pic to show what I'm talking about. Visualize the image 75% smaller and then see how large the little crescents of wood are around the sun. Cheers!

There are a few Himalayan Imports knives in various styles that have inlays on the handles and many of you'd like to do something similar. Here, in a nut shell, is a brief treatise on how to do this at home, at low cost (no Bawanna, you don't have to pawn your first born male child to do this!) and with minimal tools. The photos were taken this afternoon. This is my final rifle, #400, and is being made for myself.
Step one: Make or buy the inlay you wish to install. Then drill and countersink holes for the brads that secure it. OR! Use Acraglas gunsmith grade epoxy to affix the inlay if you don't want to use nails.
Step two: Position the inlay and secure it with brads or good tape. Do not trust your pudgy fingers to hold the inlay still. Ain'ta gonna happen, bucko.
Step three: Take ye trusty X-acto knife (so sue me for not being politically correct by using a trade name) and cut around the inlay RIGHT NEXT TO THE INLAY.

Step four: Once you have the inlay shape cut into the wood, remove the inlay. Take your little knife and recut the design in the wood to try and make it as deep as the inlay is thick. Back trench the cuts ON THE INSIDE OF THE DESIGN!! I know that sounds like a given, but there are people out there who fail to concentrate on what they're doing....in the following pic, you will see the far half of the inlay has been recut and deepened. The near side has been "back trenched". Back trenching is removing a sliver of wood, cut at about a 45 degree angle to the cut to provide relief for your gouge--so you don't bugger up the edges.

Step five: Carefully gouge out the wood inside the outline of the inlay. The take a sharp chisel/knife and smooth the roughness out of the inlay mortise.

Step six: Once the inlay fits snugly and very close to the surface and contour of the wood, brad the inlay to the wood to hold it for the next two hundred years. In the photo, I have made two brass brads and made the heads match the countersunk holes in the inlays--much like a machine screw.

Step seven: File the inlay flush to the surface of the wood and dress it off with various grades of sand paper. Wipe it clean and then use water or alcohol to wet the wood surrounding the inlay. This swells the wood, closing up any tiny gaps between the wood and inlay, and allows the wood to "grip" the inlay thus making it even more secure. When dry, re-sand to your satisfaction and you're done!

The inlays can be as simple or as complex as your skill and perseverance allows. For you Mason brothers, here's a final pic to show what I'm talking about. Visualize the image 75% smaller and then see how large the little crescents of wood are around the sun. Cheers!

