'No Frills' $75.00 home studio tent/lightbox

Hi!

Jim, I allready said it in anothe thread, but it actually belongs here: great stuff in here and chapeau for sharing your setup! This goes for all others in here as well!

I'm afraid I can't contribute a lot here, especially since I've never been a continous light shooter.

Regards,
Alex
 
This was a fun one to do. What do you think Coop?

FY7A1275-Edit-Edit_zps9e301800.jpg
 
Hi!

I'm not Jim, but really like your shot! One thing I personally do, when shooting from a similar angle is to put something small underneath the knife in order to level out the tilting from the clip (suits my preferences to have the blade facing down).

Or you could put on some counterweight at the back, like so... ;)

original.jpg


Joking aside, what I meant is that I would have tried to bring the "R" up from the back (small piece of rolled paper etc). I also like your background and the shadow area on the front of the handle (I usually prefer this to a uniformely lit shot and always go for destinct vignetting in my own fun shots). Also, great knife!


Regards,
Alex
 
Last edited:
Hi Alex,

You and I have many of the same experiences. I'm not experienced at continuous lighting either, as my setup is really strobes.

But.... no matter the source, I can see when it's done right and offer tips. Sometimes they're useful! ;) Bravo for you to show us your work.

John: Crystal clear. Enviable lighting. I'm a big fan of elevating the object, too. That ship looks like it's listing down to starboard. :D The only consideration.

I've mentioned this throughout. I use a 3M adhesive putty to position and elevate my work.

I have a little chinese food plastic dish with an assortment of sizes. Works good, but leaves a little residue. Use a chamois to reclean.

Thanks.

Coop
 
Hi Jim, thanks for all the great info! Even though I’m not good at building things, I couldn’t resist giving it a go. Here is how it turned out the first time around.

lightbox1.jpg


lightbox2.jpg


Couple of pics using the lightbox…
Busse-group-44.JPG


Busse-group-45.JPG


I probably need to get something better for the background and probably need to mess around with the lighting.

I think the PVC pipe I used were too big the first time around. The box worked fairly well, though the pictures could be better. It’s kind of hard to take pictures of large knives or multiple knives in the box. So I’m working on another one based on the picture posted by Coop & Noshtero. Hopefully I’ll get it done by this weekend.

lightbox3.jpg
 
Mamun: Don't tell me you're no good at building things. Look at you go! :thumbup:

The results are clear. I'm pleased you're having fun and making progress.

Thanks for sharing your setup. Please keep us posted with the new one.

:)

Coop
 
Jim,
I finally picked up sort of what you recommended. I had some 1/8" styrofoam sheets lying around, so I used those for the sides. Lined another with aluminum foil for the front. They only had (2) 8" clamp-light fixtures, so I got (2) 5" as well. Couldn't find all the pipe in 1.5" so I got 10 feet of 1.25". Made it 3 feet wide. My 5000k daytime CFL bulbs are "75 watt equivalent" but only 23 watts, but I've got 4 of 'em. Added a couple 12" mirror tiles in the front corners to bounce the light back a bit.

Best I've got so far is this:
NearlyThere1_zps31bf02b8.jpg

Home-made scales on my BK24.

I know I have a long way to go, and I really need some help on the creative side. But it's a far cry from my work in Post# 496. In the meantime, I didn't see it in the thread, and need to know how to maximize picture quality with my point-n-shoot. It has a wide range of ISO, Exposure, and F-Stop settings - but they are not manual. I can choose:
ISO200 1/30 F3.3 "Macro";
ISO100 1/30 F3.3 "Soft Skin";
ISO1250-ISO3200 (automatic) 1/200 F3.3 "High Sensitivity";
ISO100 1/30 F3.3 "Portrait";
Unknown ISO, 1/15 F3.3 "Food".
There are a bunch of other "scenes" option built in, but none of the others appear applicable to inanimate stills in a lightbox.
I took a whole bunch of blurry shots before the above trying different things out. I think that was on the "Macro" setting, but don't recall for sure.
I'm going to re-read the manual to see if I can change the F-Stop; I read a review that said I could, but as you can see it's been the same all along.

Anyhow, from the list above, is there anything you think would provide the highest potential photo quality using your box, that I could at least use as a baseline?
Thanks for the help, and the awesome thread.
 
Last edited:
I re-checked, and cannot change the aperture setting on my point-n-shoot (Lumix DMC-TZ3.)
In Macro mode, I can change the ISO, however. Not that it's necessarily a good idea... I dropped it to 100, and place a plate of glass under the subject above the background. Also used the timer. All it did was serve to honk up the white balance, and focus the hotspot. Still using the garbage bag diffuser and 2 mirrors.
DONE1_Set-Good_zps96b75c99.jpg


Here's an outdoor shot taken with the same settings, but with a flowering cherry as the diffusor. On a tripod about 5 feet away, with 5x optical (and no digital) zoom. Also used the timer, so it wasn't me shaking.
DONE1_outside1_zps5aa16d2c.jpg
 
I got a table, so now the lights are above the bar, not below.
Mostly settled on ISO 200
Tried again:

Copper_Wood_and_Leather_zps8d95b2e6.jpg


Too much glare from the blade, and the leather's a little dark.
I won't be taking pictures commercially to present, sell or represent other people's goods or anything. But I think it's a pretty big improvement for home photography, and likely the best I'll get until Santa brings me a new camera.

- Tom
 
Last edited:
Hi Tom,

Thanks for the posts and trials. #1 and #3 show promise. Post #2 is horrid. You know this.

On #1 the lighting is clear and not dramatic. That's OK.

Settings? I would go with macro and a lower ISO if possible.

#3 the lighting is OK, but it is centered over the lower LH corner and I'd want it exactly opposite, over the RH back. A combination of positioning the subjects and the lights could achieve this.

Keep it up. Look closely at the finished images and then determine where next to place the lights. That's what I do for EVERY shot. I move things until I've gotten the 'look' I want.

Coop
 
Thanks Jim.
I can't say what a pleasure it is getting tips and guidance from a professional such as your self. Your pics are amazing.

I just wanted to post an update showing my current setup, and a couple more photos taken with the lowest ISO I could select, and white balance set for outdoor (duh!)

Setup:
LightBox_zps663e0bea.jpg


Twins:
24abd16spines_zps403b7039.jpg

24with16_zps407ea2e5.jpg


Nice Wood:
Buckeye_zps48141f52.jpg


All are taken in Macro from about 24" away at optical zoom only, on a tripod with 2 sec delay. So I can't figure out where the blurriness comes from. I have noticed that it changes with background, but I can't find the one that clears it up. With your help, it's certainly better than I've gotten before!

- Tom
 
Hi Jim, thanks for all the great info! Even though I’m not good at building things, I couldn’t resist giving it a go. Here is how it turned out the first time around.

Couple of pics using the lightbox…
Busse-group-44.JPG


Busse-group-45.JPG

Nice knife. What is it?
 
Hi Jim,

I finished purchasing the clip lamps, the bulbs (6500K), pipes, etc, I have one question to be able to check my setup after its built: do you know how many lux are needed at the portrayed object? I happen to have a lux meter (http://www.testequipmentdepot.com/meterman/light/lm631.htm) and it would be handy to know this.

Thanks and I promise will post photos of my new setup, here are a couple of the failed previous one (tried it with and without the white sheet)

MlIb4jz.jpg


seven clip lamps:

l0tF8aj.jpg


Pablo
 
Hi Peu,

Sorry, I have never used that meter to offer ANY input. You won't need it.

More light is always better: it allows you to use less aperture opening so your depth of field increases.

Show us your examples!

Jim
 
These photos were taken with the old setup, the new setup is unborn yet :)

o8OFtdb.jpg

BYo7K1n.jpg

4dvtspk.jpg

h5hwQPE.jpg

wOnrF0j.jpg


Pablo
 
Betatesting the new setup:

H9fQdpl.jpg

USh1K9X.jpg

dBT5LS7.jpg


huZF39d.jpg

DWsAbwN.jpg

EMO6MbH.jpg


same photo with photoshop auto-tone applied

mQ9qjO0.jpg


Photos taken with my iphone 5, next week I will test it with a Pentax K-x, camera settings suggestions are welcome :)

Lens I have a tamron 18-200, the stock 50mm and and an old and nice 50mm f1.4 manual focus auto aperture.


Pablo
 
An effective set up for an additional cost of $1!!!

For years I've admired knife photography - but also realized when I tried it myself that there was a lot more involved -
especially in lighting....
EricEggly040605_zpsd9829688.jpg

Eric Eggly - Point 7 Photography set up at the Blade Show.

My main difficulty was in mirror polished blades - as the name suggests they are like mirrors so would reflect - even the photographer.
So it's always been a challenge.

I tried things like light tent/boxes - although they did give soft even lighting -
the problem was mirror finish inevitably would reflect the seams of the box,
or the photographer - since they had a restrictive opening....

Recently I managed to get a relatively effective lighting set up -
for the additional cost of $1!
It was simply a white foam art board that I bought from a dollar store.

It normally stands as a background so that it's reflect light back onto the scene -
but for mirror finish I tilt it forward so that it would lean on either the two desk lamps, or literally on my camera, or forehead.

GordonStag131209_zps079a34e9.jpg

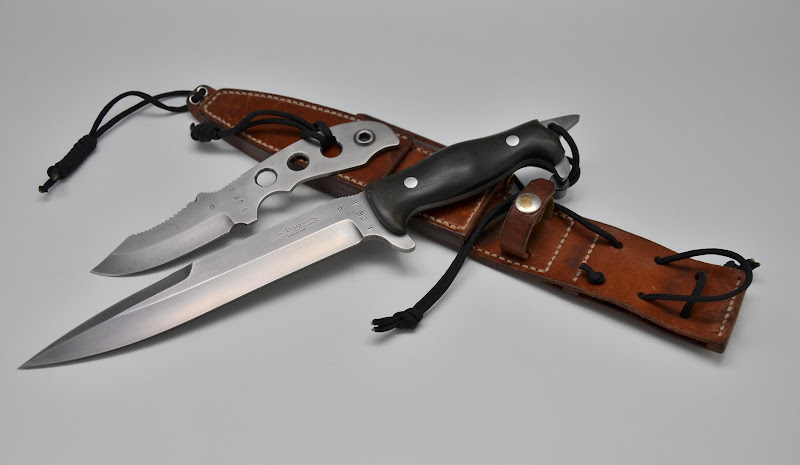
This was a relatively straightforward shot -
I merely varied the tilt of that white foam board until I got rid of any unwanted reflections
and getting the best blade modelling....

I use a dSLR with real optical through the lens viewfinder -
which allows me to make micro-adjustments until I see the best angle/shot.

GordonIronW131210_zpsf0c55243.jpg

This was also a straight forward shot - but required more post processing to bring up/enhance the wood grain.

Word about color balance - I use two 6500K "Daylight" CFLs (compact fluorescent spiral light bulbs) - 26watt rated @ 100watt equivalent.

Although they are supposed to be daylight - my dSLR set on daylight white balance show these to be a bit too blue -
whereas 5000K "sunlight" CFLs tend to be a bit too yellow/pink.

I shoot AWB (Auto White Balance) which correct the balance somewhat - but it is not always as accurate as I'd like - so I correct in post processing.

I use gray-point correction on that blades or if I shoot a white background the white point on the background.

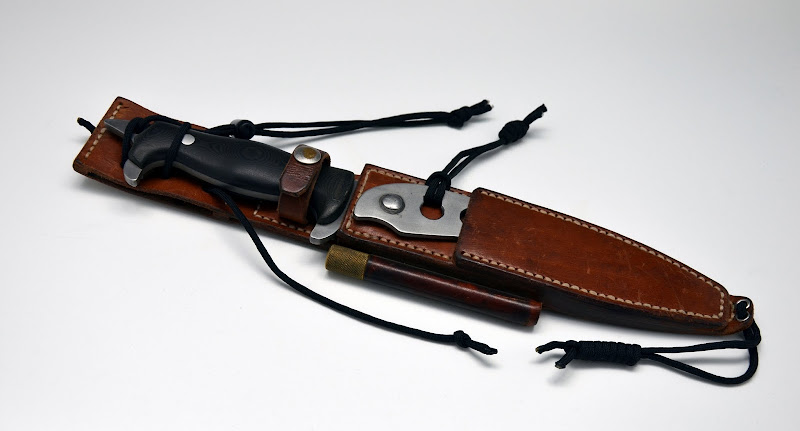
For the black background I place the knives on a piece of black craft felt material -
but the pic always shows the texture - so I either do a fill with black to get rid of the distraction - but often results in some mottled gray patches -
so I have to deselect the knives and use -100 brightness and -100 contrast to blacken the background.

HarndsCK6015_131203_zpsd2103fdd.jpg

this blade has a polished satin finish - so no where near as difficult as mirror polish -
but hard to convey its sheen - I think this was reasonably successful -
the white foam board was left standing - the the blade was lit with direct lighting and the angle was so the blade reflected the white board background.

MC113D_MokiCls131205_zps5e4c01a7.jpg


MC113D_pOpn131029_zps8ef16fd3.jpg


My very simple lighting set up -
lightSetup131212_zps9c52a1fe.jpg

white art foam board upright for most non-mirror finish.

lightSetupTilt131212_zps0a37de6c.jpg

board tilted leaning against the lamps - but often rests either on my camera, or lens barrel, or extended finger, or even head.......
vary the tilt angle to get the best modelling on the knife.

That white art foam board cost all of $1 from a dollar store.....

--
Vincent

http://picasaweb.com/UnknownVincent?showall=true
http://UnknownVincent.Shutterfly.com
http://UnknownVT.Shutterfly.com
 
west coast of canada is pretty much like a lightbox for half the year...if you can find a dry spot on a dry day you are set (^__^)
 
Vincent (UnknownVT): This setup is deceivingly simply and unquestionably effective. I'm impressed.

For the low cost of those two crappy lamps and the $1 foamboard, look at how clear that is. :thumbup: What I like is the multidirectional fill.

Me: I'd like to see some on something other than the black background.

I'm not changing my setup, however, this is one of those forehead plant setups. (Almost as easy as PhilL's piece of letter paper diffuser hovering in front of the window.) ;)

Dave (islandblacksmith): We should all be so lucky??! Grey overcast is always clear, but not always available or dramatic.

Thanks!
 
Vincent (UnknownVT): This setup is deceivingly simply and unquestionably effective. I'm impressed.

For the low cost of those two crappy lamps and the $1 foamboard, look at how clear that is. :thumbup: What I like is the multidirectional fill.

Me: I'd like to see some on something other than the black background.

I'm not changing my setup, however, this is one of those forehead plant setups.

Thanks Coop.

My apologies for the late reply - I didn't see a subscription notification.

Anyway I really only consider myself to be utilitarian in knife photography -
I do it mostly to illustrate reviews -
so strive for clarity and to make the point I am writing about -
hence the plain black or white backgrounds and low artistic flare.

Often I'll include a ruler - but realize that to get the right angles for the lighting on a blade means the shot is not straight on
and therefore there is the aspect of perspective - but ruler is included just to give an idea and not meant for actual measurement.


(from: Review - Harnds CK6015 Viper )
the clip and the Gordon blade are mirror polished as can be seen in this shot -

so it was difficult to find the right angle to shoot from -
being able to adjust both my shooting angle and the tilt of the $1 white foam board helped a lot.

I used to think to include a battery too for scale -
but have decided to use a SAK - since this is a knife forum


(from: Review - Cheap Folding Knives)
and I believe it's mandatory to own at least one SAK to join BladeForums ;)

Thanks

--
Vincent

http://picasaweb.com/UnknownVincent?showall=true
http://UnknownVincent.Shutterfly.com
http://UnknownVT.Shutterfly.com
 
Last edited:
Back
Top