paper sharpening wheels - when your time is important to you

I own several vintage Gerbers in M2 steel, both outdoor & kitchen models, and this Durendal slicer model from the '60's does duty in our kitchen.
Opening all kinds of paper & plastic food packages, slicing bags with espresso beans, cutting up larger fruits like melons & pineapples, slicing bread loafs and hamburger buns without crumbling, cutting sausages, etc.
Not every day, but at least several times a week.

I bought this Gerber about 2 years ago on E-Bay completely blunt, so i reprofiled & sharpened it with a SiC grit Paper Wheel, then refined the edge with 15 micron diamond compound on a second Paper Wheel, and then again with 6 micron diamond compound on a third Paper Wheel.
The tiny burr was removed with a fourth Paper Wheel coated with 0,25 micron diamond compound.
The idea was to get something of a semi-polish that would protect the exposed M2 edge better against corrosion issues during kitchen use, while still having some degree of bite.

The knife was then used for about 2 years in our kitchen, and when not in use stored on a magnet strip on our kitchen wall.
After those 2 years the edge only had a few very minor dings/flat spots in it (in the tiny belly area), but it could still shave the hair on the back of my hand on skin level quite well with about 90-95 % of the edge.
When cutting tomatoes however the edge tended to slide a bit over the skin before it started to cut.
The main reason for this kind of edgeholding is of course the fact that most of the edge on a slicer like this never touches a cutting board, only the belly area does, but the M2 steel performed quite admirably in my book.

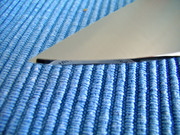
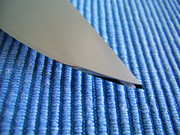
A few weeks ago i resharpened the edge, this time only with 15 micron diamond compound, then deburred with 0,25 micron diamond compound, as i want to try the knife with some more bite.
Will have to find out if there will be corrosion issues or not.
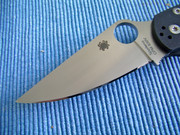
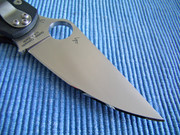
So far i've only used it on food packaging (both paper & plastic, no fruit or other things yet), but here are a few pics how the knife & edge look now.
The edge feels sticky and is still treetopping sharp.


Specs:

Blade steel: hard chromed M2 steel
Hardness: 60-62 HRC
Handle material: cast on aluminum, chromed.
Overall length: 29,5 cm
Blade length: 16,5 cm
Blade thickness: 1,36 mm in front of the handle tapering to 0,84 mm close to the point
Thickness behind the edge: 0,5 mm
Edge angle: +/- 30 degrees inclusive, slightly convex
 
Last edited:
Ok I haven't read all 88 pages so I apologize if this was already addressed somewhere in them, but: I have a standard set of whells and they give me a very polished edge with no burr that doesn't feel sharp to the touch, but actually shaves hair decently, but never gets truly scary sharp. What am I doing wrong???
 
It sounds to me like you went from the grit Wheel to the deburring/polishing Wheel too soon, as paramount for getting that truly sharp edge is that you first create a complete burr from heel to tip, so all along the edge of your knife.
If you then turn the knife over one more time and make another pass on the grit Wheel that burr must appear on that side of the edge as well, and also from heel to tip.
It's best to use a loupe, as that will help you to see much better what is actually happening.

Only then can you make the transition to the deburring / polishing Wheel.
Aim for doing as few light passes as needed to remove the burr for a very sharp yet toothy edge, or continue doing passes for a more polished edge.
 
Last edited:
I'm finding it difficult to control the knife on the grit wheel. It bumps and chatters and it's difficult to keep steady contact with the wheel, and an even bevel.
I'm using a slow running 8" grinder.
I'm wondering if a faster speed grinder (as recommended by the manufacturer) would be better?
 
Thanks kwackster I thought I was doing good on burr formation but a loupe is a good idea since my eyes are crap I will try that. Banksy I don't have that issue at all so I'd say try a faster speed.
 
@banksy: that sounds like an uneven layer of SiC grit and/or wax.
Have you tried a (stiff) steel brush yet ?
 
Wheels just ordered. Question, can these be kept on grinder in garage? I live in a very damp area, will this be a problem with paper wheels? Thanks
 
Wheels just ordered. Question, can these be kept on grinder in garage? I live in a very damp area, will this be a problem with paper wheels? Thanks

Not sure if it equates to "very damp", but mine live in a garage which ranges from 'bone dry' in the winter to very humid in the summer... and have never seen any issues.
 
Thanks 34. About the grinder, how much value is the variable speed? Can get $40 grinder anywhere, but most variable speed 6" are $100. Worth the extra for variable?
 
Thanks 34. About the grinder, how much value is the variable speed? Can get $40 grinder anywhere, but most variable speed 6" are $100. Worth the extra for variable?

I don't think variable speed is necessary... I run mine at the manufacturers recommendation (above 3000 rpm)... I think they run smoother and work better. Others however, think slower is "safer", so......
 
Currently busy with the same mod of a (user) Gerber Applegate-Fairbairn folder like i did earlier in post #1681 a few pages back.
This is how the knife looked when i received it from the owner, still with a single edge & an edge angle between 40 and 45 degrees inclusive:


And this is how the knife looks after grinding the new edge on the back of the blade & trying to match it with the reprofiled edge on the other side.
The scratch pattern complete with burr remains still present on the apex comes from a Rubber Wheel coated with +/- 170 grit diamond powder & wax (as i haven't made a Paper Wheel with the same diamond powder yet) which i used for this job.


The idea was to make the 2 edges / 4 bevels as visually similar in width & curvature as i could, with a specific edge angle of +/- 35 degrees inclusive, without damaging the names on the blade, and to create a new point that would be centered as much as possible.
Trying to achieve all these things at the same time freehand, together with many checks with a loupe in between passes isn't easy for me, so i took my time.
Tomorrow i plan to continue with 15 micron diamond compound on a Paper Wheel for one of those bling & bite finishes, after which i'm going to take a few more pics.
 
Last edited:
And the result, after a Paper Wheel with 15 micron diamond compound & deburring with a second Paper Wheel with 0.25 diamond compound.
Both edges are treetopping sharp.


speed picture
 
Last edited:
for kwackster,

Can you give out the name of the oil with the tacifier you use? I have a set of wheels coming and want to set this up as close as possible to what you have. I remember you said you put the paste on the bare wheel first, then used the oil and let it set *at least* overnight, but possibly even a few nights for the best results.

Also, have you ever tried the Tormek PA70 honing compound that Ken Onion recommended in the first few pages of this thread? It looks like it's about 3 microns. He said to use it ONLY use it on the side that the burr is on (which I take to mean if you make a pass and raise the burr on the sic grit, you flip it over and hit that side with the Tormek paste, but please correct me if I'm not understanding that correctly.)
 
OK some time ago I read a bunch of this thread but now I am being lazy.
I am about to order a RAZOR SHARP brand paper wheel(s).

The only use I will use it for is ZirconiumOxide ceramic knives and . . . perhaps . . . If I get brave enough or rich enough to get another S110V, S9OV etc blade.

First off I assume I should just go with diamond paste right off, I have some, and skip the rouge.

Should I get the set with the coarser wheel with Silicon Carbide or skip that set and just, at some time in the future, get one or two more wheels and just use diamond grit/paste?

At this point all I need to do is "strop" my ceramic blade which will see gentle but significant EDC use and is, at this point, nearly hair whittling and I just want to maintain that. I have tried wet or dry paper on my Edge Pro . . . nah dude, nah, too slow to take the edge from sort of shave sharp to shave sharp but not hair whittling. The edge is brand new and hardly used so I can just imagine when it gets some use how long it will take with the low surface feet per minute of a hand sharpener.

Thanks

PS: should I be looking at another brand or another wheel in the same brand?
PPS: my attempts to reprofile and sharpen a white ceramic neck knife have been disastrous on my many diamond plates. Successfully reprofiled but never even remotely sharp. Of course there was nothing to loose because it was very dull from the maker.
Pics ? we all like pics so here we go :

My pride and joy


My silly folly of a neck knife which actually I quite like if I could get it sharp enough to cut anything at all.
The top / white knife
 
Last edited:


The idea was to make the 2 edges / 4 bevels as visually similar in width & curvature as i could, with a specific edge angle of +/- 35 degrees inclusive, without damaging the names on the blade, and to create a new point that would be centered as much as possible.

NICE job on that Applegate-Fairbairn!
It is difficult (time-consuming) to get the tip correct on that knife! Very nice work there.

I like to polish only, spine-side edge of this knife (un-sharpened spine-side or second edge). Gives appearance of double-edged, but still legal in my state (double-edge specifically referenced in our codes as illegal unless LEO, military on duty, etc.).

Regards,
 
Last edited:
Did this user Spyderco PM2 in S30V steel for a customer who had seen pictures online of another PM2 in S110V steel i did earlier, and which are also somewhere in this thread.
The man wanted the exact same full mirror edge he had seen on the other knife, it had to be 30 degrees inclusive, and it also had to have a guaranteed hair whittling sharpness.
Of course i told him that this S30V is not the best steel for a full mirror edge, but it was what he wanted, :)

The old edge had a few flat spots and a bit of a rounded point from use, but nothing serious.
Total time i spent on this knife was one hour, in a succession of Paper Wheels with 15, 6, 3, and 1 micron diamond compound.
As a comparison: the same full mirror edge on that PM2 in S110V steel the man saw online took me two hours.
Most of this time is going into the many visual checks i do in between with my Victorinox loupe under bright light, not into the actual sharpening.

These are the quick pics i also sent to the customer, and they can be clicked twice for a bit more detail.
The owner was satisfied btw.


Last edited:
rob you are the paper wheel master bud! Taking it to the next level! Great job!
 
Hinderer XM-18 Slicer grind in S35VN steel.
According to my Tormek angle gauge the factory edge angle measured between 45 and 50 degrees inclusive, while the thickness of the steel just behind that edge went from 0.7 mm at the heel to 0.6 mm at the tip.
The knife is going to be used as a hunting folder, and the owner had 2 wishes: if possible no visually wide bevels, plus he wanted to be able to maintain the new edge on a Spyderco Sharpmaker.

Before sharpening:


After sharpening.

Edge reprofiled to an almost exact 35 degrees inclusive with a Paper Wheel coated with 220 grit SiC, after which the burr was removed with a second Paper Wheel coated with 0.25 micron diamond compound.
The new edge is what i would call sticky sharp.


Last edited:
Back
Top