How To “Tekoa” friction folder WIP (Pic heavy)

Looks like the picture situation is resolved. Thanks to everyone for your patience and help!

So I’ll pick up where it left off. So after drilling the pivot and stop pin hole, it fits together great. As you can see, still have to dial in the open and closed positions on the blade. That was the plan.
CBD2936E-6CE7-463C-A0CD-D995EDBC5208.jpeg

Time to dial in the open and closed locations. Super delicate. You can always take too little bit if you take too much, it’s over.
94BFA47B-3BCE-4A20-8547-BC89F838C3BC.jpeg

First I had to dial in the swing around the radius for the open and closed positions. You can see here there’s not enough room to fit between the pivot pin and the stop pin. Back to the grinder.
53DE2457-5076-45B6-AD66-77C9DE56278D.jpeg

Radius set.
3AA2DB3F-48C1-4F8E-91A6-A31D7F12B111.jpeg

Open position. Way off but that was the plan.
3AA2DB3F-48C1-4F8E-91A6-A31D7F12B111.jpeg

Closed position. Way off but that was the plan.
358EFAE5-D44F-4631-AEF8-C8B294531C49.jpeg

File a little. Check a lot. Rinse. Repeat. I used my 3/8 file and my 5/32 files to dial everything in a little bit at a time.
F397E7A2-D9B5-4966-92F8-18787F93F348.jpeg

Open is set.
1EDAD96B-1296-4D35-B1A2-F8A8E269366E.jpeg

Closed is set.
44793EF0-95C2-4B4F-8FFA-E20EB9A8CD75.jpeg
 

Attachments

  • D7CDA016-8C64-4757-A95F-A1357FDF2654.jpeg
    D7CDA016-8C64-4757-A95F-A1357FDF2654.jpeg
    13 KB · Views: 1
Now it’s time to profile the handle scales and start drilling more holes. Back to the wee lil’ 2x42.
D877E7DC-4227-4DCE-81AF-458ADC81BC8A.jpeg

Profiled
D0F44EB8-36C9-430E-B57F-604F19FC0DF3.jpeg

Here I’m starting the step up to the 1/2” thru holes in the handles. I worked my way through a few different sizes until I reached 1/2”.
6EDD94A6-8C7A-48B2-8F1E-D13F7253318C.jpeg

After drilling, I made sure to countersink them a good bit as that’ll make for a much cleaner look.
E086ED35-DD9E-4370-8647-C9323E5FB997.jpeg

Now that all the profiling and drilling is complete, the scales sandwich can be separated. A sharp knock against the vise a few times and the come apart cleanly.
B930C550-F589-4AF1-8EE0-21E86B624D79.jpeg 7D89ACBD-0AFB-4039-9C80-DF5D04F706AF.jpeg

She’s starting to come together.
F5A5B5CB-E806-4F99-9ED0-D843DF8E5CD7.jpeg 40714543-E645-41B9-AB4F-9D77EFE7A3F7.jpeg 659CF528-1BCE-4B88-A837-9C399207270D.jpeg
 

Attachments

  • D78BE9B9-E40B-4B2D-9EA7-FEFFE416827E.jpeg
    D78BE9B9-E40B-4B2D-9EA7-FEFFE416827E.jpeg
    16.6 KB · Views: 1
Next for the build is getting the backspacer made. I set the small block of black/gray G10 on two 3/4” parallels in my vise and flattened the first side.
595A32D2-856B-4497-A36E-D62E0528F3D6.jpeg

Next I flipped the small block over and flattened the other side while also taking the material to the final thickness that I needed for the backspacer to be. The 1/2” endmill made a mess of that G10. Better than G10 grinding dust though!
953CB676-AD4B-4A4D-B166-05E97FB9D078.jpeg

Shaped on the grinder. 1B669828-037F-486C-B828-2E62E862AD60.jpeg

I used several drops of Gorilla superglue to hold it in place. That stuff is no joke. I also inserted the pivot pin and stop pin to align the other scale with to make a perfect fit. Before placing that scale on top, I put more superglue on the backspacer.
585A7CD2-5B93-4D5F-94E1-A0FE1D52DC03.jpeg

Once that was done, I scribed two 1/8” lines from the edge and drilled 1/8” holes for my backspacer pins. They fit super tight which is great.
64FD1481-7726-41C5-A0F1-2D54F773F604.jpeg

Back to the grinder to grind the pins flush with the scales.
5FEDCD5E-9237-48A1-879D-D24FA72D35D5.jpeg

Finally I gave them a once over on my sanding block.
54004986-D694-45B9-A9F9-EB9DF84BE619.jpeg

G10 shines up SO good with WD40!
D7DF564C-2101-4BF2-BCAD-76FC5DAD1017.jpeg
 
Now it’s time to get a little crazy. The idea struck me in my workshop so I decided, what the hell? and went for it. Let’s do some gimping (sp?).

I assembled the knife and made some layout lines where my thumb naturally rested. Within that area, I scribed more lines .250” apart. I started with a hacksaw to establish the grooves lines. I followed that with a triangular file and then finally I finished with my 5/32nds chainsaw file. I absolutely love the result. First time I’ve done that.
0CA742C1-1F83-40EA-8EE5-2C74E09E5FF2.jpeg 9DEB353D-2C1C-4FB1-9BFE-98FA81D144F5.jpeg 90891EE1-D7BB-4883-9BC3-1668E7C1487F.jpeg
1FDC52BA-3284-4190-8EC2-CE1505AF3589.jpeg
5CE51334-37A8-44E6-8183-F22B99989EE2.jpeg 3EF47AE9-243A-4F89-BB6D-41CF759CC1A3.jpeg0E35F8E6-094E-41B2-9A54-4E07BBF17976.jpeg 1F248194-9036-47F0-A180-C9FAD52A4393.jpeg 12E37A6D-28A6-469C-B883-7E96408204B7.jpeg
 
Last edited:
Looking great! I know I’m not alone when I say how much I enjoy going through WIP threads. I always learn from folks willing to document their process. Threads like that helped me feel like I could take on a folder. This is a great one to get people willing to jump into giving it a try. Thanks for posting it all up.

Jeremy
I’ve always loved WIP threads too and this one has been fun. Thanks for following! Means a lot!
 
Now it’s time to get really crazy. o_O I saw Brian Brown (Brian Brown Knives) on Instagram using a tool to texture his handle scales on a folder he was making. I sent him a message and he gladly shared the info with me of what it was. It is a simple 1/8“ shank dremel tool with a rounded carbide ball. I’ve used other methods before for texturing things but this is WAY better. Side note, one thing I love about making knives is the creativity is only limited by how wild your mind gets. Don’t be afraid to try new things! If you screw up, you still learned something in the process!
17449D15-FB16-42AD-A0C1-63B343E02B3B.jpeg

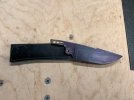
Bedazzling the blade steel.
834BD3D2-AC7C-44A6-9B3D-51A1771539EE.jpeg

What in the world am I doing??
3721D5DE-68CC-464B-BDE3-46F5486E4489.jpeg

So, here’s some honestly and transparency. I have not made a knife in 4 years. I have had quite the personal upheaval in my life but things have smoothed out now. That being said, at this point in the build, I’m scared to death I’m going to mess it all up with horrible out of practice grinding. So! I’m taking it old school and hand filing my plunge lines. I started out this way and thought maybe it’d be wise to do that again. After doing so, I may actually stick with it as common practice because it came out incredible!

Using a hacksaw again to establish the line.
24B42FED-39F5-482A-88DF-AF81BADF6947.jpeg

Followed that up with a triangular file again.
71711429-E157-432E-ACF9-E41AED28E912.jpeg

Finally, my 5/32 laid down the plunge to the desired grind height I wanted.
EC414FFA-D521-4263-B97F-A10B3A9BCDDF.jpeg

B4A5F61F-4B74-4BF2-86EA-15F733631E58.jpeg

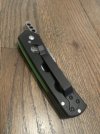
Everything is even edge side!
F17A00F5-BF1D-4D18-809D-8CD0CCF0A6A2.jpeg

Dear lord baby Jesus have mercy. :)
6A185159-8003-4E8F-A805-FAE04D7A608A.jpeg
 
Nearing the finish line now. Relief grinds at 45° along the edge to save my fresh belts. Grinding the swedge on the poon too.
D036C4E9-1DE2-4B89-BC3F-6F375568FC51.jpeg 4CC0633E-AE0E-493D-A75E-083EFA189DFA.jpeg 92236BD6-73E2-4BDF-B7BC-A568FE1F2D47.jpeg

And finally, the dirty-dirty rough grind.
186E28CF-DF41-42D3-A3BA-F6CAA0A0070F.jpeg
401FB4B1-D80D-4462-AD09-0903687519D2.jpeg

My heat treating is pretty simple for 1084. I just use the tried and true method used by many. Heat just past non-magnetic in my two-brick forge and quench in canola oil. I then temper at 400° for two hours in my kitchen oven.
F0393CC8-4CA8-4A23-B308-610837E804E4.jpeg 1A4D779B-41C4-44DF-AAF2-FEC261E324BA.jpeg 6695BED0-D96D-4968-8CAE-20B52F5C2E01.jpeg

I have always yielded right at 58 RC with that method. I’ll take it!
79E5D580-B25F-4129-80FD-A9D637BD3DA4.jpeg
 

Attachments

  • 0A3D3EAD-6369-4F82-A617-8A89B68EE60E.jpeg
    0A3D3EAD-6369-4F82-A617-8A89B68EE60E.jpeg
    11 KB · Views: 1
Last edited:
Time to do some file work and break those edges to eliminate hotspots while holding. Just a simple small file to round over the edges nice and evenly around the perimeter of the scales gets the job done. Afterwards, a wipe down with good ol’ WD40 brings back the luster of the G10.
0F2E8AF9-78FD-4E4F-89E6-4913E4F219C6.jpeg BCCB7E81-3670-4251-8584-92E68C97E4C4.jpeg EF2A63A2-6DFE-4A28-BEF9-A2CA2D9E83CA.jpeg BD3C2C7A-A94C-4B31-89F5-A5C7656FF3A2.jpeg

Pretty good symmetry on this one.
7EF0A540-337A-46C1-98C3-70ABA1903512.jpeg C6FBE914-1DEC-4922-A78C-9738D7575F71.jpeg
 
Very nicely done. I enjoy WIP and love seeing how others tackle projects. Keep up the great work.
 
Well! It’s time to wrap things up! I only have a few things left to do at this point.

So, can you pocket carry a frickie by its pocket clip? o_O I’m going to find out with this one. I imagine the positioning of the fold out of the blade in your pocket would make a difference. For this frickie, I chose to put the pocket clip on the knife with the blade to the back and tip up, meaning, the tang of the frickie will be in the bottom position. Strange idea? Also, the friction can be adjusted to allow the knife to be as tough to deploy as you’d like making it safer in your pocket I would imagine.

Getting the final assembly ready.
E69BCA05-8761-4161-8DAD-4CDCF7EF40A8.jpeg

Scribing the center points for my tap drill.
C9D4CA2D-C3B7-4318-A64C-1D9ED3047A57.jpeg

At the mill for drilling the holes for the tap. I’ve never tapped material like G10 before. I was a bit skeptical it wouldn’t tap well and the 2mm screws would not hold well. I was wrong, G10 taps like a champ. Very tight threads. I was super pleased. Definitely tap by hand though.
8AB38A7C-1D81-45AE-92E5-78668EF6B699.jpeg 4A32A50B-0E02-4D0A-99EA-81F39E7F305F.jpeg

I added bronze washers to the pivot hole part of the frickie. It’s supposed to make for smoother movement. I think I agree that it does.
63477075-40DB-4F56-8C9F-AEE188DDC704.jpeg

Drumroll please! Glamour shots next!
 
Final post of the build! The final two steps are to etch my makers mark and sharpen the blade. For etching my mark I used a method I learned from Robert at White Bone Knives. He has a video about it on his YouTube Channel that you can check out. It’s a super simple method. The very last thing I do is sharpen the knife. I rough the edge ever so slightly on the slack of my grinder and then I break out the Lanskey sharpening system and just go through the stones and finish with a good strop. I normally sharpen at the 20° angle.

Here are the final pictures!
91DF3206-72AB-4093-AE0A-6DDE0373AFB8.jpeg 03B84FD7-67C4-4EB3-AA12-CEEADB47D54B.jpeg 683D2FC0-43C4-475B-9C4E-B9FCE9AAA8A2.jpeg 19DA91EC-7B64-4652-BD1A-E25BBF6D886C.jpeg 4486C629-975E-469B-8C4D-82D2F9DF8D4A.jpeg 96D30E8F-D153-419B-8C1B-65EF9D2F18CE.jpeg D90A3D20-C3B6-4977-95B7-DA40366817B5.jpeg

1A1415EA-4B99-40E9-BB8B-D0C191AB1ABA.jpeg
 

Attachments

  • 9D4DED9E-C721-4429-9059-5F20E74FEB19.jpeg
    9D4DED9E-C721-4429-9059-5F20E74FEB19.jpeg
    16.8 KB · Views: 2
Yeah I like the look it’s just after use you get crud stuck down in the grit scratches that are difficult to remove. My CPM10V folder is bad enough with its finish but I can understand why thy did not go higher lol. Knife looks great though.
 
Back
Top