You are using an out of date browser. It may not display this or other websites correctly.
You should upgrade or use an alternative browser.
You should upgrade or use an alternative browser.
Spyderco " 204-freehanding " — Tri-Angle Sharpmaker stones & more
- Thread starter kreisler
- Start date
"to creep" is the perfect word, thank you M Mr.Wizard , as you might know the steel plate is not fixed inside the IBM, it is lying loosely in the PVC casing, a funny construction by IBM engineers. the original four corner stubs are small/low and provide no grip (traction) but are high enough to make the plastic creep under the inner steel load; on the photo i covered them with white tape to erh protect them against wear lol.Steel doesn't creep at room temperature
sometimes i think that i'd want an anodized aluminum keyboard case (no flex, no bend, easier to clean, indestructible, premium feel, no creep
") ) but in practice i would not like the metal coldness to the touch. would give me the shivers brrh. hh
) but in practice i would not like the metal coldness to the touch. would give me the shivers brrh. hh i do enjoy click clacking loud and hard on purpose though!
Last edited:
Random Thought of the Day (pertinent to the thread topic):
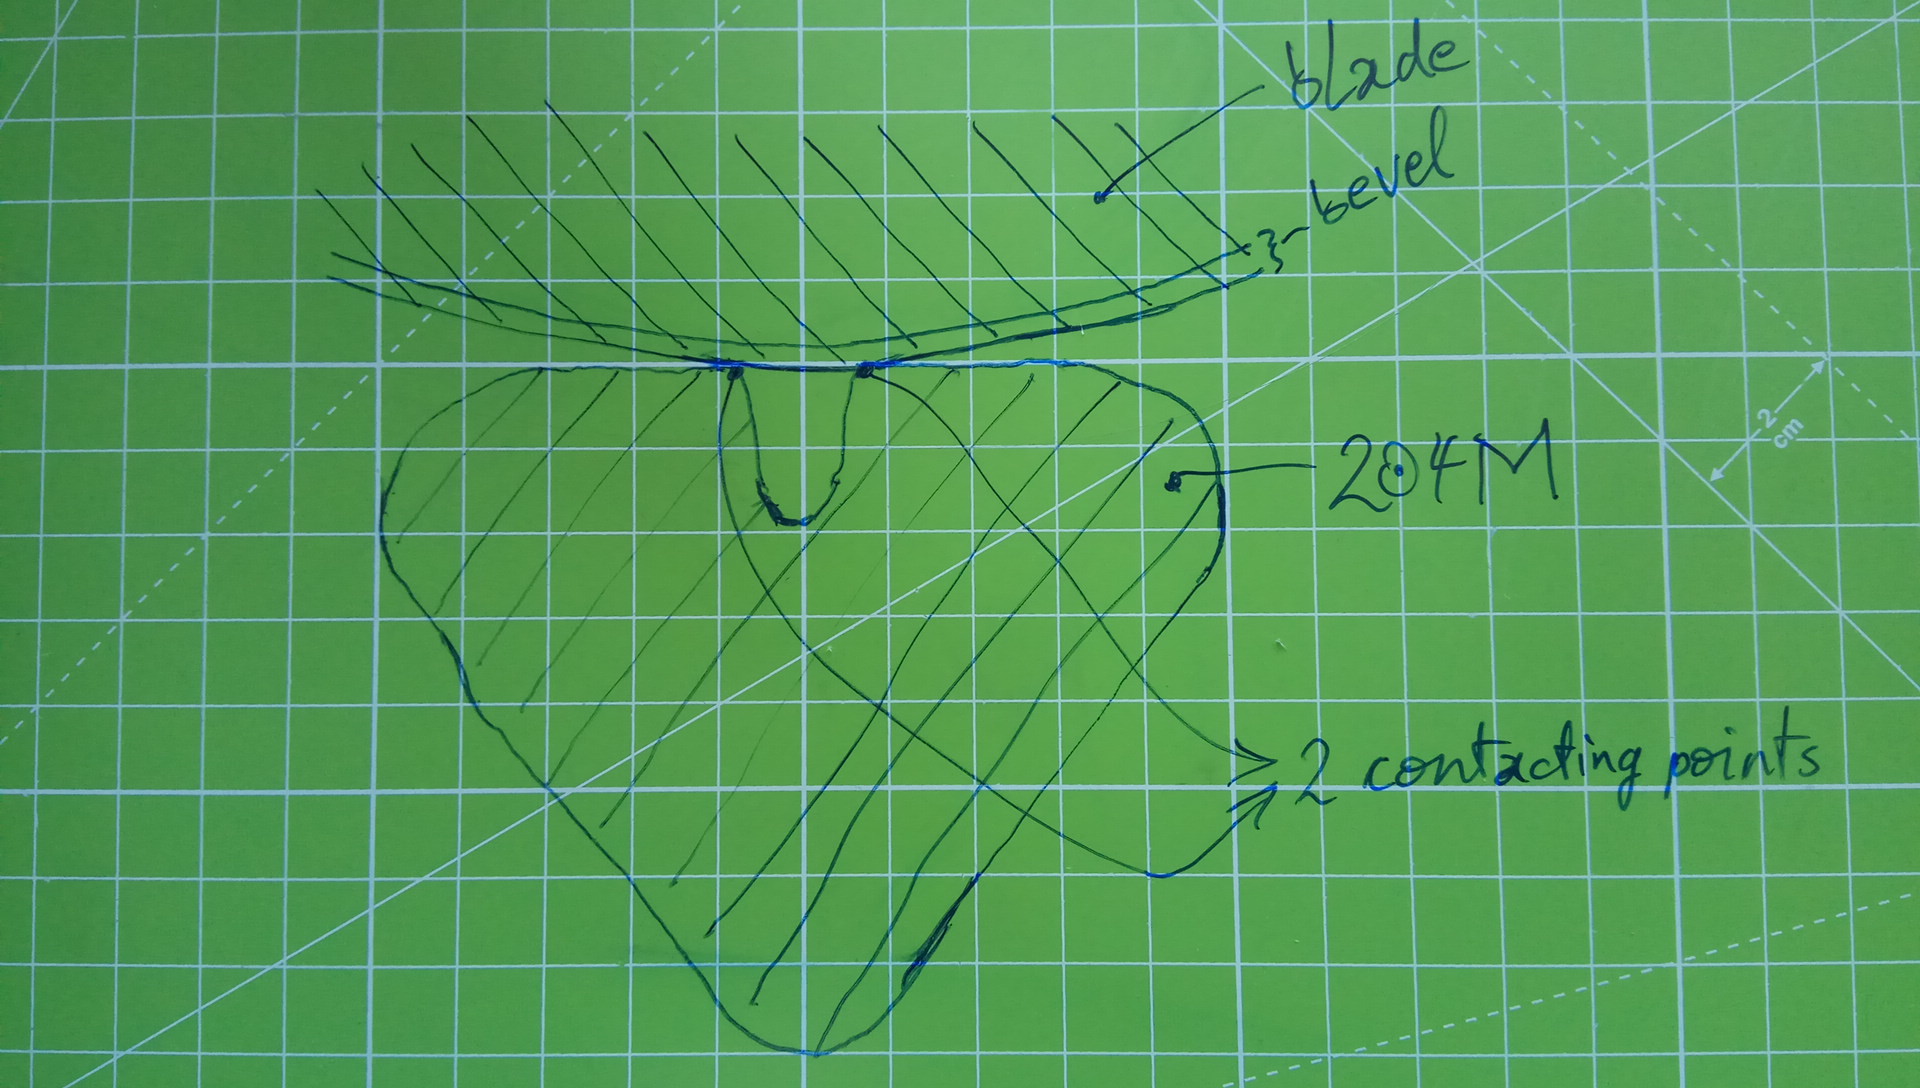
One general (major/minor) disadvantage of the Sharpmaker 204MF system or of using the 204-freehanding method is that it is not suitable for blades with straight edges. Basta. And imho one should never use it on straight edges unless you're fine with developing (and maintaining) a recurve.
That's also true for other popular guided systems (and even the Tormek), i.e. whenever the grinding contact is narrower than the straight edge length. In such instances your typical grinding efforts result in a recurve half way along the edge. Of course, you wouldn't notice the recurve right away, if the blade stock were thick and you ground off very little, e.g. leather stropping the Spyderco Yojimbo2.
The imo only correct way of maintaining/resharpening a straight edge (say razor, utility blade, Yojimbo2, tool blade) is by grinding on a wider mean dead flat whetstone (like a mean flattened 302M) because only that will produce a 100% straight edge in return.
random find 4458, Michael Christy used the 204-freehanding technique AND the RUBY3000 (Ruixin-format stone) a while back too. good to see. can't remember, maybe this was one of the few videos which had inspired me in the first place to emulate a similar technique presented in the op.
valuable footage to support what i call "204-freehanding" (and likewise "ruixin-freehanding"):
btw i was looking for the MC video where he cuts wood for minutes and then whittles hair with the knife. can't find the video, can't even remember if it was a fixed blade or folder. ne1? EDIT: found it!!
valuable footage to support what i call "204-freehanding" (and likewise "ruixin-freehanding"):
btw i was looking for the MC video where he cuts wood for minutes and then whittles hair with the knife. can't find the video, can't even remember if it was a fixed blade or folder. ne1? EDIT: found it!!
Last edited:
another thought which hasn't been shared yet afaik:
The 4678 fish hook groove on the 204 stones serves imho very nicely as spot for our deburring efforts. I've been using that face of the triangular rod for a long time (unconsciously) for deburring but only by now am i getting more conscious about it. You might have been doing it the same way, so let's note it down, document it in writing.
Advantages:
- major: With one full stroke (balancing stroke, edge-leading), every millimeter of the apex gets two sequential deburring contacts. Doubles your efficiency!
- major: Since the edge is supported by two contacting points, only half of the weight (pressure) is exerted on the apex. The less pressure, the better for deburring.
- minor: the groove helps to guide the bevel to stay in the groove. you can look "from behind" to visually check if the bevel is indeed touching the two contacting points.
- Joined
- Oct 2, 1998
- Messages
- 39,622
Btw in some instances one needs the 204 edges for deburring (e.g. scythes, or concave blade sections).
I've never considered using a 204 to remove any burr on my scythe. I just use a scythe stone on one side, then the other, feel the edge with my thumb and fingernail and call it good. It would just be a bit too much bother for me though I guess if one is actually trying to manicure their yard...maybe it's worth it.
How To Clean The Ceramic Stones?
Many ways/methods/products have been suggested to get the Spyderco ceramic stones back (really) clean again, i've tested them all and am surprised to report that BKF Bar Keepers Friend does make a difference and has to be THE best detergent for our purpose. People who couldn't really believe it (because they doht have access to BKF in Europe or outside of the US or only at forbidding shipping costs) can take it out of my mouth then: yes, BKF works in a different chemical way than any other detergent you can find in a EU supermarket, hardware store, drugstore, or else. A unique product. I got my 2 cans from a US seller on ebay, 12$ plus 25.98$ overseas shipping, for a 38$ total, can you believe it?? (…)
Summary:
I am pleased to have BKF, it does a much better cleaning job than any other product or method, and in some harder cases it's the only product which gets you anywhere. My ceramic stones are back all shiny now (just unbelievable), so i doht dare to complain about the product's limitations.
Product positives:
Product limitations:
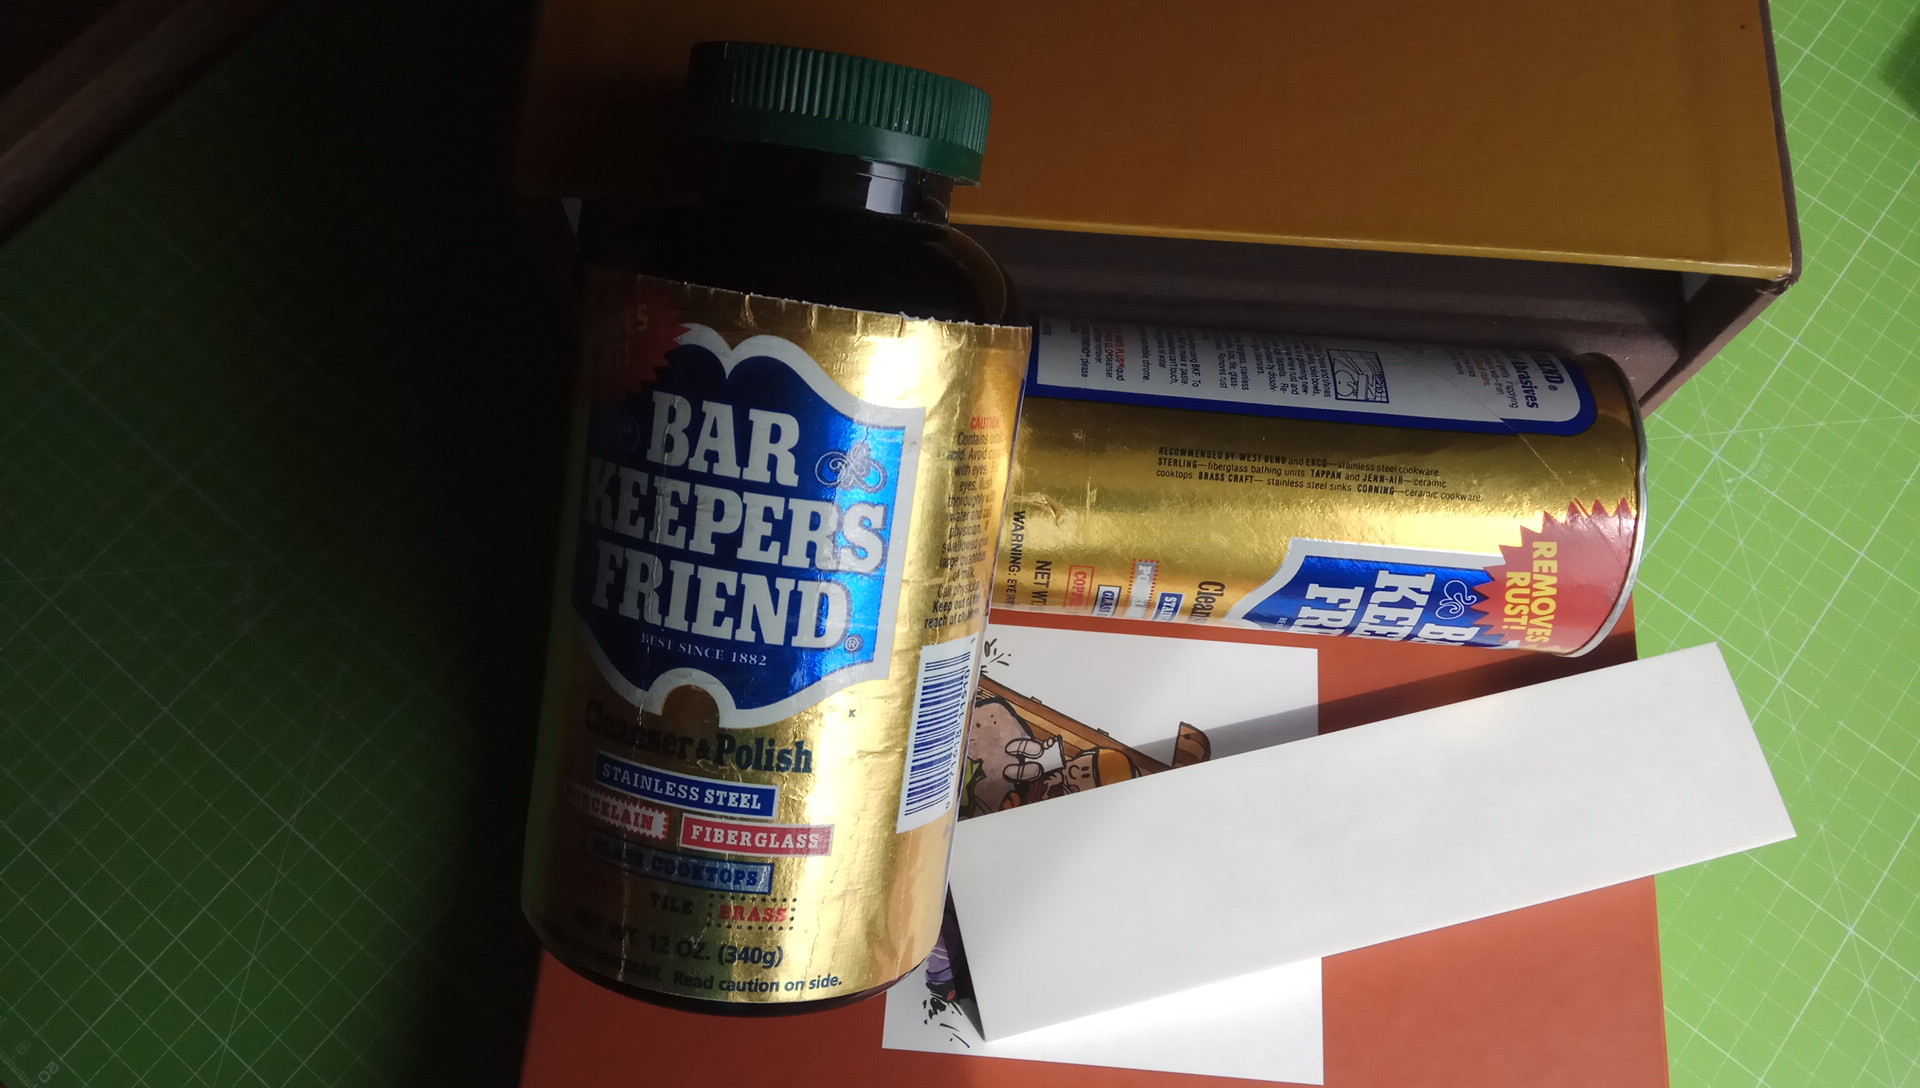
I am glad to have BKF, it plays an essential role in my setup, and am thankful that it got those screech lines out, where i had already given up because the other methods/products had failed. In an amazon customer review i'd give it a singular 5 stars rating, since it really stands out in its cleaning power; and an all other detergents would get a 3 or 4 stars rating only, from me.
Many ways/methods/products have been suggested to get the Spyderco ceramic stones back (really) clean again, i've tested them all and am surprised to report that BKF Bar Keepers Friend does make a difference and has to be THE best detergent for our purpose. People who couldn't really believe it (because they doht have access to BKF in Europe or outside of the US or only at forbidding shipping costs) can take it out of my mouth then: yes, BKF works in a different chemical way than any other detergent you can find in a EU supermarket, hardware store, drugstore, or else. A unique product. I got my 2 cans from a US seller on ebay, 12$ plus 25.98$ overseas shipping, for a 38$ total, can you believe it?? (…)
Summary:
I am pleased to have BKF, it does a much better cleaning job than any other product or method, and in some harder cases it's the only product which gets you anywhere. My ceramic stones are back all shiny now (just unbelievable), so i doht dare to complain about the product's limitations.
Product positives:
- turns a greyish hue Spyderco white ceramic back into a shiny white stone! when all other detergents failed to get the white hue back, BKF does the job, miraculously.
- can even tackle screech lines which a too steeply angled blade bevel embedded in the ceramic surface by accident. if you try to "scratch" the stone with the tip of your knife blade, this might leave a black screech line on the stone surface which is hard to scrub out. with long time scrubbing with BKF it is possible to erase the screech line gradually.
- cleans pans, rust, metals, etc etc really better than other detergents (but that's offtopic re ceramic stones)
Product limitations:
- while the overall greyish hue is gone and much/most of the identifiable black metal (burr) spots are gone or brightened up like "bleached", there are still so many (now bleached-looking) spots, or better said, points, which did not clear up to white. these must be burr residues which got immersed too deeply into the porous ceramic structure that they can't be reached by the detergent. To be clear, if you have a seriously used white ceramic stone which —after all your ordinary cleaning efforts— still looks greyish and also has areas with identifiable black metal spots, then a session with BKF will totally get rid of the greyish hue and also "bleach" those identifiable spots, but in general the spots will still be there, visible, identifiable, just less pronounced (greyish instead of blackish). This observation may vary depending on how you had resurfaced the 302UF stone, and holds especially true for a 302UF resurfaced with DMT plates. My 204F/UF stones are not resurfaced, and i can't get rid of the indentifiable spots with BKF either. To cut the story short, if a brandnew stone is 100% Like New and all your other methods/products got it from Dirty back up to 75% Like New, then BKF picks it up from there and takes it up a full notch to 95% Like New. And there seems to exist no way of eliminating the missing 5%, other than by resurfacing with a DMT plate, SiC powder, SiC wetordry sandpaper, or alike. The difference between 75 and 95 is substantial, and i am very happy about it, which makes it easy to accept the missing 5. In any case, BKF will NOT reset the stone back to 100% or 99.3% Like New, if that's what you're after. If you spend 38$ on BKF, you should be fully aware of this marginal limitation, or you could be disappointed in the BKF cleaning results.
- the powder doesn't seem very yielding. you pour a droplet of water on a small pile of powder, and woosh! the pile is gone. like magic. so you tend to pour out more powder, followed by more water, and so on. and then the can is empty, haha
- acidic stuff. should not get in contact with skin, hands, face, or eyes. or lungs. professionals wear gloves, eye-protection, and masks. i don't dispose of the substance in the sink but in the trash can, with soaked paper towels. respect your eco environment. cleaning/scrubbing with cautionary measures makes BKF less convenient than cleaning with water/soap/oil. so i use it only sparingly and when all other methods fail.
I am glad to have BKF, it plays an essential role in my setup, and am thankful that it got those screech lines out, where i had already given up because the other methods/products had failed. In an amazon customer review i'd give it a singular 5 stars rating, since it really stands out in its cleaning power; and an all other detergents would get a 3 or 4 stars rating only, from me.
Last edited:
That's a shocking price but I'm glad it's working for you. I don't think you need to worry about diluting it well and rinsing it down the drain as oxalic acid occurs in nature in significant quantity; you just don't want to ingest it!