3rd folder WIP hopefully improving

Joined
Oct 3, 2016
Messages
113
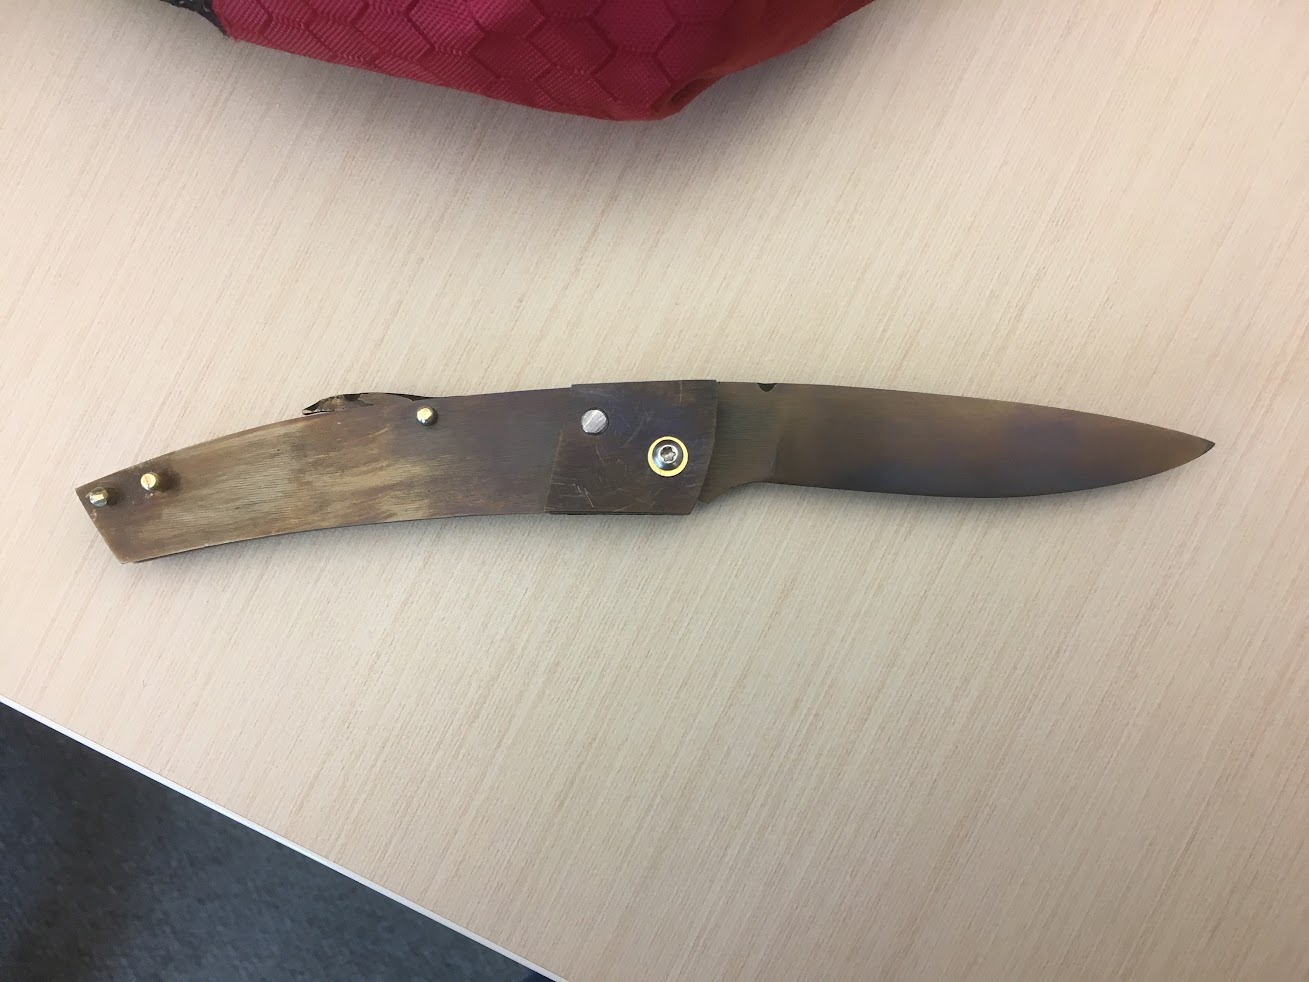
OK so I am well on my way for my third folder, like my first 2 this is a lockback folder. At this point I made all the metal parts and the heat treatment. I still need to do:
1) the wooden handle
2) the finish on all metal parts

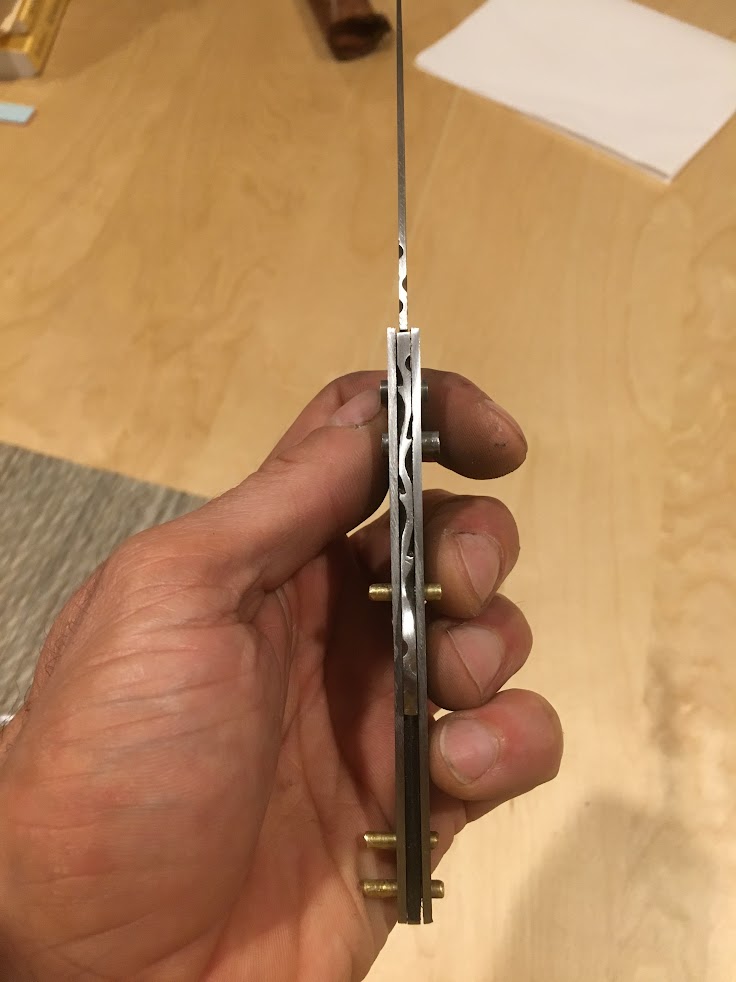
Done with tempering (colors are still there), I reassembled the knife. Third picture is before heat treat but shows the filework

What I like so far:
The general shape is more pleasant than on the first one, different than on the second but I liked the second knife's shape.
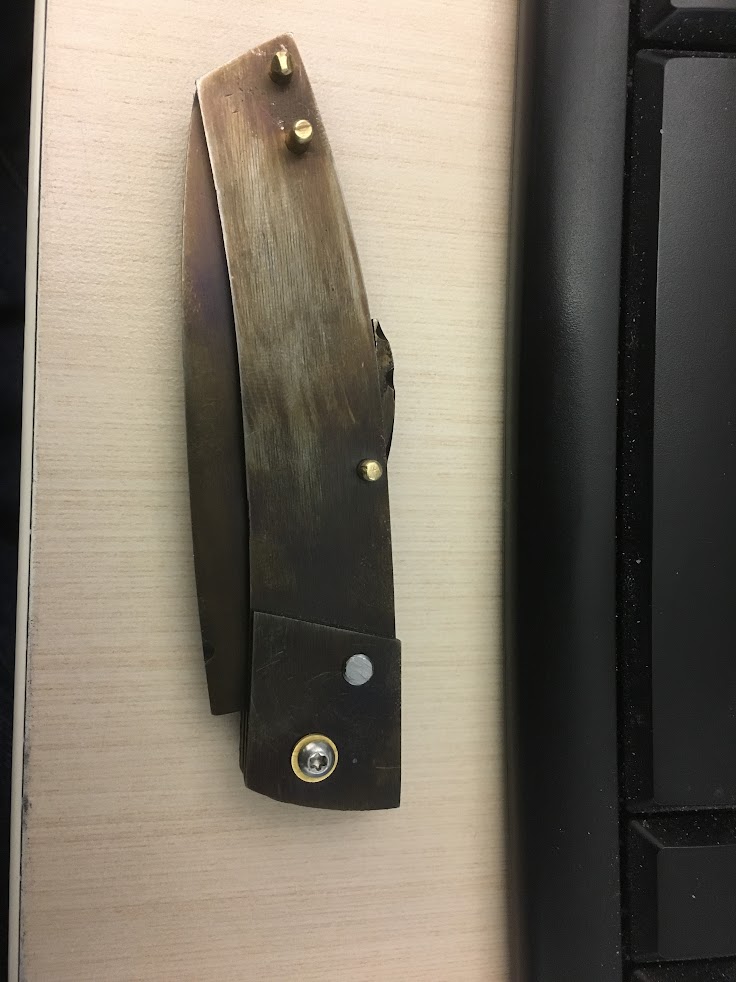
The lockbar is flush with the liners in both open and close position. The mechanism works well (locks solidly and the knife snaps closes)

What I don't like:
the protruding part of the lockbar (the place you push to unlock)should be just a bit longer so that the bottom of it is hidden by the liners.
the spring is not flush with the liners

I welcome any criticism (hopefully constructive though) and will keep you updated with progress.

PS: as my previous knife this is made only with hand tools except for a drill press, no sander, grinder and so on, files, hacksaw and sand paper so be indulgent if updates are far between every thing is time consuming.

PPS: I'll post pictures of the insides in the coming days I forgot to take any and am not at home.
1qvLdP

njZcu6

h5hfeX
 
more pictures
but before you look at them I have a question.
The initial plan was a folder with bolsters. Now that I have started to make the handle I am starting to think that the two part handle (bolster + wood) makes the knife looks unbalanced and gives the impression that the handle is too short. In addition the bolsters which are made from the same steel as the liner seem to thin.
At this point I am weighting three options:
1) continue as planned and shape the handle scales to fit the bolsters, they will be very thin in front thicker in the middle and intermediate toward the but
2) remake the bolster from thicker steel. If I do that I will probably make them sorter too. Then remake the handle
3) remake the handle without bolsters

Can you tell me what you think will be the best final look? The way I am going I will probably go forward with 1) to a certain point then start 3) and compare the two before really fixing the handle. 2) requires more metal work and I was hoping to be dine with that part of the project and it will be attempted only if I am not happy with either 1) or 3)


Internals (after heat treat before finishing):
iXpwTR

4Qoup2

Handle being fitted to the liner (still needs to be fitted to the bolster)
dMe6mq

4qDN4e

Handle cut to fit the bolster (still needs to be shaped)
4KUShS
 
Knife looks great for doing all of that hand work. The only thing I would worry about is possible lock depression and blade release with the lock being above the scales.
 
thanks for the comment. I have one french knife with a similar design (meaning the lockbar is above the scale), the "le camarguais" (google search attached). It never was a problem in the end for me so I expect this will be ok.
https://www.google.com/search?q=le+...uQ0IfXAhUb3YMKHZt0ATUQsAQISg&biw=1680&bih=982
I do agree with you that it would have been better had the lock been in line with the scale. I'll try to make it work next time.

PS: I made more progress and there should be more photos soon. I have finished shaping the scales and am currently doing the hand sanding on the metal parts, then it will be pinning and gluing the scales and I'll be done
 
The only input i have is it is usually hard to get the edge length of the blade above 70% of the total handle length, and if it's any less than 60% it looks dumb. The use of bolsters helps balance the appearance and also provides a more secure pivot. I really don't care for folders without bolsters. I also know that pictures sometimes don't look like what it does when the knife is in your hand. If the handle appears short to you, but it actually isn't, making the handle just a tad narrower may give better proportions. Once you clean up the handle and contour it, it just may look right to you. 1/32" is huge on a folder.
 
Randy, thanks for the comment.
I am actually pleased with the handle size
as promised, some updates:
Metal parts have been sanded. I will do a little bit more hand sanding on the blade but not much I'll keep it at the current grit (400). Scales are shaped they still need to be glued, riveted and finished (I'll use teak oil).

This is the first time I am making a folder which will be permanently pinned and I am a bit afraid of gluing the scales and to have epoxy go into the mechanism. My experience is with either fix blades (mechanism is much less sensitive to glue ;-) ) or folders where the scales where pinned and glued to the liners but none of the pins would go through the whole knife so I could do the glue with the knife disassembled and I could make sure that none of the glue overrun would go in the mechanism.

Any of you have a nice trick for that? I have thought about just pinning the handles with no glue but I want to avoid water getting stuck in between the liners and the handle scales.

F4JBJk

mbZxVE
 
I've ruined a couple knives trying to glue it all at once. What i do is glue the scales on and peen it before it dries. Then i clean off the glue. I usually don't glue the pins that hold the scales and spring all together, but i have and still do sometimes. What i do is get it all together with no glue, then i work one of pins out as far as i can and dab the exposed end in glue, then push it back out a bit, with less exposed than before so the end i glued doesn't reach the mechanism, and dab the end in glue and push back in almost flush.

It looks good btw!

I want to hear more about your file work, how the heck did you do that!

Edit
After looking at your design again, i see all pins go through both scales and the spring mechanism. So i would glue the scales on with pins in them, but pull the pins out once the glue just begins to dry and let it dry without the pins, then do the trick where you glue just the ends of the pins like i said before. Honestly unless the wood is brittle just peening them to where they sink into the wood should do fine. What kind of wood is that?
 
Last edited:
Nice job.

Just some suggestions for the next:
The top view shape shows the problem of flat bolsters meeting tapered scales. Make the bolsters thicker so you can taper them along with the scales for an even taper to the whole knife.

You already know about the release on the lock bar being too far out. There isn't anything wrong with a raised release tab, but it shouldn't look like a hook.The underside of it should be fully below the spine line so there is no visible gap. Yours will catch on pockets and stuff. You could have brought it down almost to the spring.
On the next one, try making a 1/2" long by 1/8" deep curved recess about 1/2" in front of the rear pins, and making the release bar flush with the spine line. This will make a sleeker knife.

On the next knife, think about using screws to mount the scales to the liners. It isn't hard to do, and 2-56 screws are available with many head types and metal choices ( I like the gold plated ones). Using screws allows the scales to be removed to install and peen the pins and then cover them. This makes a cleaner look to the knife, and reduces drilling and peening errors. Bolsters can be screwed on, too. Drill counterbored holes for screws so they are just below flush.

The pivot hardware sticking out over the bolsters look awkward. Either drill a counterbore hole to set the heads down in the bolster, or place them under the bolsters, and screw the bolsters over them. You need to drill a recess in the underside of the bolsters to match the heads. This is the most smooth and professional look. Remember, the pivot only needs to go through the blade and the liners.

The stop pin has the same issue. It only needs to go through the liners to work. Placing it under the bolsters will make for a smoother bolster. Again, this is simple when the bolsters are screwed on.
 
Last edited:
The wood is birds eye maple.
Your method sounds good so here is what I'll do (should be what you described but with slightly more details):
1) take appart the knife
2) glue the handles to the liners with pins going through them to make sure they are in the right place. While the glue dries and the handle and liners are clamped, I will remove the pins (probably pushing them through rather than pulling, I find it easier, I use a nail that is slightly thinner than the pin and which had the point filed off.
3) reassemble the knife with the final pins in it making sure I put a little bit of glue on the part of the pin that goes in the handle.
4) cut the excess pin about 1mm away from the scale and peen them in place (that may actually make step 3 unnecessary).

This way no glue will get in the mechanism

I am happy you like my filework, it is fairly basic vines and thorns the kind you find tutorial for easily on the net.
Here is the first "knife" I made about a year ago and I did it on that one too (the quotes are there as I practiced on mild steel to make this one)
VQdBf7
 
I've been cranking out a slip joint a day here lately now that i have my new shop and expanded tools. I found a craftsman guild of sorts (furniture, whittlers, yard art, etc) with a bunch of rich retirees and they've been buying them as quick as i can make them at around $150. Several guys give me all the exotic wood drop off pieces i could ever ask for for free. I've been doing textured wood handles using various stamps i filed out of scrap and do a little filework on the wood. I have seen filework like that before on the springs but never tried it on a slip joint. A bit of a dust collector and I'm not sure how it would affect the spring in a slip joint, but I'm sure those guys would eat it up. I'll dug up some utube vids, thanks.
 
Thank you for all the advice, all great ones.
Nice job.

Just some suggestions for the next:
The top view shape shows the problem of flat bolsters meeting tapered scales. Make the bolsters thicker so you can taper them along with the scales for an even taper to the whole knife.
Good idea, I new they were too thin but I didn't think about tapering them, I thought I could get a nice curve in the handle scales to make the place they join nice and tangent. You are correct that it is not quite the case and tapering both the bolster and the scales would be a nice solution. Maybe a bit hard just with files and sand paper but I am buying a 1x30 sander and it should help.
You already know about the release on the lock bar being too far out. There isn't anything wrong with a raised release tab, but it shouldn't look like a hook.The underside of it should be fully below the spine line so there is no visible gap. Yours will catch on pockets and stuff. You could have brought it down almost to the spring.
Yep I recognize that. That was a design flow in the bar and I seriously thought about redoing it but making the lock part work well with the notch in the blade tang is finicky and this was already the second bar I had made, the first one had an issue with the lock (it was fine then one too many file stroke ruined it). I figured next one would be better, one step at a time.
On the next one, try making a 1/2" long by 1/8" deep curved recess about 1/2" in front of the rear pins, and making the release bar flush with the spine line. This will make a sleeker knife.

On the next knife, think about using screws to mount the scales to the liners. It isn't hard to do, and 2-56 screws are available with many head types and metal choices ( I like the gold plated ones). Using screws allows the scales to be removed to install and peen the pins and then cove them. This makes a cleaner look to the knife, and reduces drilling and peening errors. Bolsters can be screwed on, too. Drill counterbored holes for screws so they are just below flush.
I don't understand what you mean by "cove" them (sorry I am not a native english speaker, I am french and came in the US only 3 years ago). On this one though using pins was a design decision I have used screws to hold the scales on previous knives and I wanted to go away from it on this one for a more traditional look. The pivot screws however make that moot and I agree that the mix of screws and pins look awkward.
One thing I could have done was pin the scales to the liner and have the pin for the pivot and the spring hidden behind the scales (at least some of them).
Here is my second folder, a screwed on construction with no bolsters.
BJLf9J

The pivot hardware sticking out over the bolsters look awkward. Either drill a counterbore hole to set the heads down in the bolster, or place them under the bolsters, and screw the bolsters over them. You need to drill a recess in the underside of the bolsters to match the heads. This is the most smooth and professional look. Remember, the pivot only needs to go through the blade and the liners.

The stop pin has the same issue. It only needs to go through the liners to work. Placing it under the bolsters will make for a smoother bolster. Again, this is simple when the bolsters are screwed on.
The bolster being too thin is definitely an issue and I have in fact discussed with friends here exactly the approach you mentioned for hiding the stop pin.
I think I would only be able to hide either the pivot or the stop pin, the bolster have to be fixed to the liner somehow no? And if I use a mostly screwed construction I do want to make sure the knife can still be taken appart.
I definitely need to invest in the right piloted counter bore for setting the screws correctly both in the bolsters and in the scales. I guess I would need a different style of screws too. The round headed one wouldn't look as good recessed.
A question related to screws: The screws I bought together with the pivot are too long the length of both together are longer than the pivot. Because of that I cut them to size, however that leaves a kind of bur at the end of the screw which makes it hard to start screwing them. Since the srews are so small I am having a hard time filing or sanding away this bur without destroying the thread (in part because they are hard to hold) do you have recommendation for that.

Again thanks for all the advices.
 
I've been cranking out a slip joint a day here lately now that i have my new shop and expanded tools. I found a craftsman guild of sorts (furniture, whittlers, yard art, etc) with a bunch of rich retirees and they've been buying them as quick as i can make them at around $150. Several guys give me all the exotic wood drop off pieces i could ever ask for for free. I've been doing textured wood handles using various stamps i filed out of scrap and do a little filework on the wood. I have seen filework like that before on the springs but never tried it on a slip joint. A bit of a dust collector and I'm not sure how it would affect the spring in a slip joint, but I'm sure those guys would eat it up. I'll dug up some utube vids, thanks.
I am not posting a specific video as I looked at a lot of them before trying.
Regarding file work on the back of slip joint, this is actually very common on french knives. Causes no problem with dust and I don't think it affects the spring.
The Laguiole knives are a good example of pattern which are made with all kind of intricate filework (called guillochage in french so look up "Laguiole guillochage" in google) and they are slip joints.
UDeYUU

Some company will have each individual craftman in their company do a specific type of file work on the blade in addition to that on the spring as a way to sign the knives, here from Laguiole-en-Aubrac
R8zW7N

Another french pattern often sold with file work is the le Thiers
svmqjc


PS:
I checked your other posts and couldn't find pictures of your knives, would you mind sharing?
 
The word "cove" was supposed to be cover. Sorry - typo.

The new knife is better. You might want to make the counter-bore for the screw heads a little closer fit. The rear screw seems to be sticking out on the side, but that may be the camera angle.
Also, try the next size screw smaller on the scales. It looks like you have used 4-40 screws. Again, that may be the effect of the photo closeup.
 
The new knife is better.
Actually it is not a new one it was the previous one (number 2 vs this one which is number 3, so I must be regressing).


OK knife is 3 finished, there are still things which could be better but they'll be for the next one. I took a couple picture next to my first one for comparison.
Since last pictures, the scales where glued and pinned, the pins peened, the scales oiled and buffed, the blade sharpened.
bVcFSY

w46dra
 
PS:
I checked your other posts and couldn't find pictures of your knives, would you mind sharing?

Here's one i did recently with a domed shaped stamp. It has a really good feel to it i think. I don't think I'll ever reach the level of artwork shown in the pics you posted, but it gives me something to shoot for.
eMwZvPO.jpg
 
Last edited:
Nice knife!
Thank you for the compliment the key for me is that it is a hobby and that I don't have much in term of equipment, I do spend a lot of time on making any single knife so I don't make many. I am sure you can make some that have the same level of embellishments as mine (that is actually quite a low bar) but it may not make commercial sense if you want to sell them. The key would be can you get there in a way that is time and cost effective, I certainly can't. I see a lot of people in this forum who obviously can and get amazing results and still have knives that they manage to sell taking into account the labor spent.
If you manage to make your knives and sell them at a price which you think is reasonable (meaning the buyer is not ripped off and you get compensated sufficiently for your time and materials) you are doing much better than me!

Consider this, I have started making knives about a year and a half ago, in total I have made 3 fixed blade knives (size of a steak knife) and 3 lockbacks as well as 2 practice knives made of mild steel. I am happy with my progress and the results but that is definitely not the way to go if you plan to sell anything.
 
I spent 20 hours on that one, so $150/20hr = $7.50/hr. After taking material cost in to account, it's more about $7/hr. So it's lower than minimum wage here lol. I have a good job, I don't need the money, i do it so i can buy stuff and the wife can't complain.
 
I can understand that completely. My wife is complaining when I buy stuff for knife making. And the big complains is still to come. I have been taking blacksmithing class at a local forge and I want to buy what I would need to forge at home but that means:
1) a forge
2) an anvil
3) a shed in our backyard (which is small I live near Boston and land is quite dear here), I wouldn't have any place to put the forge and anvil, we have a garage but our cars are in it.

The forge and anvil aren't really cheap but the big ticket is the shed.
 
Back
Top