Leading Edge knife sharpening system - 3D printed

Joined
Sep 16, 2019
Messages
1,033
EDIT - I am pleased to announce that my system (updated) will soon be available from https://www.gritomatic.com/

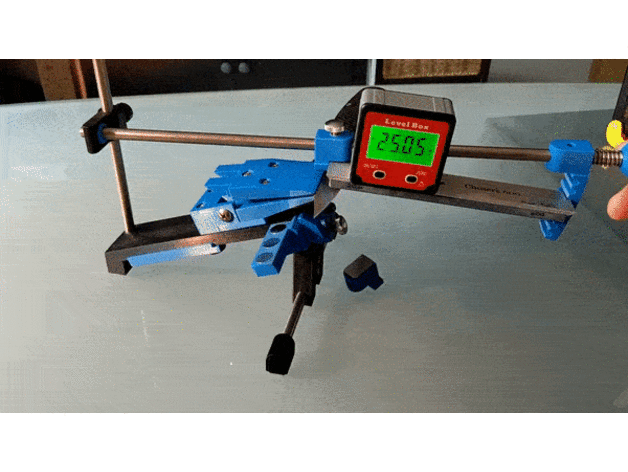
I designed a knife, scissors, Chisel, razor and general tool sharpener and made it available for free to help promote our sharpening and knife hobby.

I call it the "Leading Edge" sharpening system.

It works at least as well or better than most of the expensive sharpening jigs on the market (Trust me, I have just about all of them). It has many more features than even the most expensive systems have. After decades of using just about every system available and being frustrated by the lack of capability and high cost of most systems, I decided to design my own system that can do everything and is very inexpensive to make.

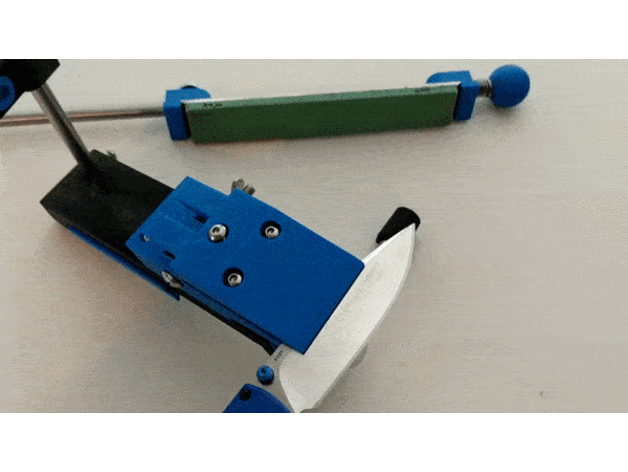
I designed a bunch of accessories to be able to sharpen just about anything. (Knives - big and small; scissors; razors; chisels; convex sharpening, whatever you need.) All modules and accessories screw onto either the top or the front of the main unit to enable any type of sharpening. (Only some basic pics here, I haven't posted pics of all of the features)

Go ahead and print & assemble one for yourselves if you have access to a 3D printer.

Here's the info and files :

https://www.thingiverse.com/thing:4135236

For sharpening stones, it works with everything from KME to Edge Pro to Venev and countless other sharpening stones. Or even just some sandpaper on plastic if you're on a budget.

Enjoy!

IMG_20210326_145447.jpg
 
Last edited:
I like the idea of an opensource guided sharpening system.
The convex adaptor is intriguing.
While I understand the rationale behind having it "zero" to 20 DPS, I don't know if that's necessarily a benefit to most potential users.
 
I like the idea of an opensource guided sharpening system.
The convex adaptor is intriguing.
While I understand the rationale behind having it "zero" to 20 DPS, I don't know if that's necessarily a benefit to most potential users.

The 20DPS you mention, is just an example I used in my description and pics. It's capable of setting any angle you would need.

The way I designed the convex adapter allows you to "zero" it on whatever angle you want, and it allows you to set the amount of convex you want too.
 
Last edited:
I like the idea of an opensource guided sharpening system.
The convex adaptor is intriguing.
While I understand the rationale behind having it "zero" to 20 DPS, I don't know if that's necessarily a benefit to most potential users.
Mine looks an awful lot like it but only goes to 1.3 degrees to the blade table. Not long ago I was using it at 3 and 4.5 degrees so it is useful in the real world, or at least mine.
 
The 20DPS you mention, is just an example I used in my photos. It's capable of setting any angle you would need.

The way I designed the convex adapter allows you to "zero" it on whatever angle you want, and it allows you to set the amount of convex you want too.

The description says you can set the angle parallel to the work surface and get a 20 DPS edge. I'm saying I'm not sure whether that's useful compared to having the knife held parallel to the work surface (like on a KME). I guess it's useful if you don't have an angle cube and aren't using the Sharpie method, but that seems like a very unusual circumstance.
 
Let's keep commerce out of the discussion so that it may remain open. Thank you.
 
The description says you can set the angle parallel to the work surface and get a 20 DPS edge. I'm saying I'm not sure whether that's useful compared to having the knife held parallel to the work surface (like on a KME). I guess it's useful if you don't have an angle cube and aren't using the Sharpie method, but that seems like a very unusual circumstance.

Yea, all I meant by that in my description was that if someone just very quickly wants to eye-ball a 20 degree angle without measuring or having an angle cube then sharpening level with the table you're using will be 20 degrees.

On open source 3D printing sites like the one where I share my designs there are hundreds of thousands of designs of everything you can think of under the sun - so most people who print and use my sharpener are not experts by any means, nor would they have OCD about sharpening like some of us on knife forums have :). That 20 degree reference is just meant as an "idiot proof" quick and easy way of sharpening at about 20 degrees and its meant to get people thinking about sharpening angles.

My sharpener is capable of incredibly precise angles with my fine tuning adapter but I also realise that for most people who use it at home, that level of accuracy would never be used. For those who want perfect accuracy, the sharpener will definitely deliver.
 
Last edited:
This looks fantastic. I wish you were selling them.

Nope, I very specifically design and share my designs for free and it is meant to promote knives and sharpening to a greater audience. Most people would never spend $500 on a sharpener (like many of us here would...:) )so they would never get into the enjoyment of properly sharpening their own knives, scissors and tools. My designs hopefully open up our knife and tool obsession to a greater audience.
 
BTW, I also have MANY 3D printable Upgrades and add-ons for commonly used sharpening systems like the Edge Pro Apex, Hapstone models, Lansky, Ruixin (various models) etc.

Everything from scissors modules, chisel modules, large blade adapters, fine tuning adapters etc. etc.

Here is a link to my other designs that you guys might find useful:

https://www.thingiverse.com/leadingedge/designs
 
Wow great design.
Do your jaws lock into place due to compression of the plastic fitting, the gif is hard to work out what locks it in other than the weight of the knife and what might be the jaws sitting not the metal pin. A cam shaped pin would would to pull it tight too

Convex sharpening accessory I am surprised every gig out there does not have one (obviously not wicked edge as it would not work without a custom paddle). Maybe one with micro adjustments so you can fine tune the degree of convex edge.

My jaws lock into place in a "cantilever" action with 3 screws onto the knife blade. You open up the screws, then pinch the clamp onto the blade with your fingers and then lightly fasten the front 2 screws. This follows distal taper & grind profile and holds the blade in place. The rear screw is then tightened and it forces the back of the clamp open, securing and firmly clamping the knife into the clamp. I have a rubberised sticker on the inside of the clamps to stop slipping (It is a plastic 3D printed clamp that it can't be tightened as much as metal, so you need the grippy surface of a rubber pad.)

The whole clamp (with knife in place) is then secured into its holder with a screw and wing nut. The holder then pinches the clamp in place securely as the plastic flexes a tiny bit.

Each side of the clamp is a mirror of the other side, so the bottom 2 sharp points slide into a recess inside the clamp holder, while the 2 top points are above the holder and not doing anything until you loosen and rotate the clamp 180 degrees. The previous top 2 points (now the bottom) then slot into the recess of the clamp holder and are then secured again with the holder pinching them as you tighten the wing nut again.

If you download my files, you should be able to view them on your computer as a 3D image that you can rotate around and look at it.

Let me know if it all makes sense! :)

PS - The clamp is an optional extra that can be 3D-printed, but definitely not needed for excellent sharpening results. Using the system without a clamp works perfectly well for any sharpening.
 
Hi
nice job:thumbsup:

So you've printed 17 of these , wow

How many grams of plastic is in 1 of 17?
How many hours to print 1 of 17?
Whats the lowest angle of the clamp without a knife? With a swiss army knife?
Any needed repairs?

featured_preview_ezgif.com-optimize_1.gif

featured_preview_ezgif.com-gif-maker.gif
 
Hi
nice job:thumbsup:

So you've printed 17 of these , wow

How many grams of plastic is in 1 of 17?
How many hours to print 1 of 17?
Whats the lowest angle of the clamp without a knife? With a swiss army knife?
Any needed repairs?

17 printed was last year, the more friends who see it, the more I have to print as gifts. :)

As far as the rotating clamp module accessory of my system is concerned, it is a good "proof-of-concept" for possible 3D printable objects and it does work very well, but if you were to have it CNC milled in aluminium, it would be even better. More details below on how I recommend using it. (FYI - My 3D files are compatible with CNC milling machines)

With the print time and weight of 3D printing, I won't bore you with too much details but it depends on many factors such as printer nozzle size, print layer height, infill, printer type etc.

In my case as an example, with my little Cetus MK3 printer when I print with a 0.4mm nozzle and a layer height of 0.2mm and 100% infill, the largest part (the main base) takes about 9 hours and uses about 170g of plastic. Smaller parts (like the vertical knife support) would typically print in about 15 minutes or so with the same print settings, and that would be about 5g of plastic.

***Edit for extra info* : 30-40% Infill with thicker sides(shells) work very well for most parts**

To print all parts and all the accessories with my cheap little Cetus MK3, printed with the above settings at high accuracy and 100% infill (for strength), it takes about 35 hours and use about 620g of PLA plastic. My other 3D printer is faster and could do the same job in about 7 hours, but it is not as accurate. With this sharpener, accuracy is important so its worth the extra print time.

Regarding my rotating clamp accessory, below I will add some pics for your reference. Each one of the jaws of the clamp is designed at about 11 degrees.

Because the rotating knife clamp accessory is printed in PLA plastic, it has its limits with grip so it needs some rubber non-slip grip on the inside. I use "ISC Racers Tape surface protection / Helicopter tape for this. The plastic clamp needs to grip about 1/8 inch of a blade and align with the grind in order to clamp properly, which then gives you a minimum sharpening angle of about 18 degrees on something narrow like a swiss army blade. (Of course wider blades will give you an even lower angle in the clamp) You can sharpen small & narrow blades at a much lower angles if you need to with my system, just use the magnetic support and my straight razor guide. This will allow sharpening angles as low as you would want to go.

The sharpener and accessories has no issues at all with being plastic, and I have not had any parts break or need repairs at all.

PICS:

Victorinox clamped into the rotating clamp. This is how you work out the sharpening angle - Zero the cube on the platform, then measure the top, rear part of the clamp. Half the angle you measured on the top of the clamp, and subtract it from the angle you measure when the stone is placed on the blade. Remember, if you use the clamp properly, it opens up a lot to align with the grind of the knife so you need to compensate for this. In this example (photos in the link below) after zeroing your cube and measuring the top of the clamp, use half of 15.1 (7.55) and subtract that from 26.1, so the actual sharpening angle would be 18.55 degrees on this victorinox blade.
https://photos.app.goo.gl/Nym2rGYeGWJ9UTjb6

Lower than 15 degrees is easily possible on a Victorinox blade (using the magnetic holder and my straight razor guide) with lots of room to spare to go down as low as you need. Have a look at how much space there is with a 15 dps angle on this small blade:
https://photos.app.goo.gl/DXHyUJja1xyW8xPL7

Some additional pics of the clamp and its holder, just for reference:
https://photos.app.goo.gl/wDcd9LDYA2HqX5d56
 
Last edited:
That is amazing work and a very big compliment for you and sharing this with us.
I don't have any experience with 3d printing but I guess you can source this to a commercial 3d printing company.
Bookmarked for future reference. I don't have any of the stones, can this rig can be made to work with spyderco sharpmaker rods?

My pleasure, glad to share my design.

You could easily send the files to a printing company, they just need to print it with a 0.4 nozzle and, around 30-40% infill, with thick walls. A good quality 3D printer is about $200-300 these days and once you have one, you'll wonder why you never had one before. Kind of like a mobile phone.

As for the sharp maker rods, I don't personally have any but they are 7"x0.5" as far as I can tell. That should be no problem and my stone clamps will hold them in place just fine but the flat side will have to be away from the knife (triangle side towards the knife) with the clamps as they currently are designed. I could very easily custom design a stone clamp for the sharpmaker rods so they could be used with the flat side facing the knife too, let me know if you ever need them and I'll design some stone clamps specifically for the sharpmaker rods.

If you do make one of my sharpening systems for yourself and you don't want to spend much on stones, I would highly recommend getting a cheap set of chinese diamond plated "edge pro-type" stones. They are only $20 or so for a set and they work very well.

Alternatively, you can buy a set of Venev "dog" or Venev "centaur" stones from Gritomatic. They are diamond bonded and absolutely fantastic stones. They are double sided, with a different grit on each side btw. I use them regularly with this sharpener.

Some stone links for your reference:

https://www.amazon.com/dp/B082VYLGS...abc_Y5KDA9YQ678MBG0FE5QG?_encoding=UTF8&psc=1

https://www.gritomatic.com/products/venev-4-dog-series-dual-side-diamond-set

https://www.gritomatic.com/products/6-x-1-dual-side-bonded-diamond-full-set
 
Last edited:
My pleasure, glad to share my design.
You could easily send the files to a printing company, they just need to print it in high detail and, 100% infill. A good quality 3D printer is about $200-300 these days and once you have one, you'll wonder why you never had one before. Kind of like a mobile phone.
Hi,
Looks like if you want one of these,
it only makes sense to buy your own printer

Seems lots of libraries (closed for covid)
have a mini printer
and will print small parts for free (short time),
or only charge for fillament ,
or allow you 1-2 hour appointments after 1-2 hour taining seminar
or even a rental ...
but its the show up at the library to find out whats possible kind of quest

supposedly UPS also offers 3d printing at some stores, but no info online about print size or rates


I looked at a bunch of hackerspaces/makerspaces,
some open with covid rules,
but 1 month membership is $100-$150
usually multiple mini 3d printer available
usually a 1 or 2 hour limit per appointment (and per week)
and training will be required
but they usually have other machines available (cnc wood router, laser...)

one place said you could rent a mini printer for a week for $75

i also checked out a few instant quoters for 3d printing,
very similar quoting software / prices
Code:
    $59.77     A_-_Main_Body.stl                        171.2 × 40.0 × 75.0 mm
    $8.07      B_-_Feet.stl                             15.0 × 41.2 × 20.0 mm
    $9.07      C_-_Pivot_Bearing_Holder.stl             54.0 × 45.0 × 14.0 mm
    $6.66      D_-_Pivot_Bearing_Ball.stl               19.9 × 19.9 × 13.9 mm
    $9.88      E_-_Handle.stl                           30.0 × 30.0 × 28.0 mm
    $10.44     F_-_Stone_Holders.stl                    46.0 × 25.0 × 25.0 mm
    $14.22     F_v2_-_Stone_Holders_Platform.stl        47.0 × 25.0 × 55.0 mm
    $13.85     G_-_Knife_Guide_Parts.stl                80.0 × 64.0 × 8.0 mm
    $8.47      H_-_Scissors_Clamp.stl                   40.0 × 30.0 × 10.0 mm
    $22.87     I_-_Knife_Clamp.stl                      80.0 × 83.0 × 10.0 mm
    $15.46     J_-_Knife_Clamp_Holder.stl               54.0 × 40.0 × 20.0 mm
    $20.53     K_-_Large_Blade_Attachment.stl           140.0 × 30.3 × 29.5 mm
    $12.57     L_-_Convex_Edge_Attachment.stl           71.9 × 20.0 × 25.0 mm
    $6.66      M_-_Vertical_knife_support.stl           40.0 × 30.0 × 3.0 mm
    $8.59      N_-_Fine_Tuning_Adapter.stl              49.0 × 22.0 × 19.5 mm
    $9.61      O_-_Straight_Razor_Guide.stl             80.0 × 44.2 × 5.0 mm
    $6.66      P_-_Stopper_Ring.stl                     18.0 × 18.0 × 10.0 mm
    $21.97     Q_-_Chisel_Attachment.stl                70.0 × 76.0 × 15.0 mm
    Total: US$174.87
    Minimum order $100
        3D printing
        HP PA 12 (MJF)
        Color: Gray (default)
        80μm
        Nylon
        20% infill
        Tolerances   Standard (±0.3% with a lower limit of ±0.3 mm (±0.012″))
Code:
G_-_Knife_Guide_Parts.stl
$16.72  $16.72
Material Volume:   10.27 cm3
Support Material Volume:   0.00 cm3
Box Volume:   40.96 cm3
Surface Area:   114.28 cm2
Model Weight:   12.94 g
Model Dimensions:   6.40 x 8.00 x 0.80 cm
Number of Polygons:   140
PRINTING SERVICES   $16.72
Printer : Creality CR-10S Pro - 200‎μm ######
Infill : 20%
Code:
I_-_Knife_Clamp.stl
$26.79  $26.79
Material Volume:   18.29 cm3
Support Material Volume:   0.00 cm3
Box Volume:   66.40 cm3
Surface Area:   154.41 cm2
Model Weight:   23.05 g
Model Dimensions:   8.30 x 8.00 x 1.00 cm
Number of Polygons:   2220
PRINTING SERVICES   $26.79
Printer : Creality CR-10S Pro - 100‎μm ######

I_-_Knife_Clamp.stl
$23.13  $23.13
Material Volume:   18.29 cm3
Support Material Volume:   0.00 cm3
Box Volume:   66.40 cm3
Surface Area:   154.41 cm2
Model Weight:   23.05 g
Model Dimensions:   8.30 x 8.00 x 1.00 cm
Number of Polygons:   2220
PRINTING SERVICES $23.13
Infill : 20%
Printer : Creality CR-10S Pro - 200‎μm ######
Code:
I_-_Knife_Clamp.stl
Material Volume:    39.48 cm3
Support Material Volume:    0.41 cm3
Model Weight:    49.75 g
Model Dimensions:    8.30 x 8.00 x 1.00 cm

100% infill         $24.25 #######


Then there are one-man printing service like on etsy which quotes price "per gram" and "per hour"
Code:
0.95 * 35  hour = 33.25
620  grams * .15 = 93
93 + 33.25 = 126.25
126.25 cad in usd
$98.61 (US dollars) (February 4, 2021)

I also tried quoting CNC prices,
machining plastic out to be faster than printing plastic,
but it took a while to find a working websites,
but then they want STEP or STP format,
... the overall impression I get is that even cnc machining plastic would be more expensive than 3d printing, and they really dislike doing one-off prototype prints
 
Thank you:thumbsup:

To print all parts and all the accessories with my cheap little Cetus MK3, printed with the above settings at high accuracy and 100% infill (for strength), it takes about 35 hours and use about 620g of PLA plastic. My other 3D printer is faster and could do the same job in about 7 hours, but it is not as accurate. With this sharpener, accuracy is important so its worth the extra print time.
Hi
Where is the accuracy actually needed?
knobs obviously don't need accuracy
lots of holes esp screw holes could be undersized
since magnets are glued, its not the magnet holes
hmm
 
Thank you:thumbsup:


Hi
Where is the accuracy actually needed?
knobs obviously don't need accuracy
lots of holes esp screw holes could be undersized
since magnets are glued, its not the magnet holes
hmm

Wow, that's a lot of great and fast research bucketstove! I didn't even know city libraries and some UPS locations offer 3D printing services.

Most of my parts need high accuracy in printing. As an example, the magnet holes are exact size and they fit in tight, perfect and flush in their recesses without space for crud to collect. The ball and ball bearing holder for the sharpening rod is designed to be a perfect fit too, I don't want any movement when sharpening and the bearing action needs to be exact, with no play. The fine tuning adapter is a 2-part unit with male and female thread inside, so the threads are also important to print accurately. All the accessories fit and slot in perfectly and their holes need to line up exactly too. The 3-point knife guide slides together and fits nice and smooth in its grooves. I normally print every part of this sharpener in high detail, because I am a little obsessive about fit and tolerance when it comes to sharpening systems.

There are some other 3D printable sharpeners on thingiverse, I have tried most of them just to see if they are any good. Most are terrible. I designed mine to be a different beast altogether, so printing in fairly high accuracy (with no more than a 0.4 nozzle) is very important. The end result is a Great sharpening system.

I would highly recommend getting your own 3D printer, a decent quality one like the Ender 3 Pro is only about $200, and a spool of PLA plastic is about $22 per 1kg.

A huge step up would be getting a Prusa Mini or MK3S+. They are awesome. I now use a Prusa MK3S+ and I am very happy with it.

Trust me, having a 3D printer is worth its weight in gold. There is SO much you can do with them, and hundreds of thousands of free models on websites like thingiverse to download and print for free. Just about everything you could think of that can be made from plastic, you can 3D print. The printer pretty much pays for itself after only 1 or 2 prints.
 
Last edited:
I've also checked some printers and came to the same result: you really need a 3d printer yourself.

777edge's post made me check some other things about spyderco sharpmaker addons.
The idea i like most there is the one of small adapters for the sharpmaker, that you actually put in the 30 and 40 degree slots and provide an +-2 and +- 4 offset for the original. So that you can use it to get the angles 44,42,40,38,36,34,32,30 28,26 inclusive, with just a couple of small adapters.

A 'no' is what I have, and a 'yes' is what I can get :) so 777Edge, since you're the only 3d cad person I know that can possibly do spyderco sharpmaker things:
would you be willing to create those? I'd be willing to sponsor/pay a bit.
 
Back
Top