- Joined
- Aug 7, 2009
- Messages
- 251
I've spent quite a while looking at the white box stove (http://www.whiteboxstoves.com/). It's an intriguing design because it is heavier duty than most pop can stoves. For a small jump in weight, you go from readily crushable to bombproof. It's meant for multi-person cooking though. Since I rather like to tinker I decided to make my own instead of forking over $20.
Instructions for riveted beer "cottle" stoves are a dime a dozen online and I don't drink beer, so I thought I'd go a slightly different route. I went to Shoprite, bought a $2 energy drink, chugged it, and broke off the hard plastic threads giving me this:

I broke out the sandpaper and stripped off all the dark paint so I could actually see what I was doing. The paint was surprisingly tough, but elbow grease will get you everywhere.

My ultra high precision tools for marking the bottle were various rolls of tape and a sharpie. I held the sharpie still against the rolls of tape and rotated the bottle to get a clean line. This is convenient since most tape comes in width multiples of 1/2".

And now for some arbitrary numbers. The game plan is to cut off the top, invert it, and fit it down into the base, then fold over the top edge of the base for a good, tight seal. I marked the bottle 3 1/2" from the bottom and 2 1/2" from the top figuring that this would give me a good fit with some extra material once the formed bottom of the bottle is taken into account.

Next, I took the bottle to the hideously messy workbench of doom(tm) and equipped the coping saw with the finest toothed blade I had. While slowly rotating the bottle, I cut partway through the aluminum along my sharpie lines. As long as you go slowly, the cut is rather self-guiding. I started to saw all the way through, but found a better method. I took a small, triangular file and followed the sawed lines around the bottle with one of the "points." After sufficient filing, I could break the aluminum along the score line by hand from a combination of thinned metal and severe work hardening.

Rinse and repeat with the other sharpie line, then smooth the cut edges of both with sandpaper.

Before going any further, I took a round file and made these notches in the top rim of the bottle, then smoothed them with some fine emery cloth. When in place in the stove, these allow alcohol to flow from the central part into the outer reservoir.

Next, I added the burner holes. The domed bottom of the bottle sits 1/2" above the surface it's on and the inverted top of the bottle sits on top of that. I decided to place the burner holes at 2" up the side of the stove. That means they are in line with the 1 1/2" mark here- not too low that alcohol dribbles out easily and not too high that they're blocked off.

By slowly rolling the bottle along a ruler, I found it's circumference to be 8". I made 16 marks (every 1/2") along a line 2" from the bottom of the bottle.

Here, I did some planning. The portion of the bottle top that doesn't fit into the bottom is about 5/8" tall. I want somewhere around a half inch of metal to crimp down, so 3/8" will do. I therefore need to make the metal soft on the top inch of the bottle bottom to minimize risk of splitting and give me any chance of folding the excess over.

I drew a line at 2 1/2" from the bottom for the annealing later. I took a 1/16" drill bit and added my holes, holding the drill perpendicular to the bottle.

I then mixed up some wet sand and filled the bottle bottom and mounded it up so it sat at the line I drew earlier. I am going to anneal the top inch by heating it with a blowtorch and letting it air cool. The wet sand is there to keep everything below the line cool. By heating past a certain temperature, the metal recrystallizes and becomes soft. Things are trickier with steels and fancier aluminum alloys which have a host of other factors involved in determining the final hardness. Since I don't know what alloy the aluminum is, I'm not sure how hot I need to get. 800F seems like more than enough to anneal most basic alloys based on some quick internet research, but I have no way of measuring. In addition, aluminum melts at 1220F, surely within the capacity of my cheapo propane plumbing torch.

In order to avoid melting, I rotated the piece and kept the torch in constant motion. The clear plastic liner on the inside of the bottle charred during the heating, unsurprisingly.

I pulled the can out of the sand and let it cool before sanding off the charred plastic remains.

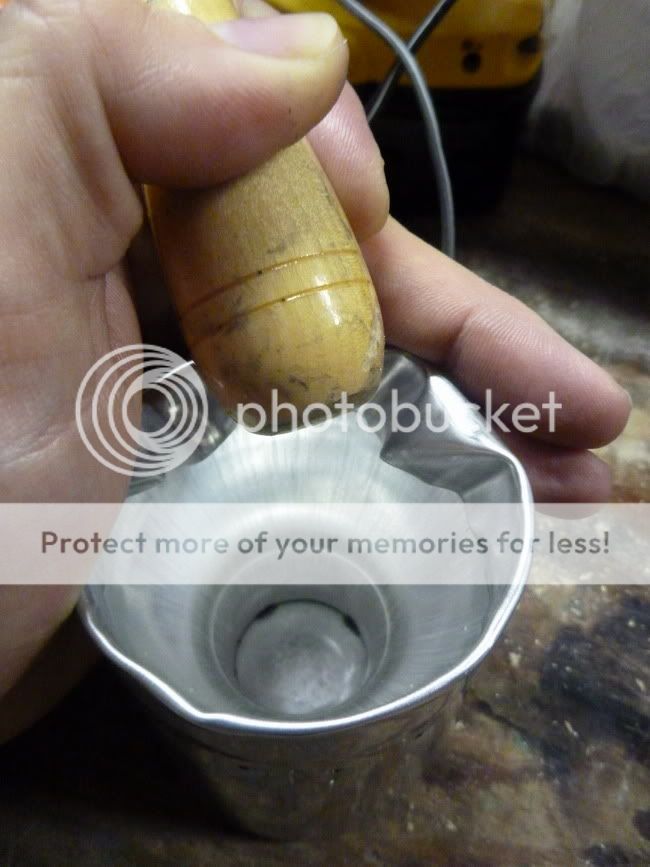
Now that the top inch is softened, it's time to start the final assembly. I used a thick, round-ended tool handle to apply downward pressure to the inverted lid like so:

For the most part, the bottle top slid right into the now softened aluminum. It took a few taps with a hammer to settle it cleanly against the bottom

Since this was my last chance to clean up the top edge before folding it in, I threw some white rouge on a buffing wheel and had at it. Not the best job, but I'm a novice at polishing stuff.

This step could use some refinement. I found out that I probably would have been better with a 1/4" less material to fold over. A die would probably help quite a lot here. But, as a first attempt, I used a rounded wooden handle (to minimize damage to the metal) to fold the top edge over.
Not a great picture, but I then used a piece of aluminum pipe and tapping with a small hammer to roll the edge flat and crimp it shut. It needs to be as level as possible all the way around so a pot will sit flat on it and keep the alcohol vapors in.

I did an inaugural burn with denatured alcohol and it bloomed wonderfully, albeit slowly. I think that I will add some fiberglass priming wick soon.

I then took it outside for some testing. Stove weight is a mere 45.2g. Ambient temperature was 59F and initial water temperature was also 59F. I fueled the stove with 2oz of SLX denatured alcohol. Once bloomed, I put on a 7" MSR blacklite pot with 3 cups of water in it and with the lid on. The water came to a rolling boil at 5:32. Total burn time was 14:29, so I had used quite some excess alcohol.


Here's another shot of a bloom once it got dark out:

And this is the finished product, along with a volcanic rock for artistic effect:

Thanks for looking!
Instructions for riveted beer "cottle" stoves are a dime a dozen online and I don't drink beer, so I thought I'd go a slightly different route. I went to Shoprite, bought a $2 energy drink, chugged it, and broke off the hard plastic threads giving me this:
I broke out the sandpaper and stripped off all the dark paint so I could actually see what I was doing. The paint was surprisingly tough, but elbow grease will get you everywhere.
My ultra high precision tools for marking the bottle were various rolls of tape and a sharpie. I held the sharpie still against the rolls of tape and rotated the bottle to get a clean line. This is convenient since most tape comes in width multiples of 1/2".
And now for some arbitrary numbers. The game plan is to cut off the top, invert it, and fit it down into the base, then fold over the top edge of the base for a good, tight seal. I marked the bottle 3 1/2" from the bottom and 2 1/2" from the top figuring that this would give me a good fit with some extra material once the formed bottom of the bottle is taken into account.
Next, I took the bottle to the hideously messy workbench of doom(tm) and equipped the coping saw with the finest toothed blade I had. While slowly rotating the bottle, I cut partway through the aluminum along my sharpie lines. As long as you go slowly, the cut is rather self-guiding. I started to saw all the way through, but found a better method. I took a small, triangular file and followed the sawed lines around the bottle with one of the "points." After sufficient filing, I could break the aluminum along the score line by hand from a combination of thinned metal and severe work hardening.
Rinse and repeat with the other sharpie line, then smooth the cut edges of both with sandpaper.
Before going any further, I took a round file and made these notches in the top rim of the bottle, then smoothed them with some fine emery cloth. When in place in the stove, these allow alcohol to flow from the central part into the outer reservoir.
Next, I added the burner holes. The domed bottom of the bottle sits 1/2" above the surface it's on and the inverted top of the bottle sits on top of that. I decided to place the burner holes at 2" up the side of the stove. That means they are in line with the 1 1/2" mark here- not too low that alcohol dribbles out easily and not too high that they're blocked off.
By slowly rolling the bottle along a ruler, I found it's circumference to be 8". I made 16 marks (every 1/2") along a line 2" from the bottom of the bottle.
Here, I did some planning. The portion of the bottle top that doesn't fit into the bottom is about 5/8" tall. I want somewhere around a half inch of metal to crimp down, so 3/8" will do. I therefore need to make the metal soft on the top inch of the bottle bottom to minimize risk of splitting and give me any chance of folding the excess over.
I drew a line at 2 1/2" from the bottom for the annealing later. I took a 1/16" drill bit and added my holes, holding the drill perpendicular to the bottle.
I then mixed up some wet sand and filled the bottle bottom and mounded it up so it sat at the line I drew earlier. I am going to anneal the top inch by heating it with a blowtorch and letting it air cool. The wet sand is there to keep everything below the line cool. By heating past a certain temperature, the metal recrystallizes and becomes soft. Things are trickier with steels and fancier aluminum alloys which have a host of other factors involved in determining the final hardness. Since I don't know what alloy the aluminum is, I'm not sure how hot I need to get. 800F seems like more than enough to anneal most basic alloys based on some quick internet research, but I have no way of measuring. In addition, aluminum melts at 1220F, surely within the capacity of my cheapo propane plumbing torch.
In order to avoid melting, I rotated the piece and kept the torch in constant motion. The clear plastic liner on the inside of the bottle charred during the heating, unsurprisingly.
I pulled the can out of the sand and let it cool before sanding off the charred plastic remains.
Now that the top inch is softened, it's time to start the final assembly. I used a thick, round-ended tool handle to apply downward pressure to the inverted lid like so:
For the most part, the bottle top slid right into the now softened aluminum. It took a few taps with a hammer to settle it cleanly against the bottom
Since this was my last chance to clean up the top edge before folding it in, I threw some white rouge on a buffing wheel and had at it. Not the best job, but I'm a novice at polishing stuff.
This step could use some refinement. I found out that I probably would have been better with a 1/4" less material to fold over. A die would probably help quite a lot here. But, as a first attempt, I used a rounded wooden handle (to minimize damage to the metal) to fold the top edge over.
Not a great picture, but I then used a piece of aluminum pipe and tapping with a small hammer to roll the edge flat and crimp it shut. It needs to be as level as possible all the way around so a pot will sit flat on it and keep the alcohol vapors in.
I did an inaugural burn with denatured alcohol and it bloomed wonderfully, albeit slowly. I think that I will add some fiberglass priming wick soon.
I then took it outside for some testing. Stove weight is a mere 45.2g. Ambient temperature was 59F and initial water temperature was also 59F. I fueled the stove with 2oz of SLX denatured alcohol. Once bloomed, I put on a 7" MSR blacklite pot with 3 cups of water in it and with the lid on. The water came to a rolling boil at 5:32. Total burn time was 14:29, so I had used quite some excess alcohol.
Here's another shot of a bloom once it got dark out:
And this is the finished product, along with a volcanic rock for artistic effect:
Thanks for looking!
Last edited:

