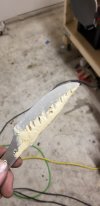
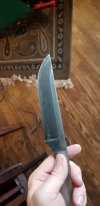
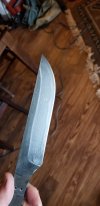
Photos Blisters etching as different colors when trying temper line.

Joined
Aug 3, 2011
Messages
46
20180704_131141.jpg 20180704_143034.jpg 20180704_143225.jpg I have looked over all of the threads that I could find related to this issue, but I couldn't find one that explained my situation. I think the issue that I am having is with blistering but I am using an Evenheat kiln with precise temp control. So I was trying my hand at a temper line/hamon for the first time. I am using 1084 Aldo steel. I know that I am not going to get all that much activity but I wanted to test the process. I used Rutlands furnace mortar on 3/16 1084, no forging, only stock removal. I then heated the knife to 1500 degrees and soaked it for 5 minutes in an evenheat kiln, at which point I quenched it in canola oil and immediately tempered it at 400 degrees for two, two hour cycles. At this point I notices these small circles near where the clay stopped. I sanded the blade down to a 350 grit finish and test etched in ferric chloride, and saw that where those circles once were the etch did not take. So I re-sanded up to 550 to the point where the surface of the steel was 100% uniform and re-etched. While a was able to create a little but at a temper line the circles still etch differently and create and unwanted effect. I have attached photos of this issue. Any information on this would be greatly appreciated, as I am not sure at what step this might have been caused.
20180704_143225.jpg
20180704_143225.jpg
[/URL][/IMG]
 
Last edited:
Pictures aren't working for me but......

Did you make sure to do some significant grinding to remove scale/decarb/clay crud before sanding and etching?
 
Pictures aren't working for me but......

Did you make sure to do some significant grinding to remove scale/decarb/clay crud before sanding and etching?
Yes sir,

I made sure it was 100% down to clean metal. I'm not sure what up with my photos. I will work on getting it fixed.
 
That surface is at 500? It looks like there are a lot of deep scratches. Before etching it was a perfectly even 500 grit finish, hazy but uniform? How long was it in the etch and what etchant did you use (assuming FC based on color).
 
That surface is at 500? It looks like there are a lot of deep scratches. Before etching it was a perfectly even 500 grit finish, hazy but uniform? How long was it in the etch and what etchant did you use (assuming FC based on color).
Sorry I should have specified, I took the bevel to what looked like to me a complete 500, the flat is probably a 220. And yes, it was FC and it was under for maybe 15-20 minutes. and I used 1000 grit with windex running it parallel down the blade to remove the loose oxides.
 
It looks like decarb and scale that wasn't ground off....just grinding to bright steel usually isn't enough. You need to grind the outer layer of steel off completely.

In addition to that, it sounds like you might have WAY over etched that.
 
It looks like decarb and scale that wasn't ground off....just grinding to bright steel usually isn't enough. You need to grind the outer layer of steel off completely.

In addition to that, it sounds like you might have WAY over etched that.
Ahh :thumbsup: understood, thank you for the awesome information. I will adjust my process with this in mind. You guys have been super helpful!!
 
It looks like decarb and scale that wasn't ground off....just grinding to bright steel usually isn't enough. You need to grind the outer layer of steel off completely.

In addition to that, it sounds like you might have WAY over etched that.
It does look like scale.

I would grind the bevel a bit with 120 a few passes either side, then dip in FC for a few seconds. See if you seen any activity. Your line should be visible after a very short dip if not visible after polishing. I generally leave a generous amount of grinding for post HT, will save you from this issue if that is scale/decarb.
 
OK, I see two main things in the photo - deep scratches that have not been sanded away, and decarb spots. It looks like the blade may have ben overheated in the HT a bit.

I bet the blade was not as completely sanded as you thought it was. Shiny metal isn't a determiner of decarb free. You have to take the surfaces down a few thousandths after HT with a grit the same or one lower than you stopped at before HT. Then after getting a perfect finish to at least 400 grit, you can etch. I prefer 800 before etch. Post etch, you need to rub down the surface with a finer grit to remove oxides. I like 0000 steel wool for post etch cleanup.

I use this regimen:
Sand to 400 grit pre-HT and leave the edge around .025-.030".
HT
Sand starting at 220 grit and take to 800.
Clean the blade like it was going to be used to do surgery on your grandmother. It has to be absolutely clean and not touched with bare hands once clean.
Etch in 3:1 to 5:1 FC.
Check the etch progress and wipe off with a clean paper towel every three to five minutes for a deep etch, or every 30 seconds and wipe for a light etch.
Rinse well and wipe off with paper towels.
When etching to get a dark blade surface, boil in water with a tsp of TSP for 30 minutes. I then clean up with 0000 steel wool.
When etching for a quench line or light hamon, I clean well with soap and water, spray heavily with Windex, wipe off, and rub lightly with 0000 steel wool.
 
Thank you everyone for all of this great feedback. As is evident, I am still learning and working on getting my process as refined as I can. It is becoming very apparent that I need to take more time on each step. Another question, where do ya'll stand on surface conditioning belts as a time saver in the process of bringing out a hamon? Worth it? Or would my time and energy be better spent putting in the elbow grease hand sanding?
 
So you can totally do a machine finished hamon. It won't look as amazing as a hand finished job, but if you get it up to 600 or 800 on the grinder, then hit it with a scotchbrite prior to etch and ultimately finish as Stacy suggests, you can get good results. To get the really spectacular activity along the line, you may have to do multiple quenches, use a high activity steel, and hand polish way up into the 2k range. Maybe with the use of lemon juice or similar for your etchant. With some steels, a mirror polish alone seems to show good activity. On others, you may not be able to see much even with an etch.
 
As Joe ssid, using a belt grinder and new belts up to 800 grit is fine. Just keep things cool and flat. Beyond that you need good quality sandpaper and elbow grease.

On any high carbon low alloy steel a simple suguha hamon can be done with a layer of satanite on the spine and upper bevel and grinding belts up to 800 grit. 1070, 1084, 1095, W2 all work fine.

For high detail hamon with ashi and clouds you want a really clean and low alloy steel like W2 or Hitachi white#1. These should be carefully sanded per-HT and calyed carefully. Post HT work is all by hand. It may take dozens to hundreds of hours to get the max from the hamon. It takes different abrasives and stecants and various polishing techniques. To learn more about togi (polishing Japanese blades ) there are several good books. The best is "The are of Japanese sword polishing" by Setsuo Takaiwa. I would suggest anyone who wants to learn howto make a hamon own this book.
 
Even 400 grit and a gray belt looks pretty nice. You can etch then hit lightly with the gray belt again. Keep going back and forth until you like it.
 
Hey everyone,

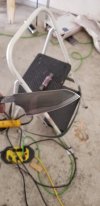
I wanted to update you all who helped me with this hurdle. After grinding past the decarb and scale there was no temper line :(... But a second attempt with 1095 and following the awesome advice I got on here I was able to achieve my first temper line/ hamon. This is a pairing knife I'm making for my mother, hand sanded to 400 and dipped in FC in 20 second intervals three times scrubbing it with 0000 steel wool after each dip. This is knife #9 I have ever made.
20180714_113805.jpg 20180714_113808.jpg
 
Nice. Unusual profile for a paring knife...
Yeah, I was trying to recreate some examples I had seen of Japanese petty knifes. From what I could find, that seemed to be their equivalent of a pairing knife. I will see what feedback I get from the user and see if I need to make a more traditional pairing knife.
 
Variety is nice. Guests always compliment the different kitchen knives I've accumulated, many of them home made.
 
I consider the Japanese equivalent of the pairing knife is the kamagata usuba.
The bano-ko-bocho style like yours is more of a utility knife ( to me anyway).
 
Last edited:
One thing I noticed with your 1084 is you did not thermal cycle the steel. I have found with 1084 from that supplier you have to thermal cycle it or it won’t harden worth a dang.
 
Back
Top