Braiding a leather fob and installing a bead

Update that now I use some rubberized cork material for the wedge, works great and retains it's springiness better than a wedge of leather. Not sure where you'll find some, as I salvaged some from our machine shop as they were making gaskets and I kept the scraps ! :)
G2
 
If it's like the cork gaskets from the automotive world, you can buy those in sheets for not that much, I just saw a sheet 12x12 sheet for $20 at a parts shop out here... that should be enough to last a while.
 
That may not be a thick enough material, probably need to be around 1/4" thick or thicker and slice and dice it from that, I lucked into this stuff, I'll see if I can find out where they got this material.
G2
 
The rubber "cork" in the bottle of Barefoot brand wine my wife and I had tonight might work ... it's fairly dense and does not crumble when carved. Most inexpensive domestic wines without screw tops now use this artificial cork material so If it works there is a steady supply available.
 
Fob just added to my "old" Navy issue Electrician's Knife. Using the rubber "cork" material as a wedge (instead of leather) ... it worked very well and locked the button between the tails. I can't pull the button off - and I really tried to pull it off - couldn't do it!

DSC01922.jpg DSC01923.jpg DSC01924.jpg DSC01925.jpg

Thanks G2 (and all the experts that contribute) - these tutorials really add to my enjoyment of leather crafting. If I can see it ... I can do it. This forum is very supportive of amateur crafters and knowing that I can call on the expertise of professionals is a tremendous resource.

Lessons learned: Don't make the strip too thin - it wants to roll when you're passing the tail through (wider is better). A leather with a greater color difference between the flesh side and the grain side is more striking. Don't cut too many slots ahead or the pattern will start to spread out as the leather stretches - cut the slots as you need them to keep the chevron pattern tight. Don't make the wedge too wide - the ideal fit would be that the wedge gets pulled into the hole and the tails fill in around the wedge and traps the leather against the walls of the bead (or in my case a stag button).

Scott D
 
Nice Scott!

I usually only do two slits & braid so you end up with the 'good' side of the leather showing on the out side I adjust the position of the bead so it is just far enough away I can catch it with my pinky
G2
 
Last edited:
I prefer a 4-strand braid using two different colored laces. I like a more round shape to my lanyards. A dot of Barge Cement inside the braid keeps it all in place, and your idea of the wedge keeps the 'bead' in place! (I don't actually use a 'bead.' I tie a lanyard knot from another piece of lace, and use that as the 'bead.')


Stitchawl

Sounds good...let's see a picture.


My bad... I didn't use a Lanyard Knot for the bead, I used a Turkshead. (Senior moment?)
The white and black braid is done with flat suede lace, and the Turkshead is done using a smooth round leather lace.
Here's a quick shot taken with my phone.

moki1.jpg


Stitchawl
 
Very nice - I'll have to give that a try. Just got a GEC 73 with a tube ... it needs a Fob!
 
It's much easier (for me...) tying a 'small' Turkshead knot or Lanyard knot using round lace. Trying to keep everything flat, untwisted, and smooth with flat lace is really difficult for me when the knot is only 1/2" or so in diameter! Round lace eliminates that problem.


Stitchawl
 
Stitchawl, nice knot there! I've tried making those but they come out looking pretty ugly ;)
G2
 
A rise up as a fellow asked how this was done, figured it may serve to help new folks as well,
G2
 
You're most welcome, here's one I did just recently, on a folder like this, it's handy to grip your pinky around the bead to help draw the knife out of the pocket.

leather_braid_22 by GaryWGraley, on Flickr

G2
 
Last edited:
I've made a few of those through the years and can attest to their usefulness. :)

I learned it from you. :D
 
Thanks Dwayne, I enjoy making them and using them on my knives, just adds a little bit of customness if that's even a word, to the knife ;) Just added one to this knife, it doesn't have a lanyard hole...

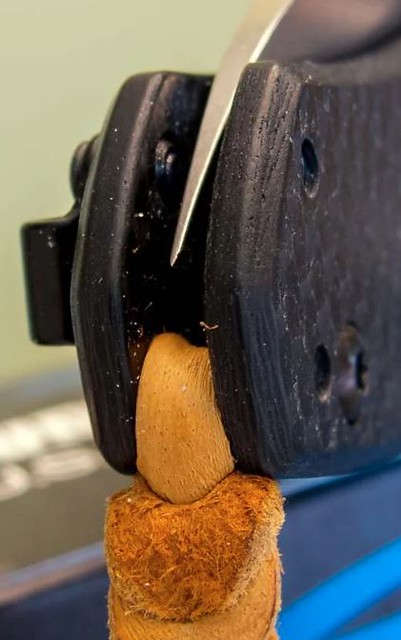
Reason for the photos is to show that you can add a lanyard fob to the knife, even though it doesn't have a lanyard hole. There is an exposed pin at the end of the handle, in order to attach a lanyard to it you need to braid it VERY tightly around that pin. I folded the leather over and made slits into it close to the end of the fold so that it would be very tight when I went to braid it and it worked out well.

The skull bead is held in place by way of a wedge of rubberized cork, nestled between the two pieces of leather and then the skull is pulled down tight over that, it prevents the skull from sliding off. A much cleaner way of keeping it in place instead of tying a knot there.

Here are the photos, with the lanyard on, I can hook my pinky around the leather and catch the bead and draw the knife from the pocket, plus the skull is kinda cool, not into skulls really but they work well for this purpose.

Tight around that pin

leather_braid_12 by GaryWGraley, on Flickr

leather_braid_13 by GaryWGraley, on Flickr

leather_braid_14 by GaryWGraley, on Flickr

leather_braid_15 by GaryWGraley, on Flickr

Nice knife too, a ZT 0770cf model, Click here to see Jim's thread on his full review of that knife

G2
 
Last edited:
Back
Top