- Joined
- Jan 27, 2006
- Messages
- 497
A few days ago my NEW Buck 500 with stainless steel bolsters arrived in the mail. Overall the best $40.00 (shipped) I think I'd spent in a long time. I'd never considered this model before because I'd had a 112 and 110 for so long I didn't think I needed another Buck folder. I was wrong! 
The 500 Duke has a much thinner profile than my previously favored 112, and goes virtually unnoticed in pocket carry. The plumper 112 shows through a little, not that THAT ever stopped me from carrying it! lol
However, first impressions of my 2014 vintage 500 revealed a few issues for me, which I knew I needed to address before I could really enjoy this one. On this recent manufactured example the outer edges were pretty "sharp" and uncomfortable in the hand. Some folks like sharp there perhaps, but I'm not one,.....so that had to change.
The only other issue was the blade had about a millimeter or so of lateral play in it. I'll admit it,....I'm a bit fussy and nitpicking here,.....but 35 years as a bench jeweler/diamond setter made me that way.
For SURE we're looking at a great "canvas" here, and I certainly can't expect a huge amount of custom finishing be done on such a bargain priced and practical knife,.......straight out of the box. On sale at $40.00 shipped on ebay,.....a no brainer.
So OK, I look at some forum posts here and decide the blade play removal is something I can do myself. So I grab a piece of 1/8" thick scrap leather and fold it to pad the jaws of my small jewelers vice, make sure I'm centered over the blade pivot rivet (and not catching some of the rosewood scales), ....and slowly tighten the vise until I felt a hint of movement.
Removed the knife from the vise and could see just one side of the blade rivet was now protruding a smidge, and ALL of the lateral play was now gone! I used a steel staking punch to carefully tap down the rivet after padding the back side with just a business card against a scrap steel piece that I added a slightly cupped surface to match the surface contours of the bolster/rivet area. Some light sanding and crocus cloth followed by a 1" muslin wheel polish and that was done. The blade was actually a smidge tighter than I preferred, but opening and closing the knife a few hundred times made it about perfect. (and still no play in the blade)
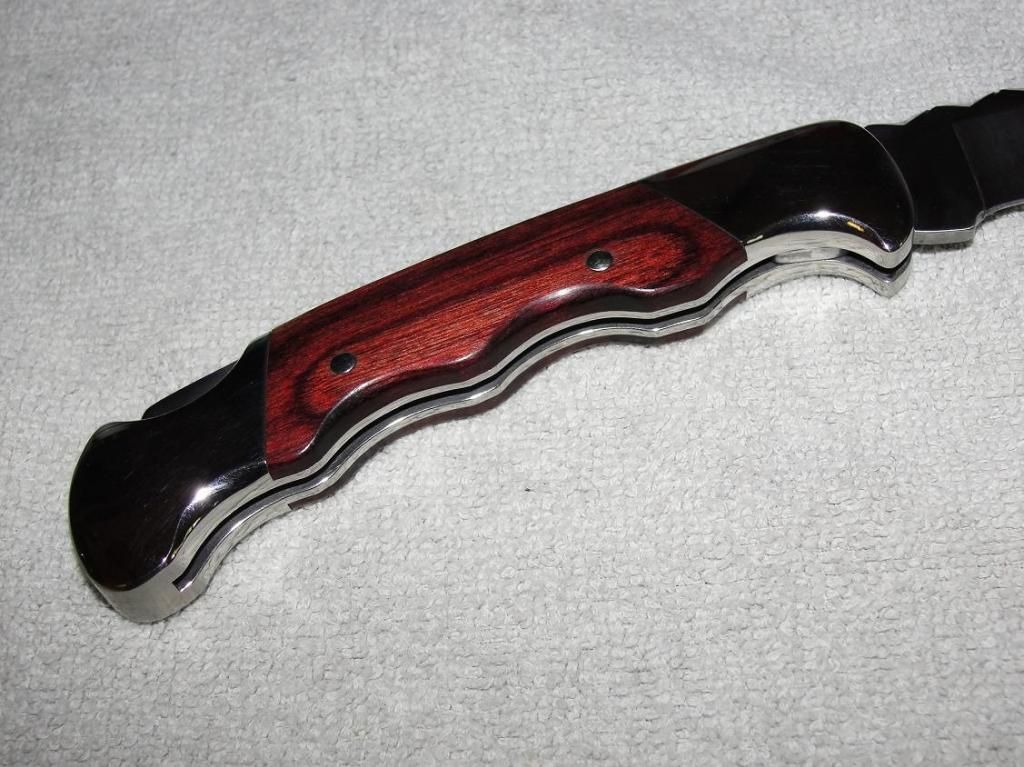
I decided to get rid of all the sharp corners next, and that was pretty simple using a 1/2" rubber backed cylinder sanding disc using 120 grit disc. I finished up with a few finer grits by hand, and finally used the small polishing wheel until it felt S M O O T H")
So OK, smooth corners and tight blade lockup,....but something was still missing in my mind. Most of my other Buck folders I have added custom fitted finger grooves. But those were all done on brass bolsters,....and THIS one had stainless steel to contend with!
I'd remembered reading on the making of stainless steel bicycle frames the time it took to make was about DOUBLE that of chromoly steel ones. AND,...the stainless had a tendency to wear out cutters a lot quicker!
So OK, most of my jewelers diamond burs I'd long ago abused cutting out a frozen bottom bracket on a bike rescue buy of a Serotta road bike frame. But I DID have lots of sanding discs and stone cut off discs at hand. I decided to put 3 thin stone cutoff discs on the spindle to increase the surface area to be removed on my Foredom Flexable shaft machine (a glorified Dremmel).
That worked fine,...but also VERY SLOW in this monster metal! Grind a few seconds, dip in water to keep cool, repeat. Folks, it took me about THREE HOURS to get where I wanted to be on this knife on just the finger grooves! (blade tightening and edge rounding an additional 1/2 hour or so)
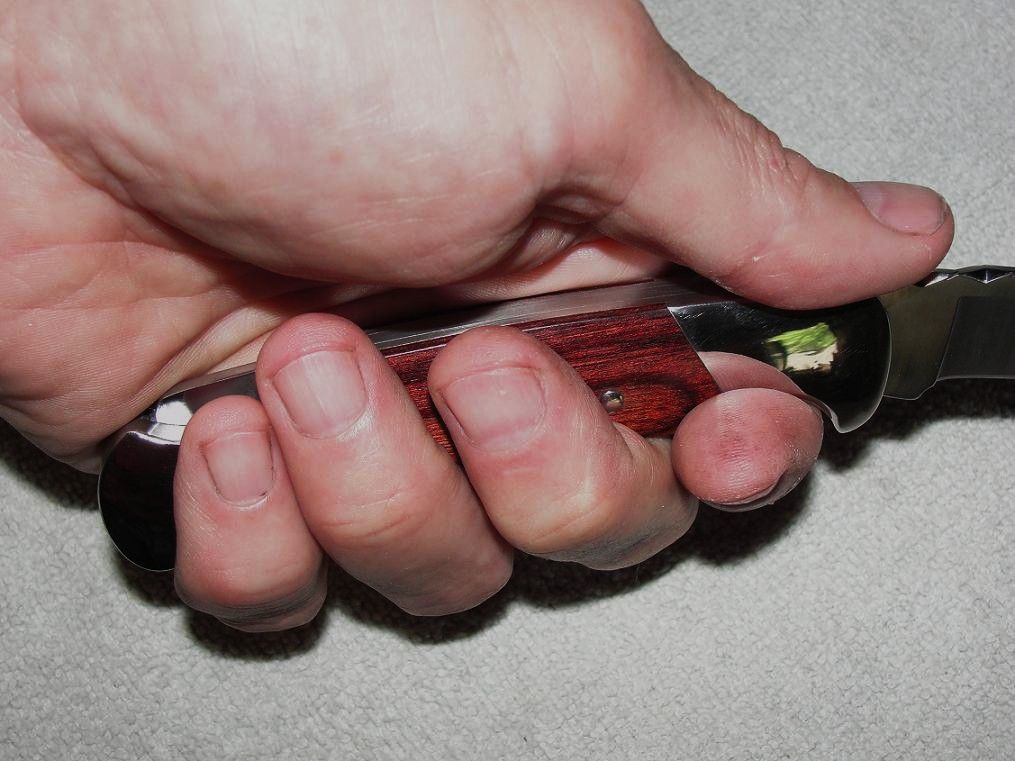
Once I got close with the tripled up cut off discs, I finished up with the rubber backed 1/2" sander and 120 grit, followed by hand finishing to about 800 grit to a final polish. The outer corners of each finger groove has a comfy taper to them, and each groove placement was centered over my own hand. I suspect this will fit the majority of users in any case as my hand is about average.
I'd like to add that "maybe" the reason these stainless bolstered 500 Dukes aren't in constant production might be because this knife is NOT profitable for Buck to make! Sort of like a loss-leader to get you in the Buck family, but a dog for them to produce due to the tough metal to machine and the abuse on their cutters. Just a feeling mind you, but I can tell you this stuff is a LOT harder to work than Brass! That may also be the reason you don't see many SS Buck 500's with finger grooves! (tough on the tools
Anyway, I'll include some pics below that I think will show the result. An added bonus is the knife dropped about 1/2 ounce in weight, and feels great in the hand. It's become one of my favorites to carry in my pocket. I quickly stitched together a small leather dust cover to help keep the works clean for pocket carry. An added hole will allow for neck carry under a T-shirt or tie to you belt for added security on a fishing boat and such.
Oh,...I later perfectly leveled the top of the locking bar flush with the frame, and added a little love on top of the blade,.....just felt like it.
All gone over and she got a good cleaning in dish detergent and heavy streaming water and brushes, followed by about 80 PSI of blowing out with my air compressor followed. I used a light oil on the blade pivot and lock bar pivot, and some moly paste at the blade lockup and where the post spring meets the lock bar areas.
.....I think I'm done with this one now,...and she feels sweet in hand! Yeah Baby!!!
NOTE: One wish is that Buck would offer this knife optionally WITHOUT a nail cutout. It's a beautifully shaped blade, and with the added finger groves there is no need for the nail groove There is PLENTY of blade to grab onto to open her up. The old 2 dot 112's look so much better without that groove,.....but the clip point not a favorite of mine. The 500 Duke drop point blade is mighty fine otherwise.


The index finger groove stops right at the bottom of the blade structure that tensions the blade in the closed position. Do NOT cut into that area!


A good fit and the knife placed in the cover this way (blade pivot DOWN) keeps most of the dirt out while pocketed:


The 500 Duke has a much thinner profile than my previously favored 112, and goes virtually unnoticed in pocket carry. The plumper 112 shows through a little, not that THAT ever stopped me from carrying it! lol
However, first impressions of my 2014 vintage 500 revealed a few issues for me, which I knew I needed to address before I could really enjoy this one. On this recent manufactured example the outer edges were pretty "sharp" and uncomfortable in the hand. Some folks like sharp there perhaps, but I'm not one,.....so that had to change.
The only other issue was the blade had about a millimeter or so of lateral play in it. I'll admit it,....I'm a bit fussy and nitpicking here,.....but 35 years as a bench jeweler/diamond setter made me that way.
For SURE we're looking at a great "canvas" here, and I certainly can't expect a huge amount of custom finishing be done on such a bargain priced and practical knife,.......straight out of the box. On sale at $40.00 shipped on ebay,.....a no brainer.
So OK, I look at some forum posts here and decide the blade play removal is something I can do myself. So I grab a piece of 1/8" thick scrap leather and fold it to pad the jaws of my small jewelers vice, make sure I'm centered over the blade pivot rivet (and not catching some of the rosewood scales), ....and slowly tighten the vise until I felt a hint of movement.
Removed the knife from the vise and could see just one side of the blade rivet was now protruding a smidge, and ALL of the lateral play was now gone! I used a steel staking punch to carefully tap down the rivet after padding the back side with just a business card against a scrap steel piece that I added a slightly cupped surface to match the surface contours of the bolster/rivet area. Some light sanding and crocus cloth followed by a 1" muslin wheel polish and that was done. The blade was actually a smidge tighter than I preferred, but opening and closing the knife a few hundred times made it about perfect. (and still no play in the blade)
I decided to get rid of all the sharp corners next, and that was pretty simple using a 1/2" rubber backed cylinder sanding disc using 120 grit disc. I finished up with a few finer grits by hand, and finally used the small polishing wheel until it felt S M O O T H
So OK, smooth corners and tight blade lockup,....but something was still missing in my mind. Most of my other Buck folders I have added custom fitted finger grooves. But those were all done on brass bolsters,....and THIS one had stainless steel to contend with!
I'd remembered reading on the making of stainless steel bicycle frames the time it took to make was about DOUBLE that of chromoly steel ones. AND,...the stainless had a tendency to wear out cutters a lot quicker!
So OK, most of my jewelers diamond burs I'd long ago abused cutting out a frozen bottom bracket on a bike rescue buy of a Serotta road bike frame. But I DID have lots of sanding discs and stone cut off discs at hand. I decided to put 3 thin stone cutoff discs on the spindle to increase the surface area to be removed on my Foredom Flexable shaft machine (a glorified Dremmel).
That worked fine,...but also VERY SLOW in this monster metal! Grind a few seconds, dip in water to keep cool, repeat. Folks, it took me about THREE HOURS to get where I wanted to be on this knife on just the finger grooves!
(blade tightening and edge rounding an additional 1/2 hour or so)Once I got close with the tripled up cut off discs, I finished up with the rubber backed 1/2" sander and 120 grit, followed by hand finishing to about 800 grit to a final polish. The outer corners of each finger groove has a comfy taper to them, and each groove placement was centered over my own hand. I suspect this will fit the majority of users in any case as my hand is about average.
I'd like to add that "maybe" the reason these stainless bolstered 500 Dukes aren't in constant production might be because this knife is NOT profitable for Buck to make! Sort of like a loss-leader to get you in the Buck family, but a dog for them to produce due to the tough metal to machine and the abuse on their cutters. Just a feeling mind you, but I can tell you this stuff is a LOT harder to work than Brass! That may also be the reason you don't see many SS Buck 500's with finger grooves! (tough on the tools
Anyway, I'll include some pics below that I think will show the result. An added bonus is the knife dropped about 1/2 ounce in weight, and feels great in the hand. It's become one of my favorites to carry in my pocket. I quickly stitched together a small leather dust cover to help keep the works clean for pocket carry. An added hole will allow for neck carry under a T-shirt or tie to you belt for added security on a fishing boat and such.
Oh,...I later perfectly leveled the top of the locking bar flush with the frame, and added a little love on top of the blade,.....just felt like it.
All gone over and she got a good cleaning in dish detergent and heavy streaming water and brushes, followed by about 80 PSI of blowing out with my air compressor followed. I used a light oil on the blade pivot and lock bar pivot, and some moly paste at the blade lockup and where the post spring meets the lock bar areas.
.....I think I'm done with this one now,...and she feels sweet in hand! Yeah Baby!!!
NOTE: One wish is that Buck would offer this knife optionally WITHOUT a nail cutout. It's a beautifully shaped blade, and with the added finger groves there is no need for the nail groove There is PLENTY of blade to grab onto to open her up. The old 2 dot 112's look so much better without that groove,.....but the clip point not a favorite of mine. The 500 Duke drop point blade is mighty fine otherwise.


The index finger groove stops right at the bottom of the blade structure that tensions the blade in the closed position. Do NOT cut into that area!


A good fit and the knife placed in the cover this way (blade pivot DOWN) keeps most of the dirt out while pocketed:


Last edited:
") A great all around user as it comes too, but the sharp edges at least had to go for me. I've put aside (for now
A great all around user as it comes too, but the sharp edges at least had to go for me. I've put aside (for now 


