Cutting up snakewood

JTknives

Blade Heat Treating www.jarodtodd.com
Knifemaker / Craftsman / Service Provider
Joined
Jun 11, 2006
Messages
8,633
I have just bought a snakewood log that should be all dry. It is 5.5 inches in di and 8 inches long. Great grain pattern. I was wondering if i should send it out to someone that knowes what there doing to cut it up. I was then thinking of sending it to wssi to get stablized. I just dont want to mess up this great log. Any ideas?
 
I have cut up a few logs of the stuff for knife handles, it is one of the few woods that shows its pattern all the way around a block, this makes it especially good for hidden tangs. Not all snakewood has the classic snakeskin pattern. Within the same piece you can have incredable pattern and areas of absolutly nothing. It is very dense and like ironwood is very abrasive, you will want to use a bi-metal blade if one is available for your saw, 3/4 inch wide is better, three teeth per inch will work best for the size you are talking about. What size saw do you have? If you have trouble finding a blade for your machine, let me know, I will weld you one up. If your bandsaw is variable speed, all the better, this is one of the woods that likes to chatter when you cut it.

You really need to wear dust protection when cutting this wood, you should with all of them but like cocobolo and ironwood, snakewood is one of the particularly bad ones.

Map out your cuts around the checks on the end, as soon as you are done cutting, paint the ends with glue or latex paint, I usually just spray the whole block with polyurethane. Snakewood is really bad for checking. Unfortunatly, sealing it up makes it harder for the stabizer to work.

Most of all, enjoy the adventure. Mark
 
I just did a set of damascus kitchen knives for my wife for xmas snake wood is my all time favorite. There is knothing in my opinion thats better than a figured matching set of snakewood scales . There are a wide variety of snakewoods but suriname snakewood is the best. As far as hard in my opinion its harder than iron wood I do lots of handles of ironwood so I have a good idea . Ide say suriname snake wood is 25 % harder just by the way it sanded and how long it took me to finish in comparison to ironwood. I would ask how to cut it but your log is very small so to 1/4 saw it you may only end up with 1 or 2 sets of scales if you cut it length wise you may get 6 sets 4 inches long. Here is a picture of the knives I made.This was the piece of wood used to make 2 handles from .
HPIM1831.jpg
HPIM1770.jpg
 
Kelly's cross grain use of the snakewood is interesting. It certainly saves the high waste of the sapwood areas.

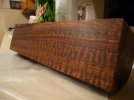
The premium area is the highly figured "snake-skin" pattern located toward the core.
After the first cut ( half log), carefully consider the location and type of the pattern before cutting the log farther. Also, think about the handle types you will be making. I slab one quarter into thinner scales, one into thicker scales, and the other two into handle blocks.
When you quarter-saw the log, it will yield slabs like Kelly showed, having stripes toward the outer side, and snake pattern toward the inside. On the wider slabs, I rip saw the two areas apart. The stripped and lesser figure areas I use for tool handles and turning projects. The highly snake figured slabs I use for high end handles. Expect about 25% of the slabs will be primo, 25% good, and the rest used for lower end knives or other projects.

I have never had snakewood stabilized. But know that some folks do. Check with Mike ,at WSSI, on his opinion.

After the newly acquired log is quarter-sawn, I seal the ends with CA. Then I let it sit on the wood shelves for a long time - 6 months minimum, a year or more is better. It needs time to stress relieve. Expect cracks and checks...that is the nature of snakewood.
With snakewood, cyanoacrylic glue is you friend. When ready to use the slabs, flood the surface of the slabs with super thin CA and let it cure for a day or two. As you work the wood, flood any cracks that show up with CA and let it cure before continuing. I do not like accelerator for such uses. It can create stress, heat, and also can cause a funny hazy look to the wood.
Sanding and finishing snakewood is best done as much by hand as possible. Use sharp belts for any power sanding, bi-metal or carbide blades when sawing, and avoid any heat buildup. Be very cautious if power buffing, as cracks can form in the surface while and after buffing ( the same as with ebony).
When the handle is done with all shaping, flood it with CA again, let it cure for a couple days, sand it down to the surface, and finish the grits up to 8000. It will shine like glass. Even now, the knife is not done. You will need to set it aside for a month or two to allow any new (usually tiny) cracks and checks to show up. If any do, seal them with super thin CA, and hand finish that spot again.

Snakewood is not for those in a hurry, or those with low patience, or short fuses. It will reward you with a stunning handle if you take your time and work with the wood, not against it.

Stacy

Afterthought -
Never plain-saw ( flat saw) a snakewood log. Plain-sawn snakewood looks different from one side ( looking toward the center) than the other ( looking toward the outside of the log) The wood may look very figured,and appear even in color as a block - but when you are done with the knife, it will display different colors, pattern, and chatoyancy on each side of the handle. Generally one side will be light and the other dark. A properly sawn snakewood block or scale block should look the same from opposite sides. When the flat sawn log is used for scales, this is not such a problem ( as you only see one side of a scale), but, if using scales, carefully examine the surface and pattern to assure that you are putting matching surfaces showing, or the same problem will arise.

Stacy
 
I also just purchased an 8" long x 5" diameter log of snakewood and expect it to arrive any day now. I'm watching this thread closely to see how your cutting went. I expect to quarter saw mine, but am still a little unsure about what size blocks I might be able to get out of it. I'll do some "mapping" when it arrives.

Mike L.
 
WOW Stacey I though I did something really wrong and went right to the super glue. I was sanding and noticed a small crack I filled it with super glue and carried on . I obviously over heated the wood even used ne belts to sand . The next day another crack showed up even larger so I filled it and hand sanded from then on . I only went to 1500 grit . My snakewood is all stabilized and still cracked so at least now I know how to go at it next time. I have about 10 sets of this and is and will be my favorite for a long time. Thanks again Stacey your a huge asset to this forum.
 
well the log showed up today. wow it looks great. the whole thing is covered in wax, is this OK. i asked the seller and he said that it has been dry for years. i am still a little confused about quarter sawing. do i cut the log into 4 pie shape wedges?
 
Hey Mark,

That handle looks like what I would imagine a stabilized/embalmed pine cone might look like. So how did you do that? What's the story behind the leather too?

Thanks, Phil
 
It's coated in parafin wax to prevent it from drying too much, causing further splitting / cracking of the log. I think you should quarter-saw it then reseal the wood and let it sit for a while longer before cutting into blocks.

Otherwise, you could quarter-saw it and continue cutting into blocks, then re-seal the blocks and allow them to sit for a couple of months. This is how I plan on dealing with my snakewood log that I just received.

Hopefully, someone else with more experience will chime in soon.

Mike L.

Here's mine:
snakewood2_600.jpg
 
Last edited:
Snakewood is one of my favorite woods. In my opinion there are very few woods that match its beauty.

1) Snakewood takes a long time to dry.
Most of our snakewood has been in and out of the kiln for more than two years before we send it in to be stabilized. We measure the moisture before the it is put in the kiln. The wood is removed from the kiln and placed on a shelf when it stops losing moisture. After about 4-6 week the wood is put back into the kiln. The process is repeated until the wood hits 12% moisture. It is then sent to WSSI to be stabilized. Snakewood is the only wood we do not dry below 12% before stabilizing.

2) Snakewood is difficult to dry properly.
It is common for a log to measure 10%-12% moisture on the surface. Cut an inch into the log and the moisture content is over 20%. We keep the ends waxed or coated with CA while drying. When we find a crack we immediately cover the crack with CA and spray with accelerant. If you use odorless CA there will be no hazing i.e., the CA the will not turn white.

3) The maximum thickness WSSI can penetrate is .375". K&G says they get complete penetration on blocks.

4) Let the wood sit after stabilizing. I prefer to let it sit for at least two months.

Working tips:
Never force snakewood. Cut using your sharpest blade. Buy a sharp blade if necessary. All pin holes should be oversize, NOT tight. Use new belts when grinding. Set it aside to cool if it gets warm. Don't let it get hot or wet.

We don't buy logs. Snakewood logs can hide internal cracks. We bought a log that looked great on the outside and was shattered inside. Have the seller half or quarter the log before buying.

There are several points at the link above I disagree with. I especially disagree with his comments regarding color loss:
One of the main benefits that air drying wood offers woodturners vs. Kiln dried wood is color retention. Air dried wood consistently retains more of its natural color than wood that has been Kiln dried. The Kilning process tends to destroy many of the subtle colors in the wood, transforming it into a more homogenised color, absent of the delicate and subtle colors that existed in the wood before it was Kiln dried.
I call BS! I have never found any color loss in the wood we dry in the kiln. The only way we can tell the kiln dried block from unprocessed blocks is by moisture content. The color is the same. I don't know what kind of kiln he is or has used but I suspect the tool is getting blamed for process problems.
 
Hey Mark,

That handle looks like what I would imagine a stabilized/embalmed pine cone might look like. So how did you do that? What's the story behind the leather too?

Thanks, Phil

Hi Phil and all, the snakewood in the handle above looked to me like it needed scales in it so I cut it into scales and re-assembled it, the sheath is barremundi skin laminated to leather. The knife was designed with the fish skin in mind, I think they go well together. The fish skin complements of my friend down under, Bruce. G'day Bruce.

I have found that in most cases tou do not get to decide how to cut snakewood, ie, flat sawn or quarter sawn, rather the checks and the pattern tell you where to cut. Have fun with it Mark
 
Hey Mark,

That handle looks like what I would imagine a stabilized/embalmed pine cone might look like. So how did you do that? What's the story behind the leather too?

Thanks, Phil

Pine cone looks good too, here's what it looks like
 

Attachments

  • pinecone.jpg
    pinecone.jpg
    29.4 KB · Views: 55

This is one of the best diagrams I've seen that shows how to quarter saw a log.

I agree that the snakewood should be quartersawn to show the best detail. It's very similar to a figured log. The figure shows the best when it's cut the right way.

Because of the density of snakewood, I wouldn't recommend stabilizing it in blocks. With scales, you'll be sure to get complete penetration.

Awesome log section by the way. I look forward to seeing some beautiful knives from it :)

Christina
Woodstabilizer
 
I quartered up the log tonight. i did not have the guts to cut any scales from it yet. i cut it in half then cut one half in half again. so i have 3 chunks now, just wanted to see how it looked inside. i sanded one of the quarters on both sides to 600 grit and i must say it looks good :) here are some pictures.

here thy are in there bags
attachment.php


this is a close up shot of one side to show grain
attachment.php


this shot shows both sides
attachment.php


here it is with a bit of water on it to show what it really looks like :D
attachment.php
 

Attachments

  • baged.jpg
    baged.jpg
    55.4 KB · Views: 196
  • quarter 1.jpg
    quarter 1.jpg
    47.8 KB · Views: 197
  • quarter 2.jpg
    quarter 2.jpg
    56.3 KB · Views: 195
  • quarter 3.jpg
    quarter 3.jpg
    56.9 KB · Views: 193
This is one of the best diagrams I've seen that shows how to quarter saw a log.

I agree that the snakewood should be quartersawn to show the best detail. It's very similar to a figured log. The figure shows the best when it's cut the right way.

Because of the density of snakewood, I wouldn't recommend stabilizing it in blocks. With scales, you'll be sure to get complete penetration.

Awesome log section by the way. I look forward to seeing some beautiful knives from it :)

Christina
Woodstabilizer

Those are standard diagrams found in most wood books except that rift one. it's the second time I've seen it and it's just as silly the second time. No lumber producer would ever wast material to cut for rift that way. The pie shap diagram makes no sense either.

The "figure" in snakewood is a pigment classification and has no grain specific direction. It's similar in origin to ink line markings in rosewood and the dark bands in zebrawood. It is not a result of grain undulation in either tangent or radial planes. Snakewood figure has several presentations and several market names world wide. Spotted snakewood is called "leopardwood" (fish tail oak is now marketed as Leopardwood) and jumbled markings called "letterwood" due to it's resemblance to alphebet letters. Like Chuck said, cut snake wood for yield taking consideration for known cracks and how the figure presents itself. Mother nature paints her wood with a broad pigment brush with lots of variation. Snakewood "figure" comes and goes and my personal preference is landscaped ink lines mixed with the bands. Sapwood is white and is never imported with log or lumber form..it's hacked off by axe.

Snake wood has a species average specific gravity of 1.4, slightly higher than average African ebony. It takes a super long time to dry and will crack no matter the care used because it is very stiff and brittle. Snakewood does not dissipate heat well and will heat crack if sanded hard. Use clean, new paper. Because of it's stiffness, drilling pin holes in thin scales must be slow and careful. No over heating with the bit and clear the hole of debris or it will crack the wood side wall since the wall will not flex.

Impregnating thick snake wood with acrylic resins is not difficult with proper protocols, equipment and knowledge. A thinner resin is needed. Keep in mind to impregnate a 1" thick block you only need .5" penetration since pressure is equal on all sides in a pressure chamber. Proper pressure is necessary of course...don't try it in a paint pot. I have routinely infused 1" snake wood. Years ago before I perfected my own acrylic impregnation system I sent snakewood to Ken at K & G and he gets impregnation thru and thru on 2" thick stock for sure. Snakewood does not gain much weight due to it's density after processing and I've found over the years "stabilized" snakewood cracks about the same as natural snakewood. I have cut hundreds of pounds of quality snake wood over the years, but refuse to buy log chunks.
 
Back
Top