DIY Goniometer.. does it work?

Joined
Mar 24, 2021
Messages
77
I've seen the CATRA version, but ran into this on YouTube:


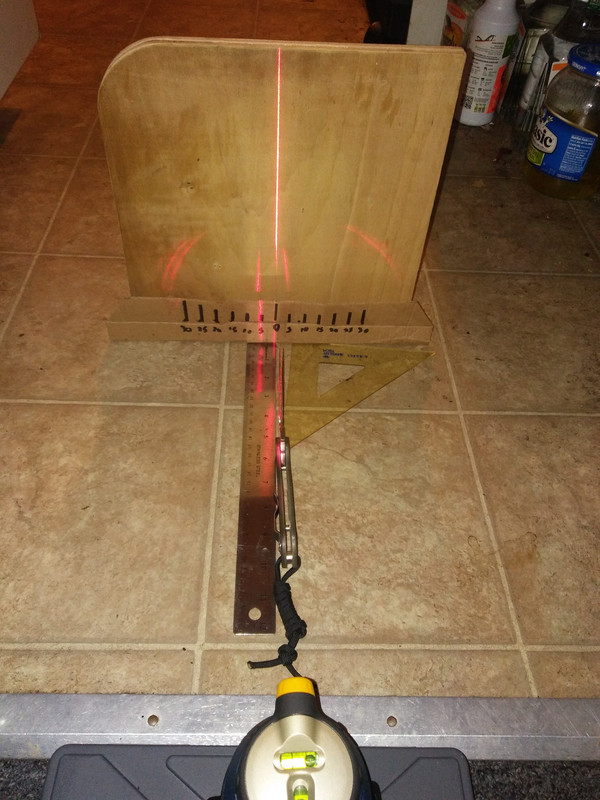
I gave it a try with a laser bore sighting tool, and found a printable protractor online. I am not an engineer or scientist... and I'm pretty bad at math so I could be way off base. I tested my setup using objects with a known angle (those little plastic sharpening wedge guides) as well verifying with a digital angle cube.

The (2) pics show a Sebenza that I sharpened to about 25 degrees per side on a fixed angle system, and a Native 5 that I hand sharpened to about 15 degrees per side. You can see the laser bore sight at 9 0'clock in the frame. On the Native 5, I found a flat spot on the blade that refracted the laser to the handwritten zero on the protractor. The picture show the edge interrupting the beam, and the laser is refracted as a smear centered over the hand written 15 degree mark. The Sebenza refracts a dot near the 25 degree mark. It's a dot rather than smear because the edge is not convex and was sharpened on a fixed angle system.

Seems to work.. but does it really??


Pretty cool d.cutting.edge d.cutting.edge !

I have a Gritomatic master goniometer and some time ago I was thinking of making a 3D printable one that can work with a cheap laser pointer. I might revisit the idea. :-)

I see your blade is flat on a table with the side facing up and I assume your laser source is to the right of the photo. Does the laser then reflect off of just one side of the edge?

Normally the goniometers has the knife facing edge towards laser, and the laser pointing straight into the edge. The edge then splits the laser beam and it deflects to both sides of the spine and shines on a protractor above the edge of the knife.
 
Last edited:
Pretty cool d.cutting.edge d.cutting.edge !

I have a Gritomatic master goniometer and some time ago I was thinking of making a 3D printable one that can work with a cheap laser pointer. I might revisit the idea. :)

I see your blade is flat on a table with the side facing up and I assume your laser source is to the right of the photo. Does the laser then reflect off of just one side of the edge?

Normally the goniometers has the knife facing edge towards laser, and the laser pointing straight into the edge. The edge then splits the laser beam and it deflects to both sides of the spine and shines on a protractor above the edge of the knife.

Thank you! Yes the laser is just pointing at one side, and the laser is actually on the left side. You can see the laser at around nine o’clock in the picture. I am going to try splitting the laser as well using a setup similar to the CATRA and Gritomatic goniometers.
 
I am going to try splitting the laser as well using a setup similar to the CATRA and Gritomatic goniometers.

Nice, that's what I'm thinking. I want to design something that's 3D printable and affordable. I don't think there is any need for an expensive laser, so I'm thinking I can design something that may cost very little and be affordable to anyone who wants a basic edge goniometer.
 
Nice, that's what I'm thinking. I want to design something that's 3D printable and affordable. I don't think there is any need for an expensive laser, so I'm thinking I can design something that may cost very little and be affordable to anyone who wants a basic edge goniometer.
Affordable is good! I bought a BESS tester and saw the CATRA goniometers cost twice as much. You can buy a very decent knife for the cost of a BESS tester. I’m looking for affordable ways to test and observe my edge and apex during a sharpening progression and as I move through strops. Thanks!
 
Yup, it works.
A dollar store laser printer works well enough
However, it does require some uniformity to the finish
... I did a rough hand regrind on a chef knife,
and there is too much scatter to get a reading from the sides of the blade :)


Speaking of vertical edge reading, lots of links here
jasonstone20 makes basic verhoeven version Re: Making Your Own Goniometer: How To?
1589911690770666102762.jpg


Turns out it has another name
The DILAGON: a DIY laser goniometer
square box version cyrano-dilagon-20-pdf.pdf
i-fbb3Lns-XL.jpg

i-jKbvbw3-L.jpg


Speaking of 3d printing, binder clip on version, ~$3 dollars
https://dschep.github.io/imgur-album-downloader/#/xTma1cJ
imgur.com/a/xTma1cJ
... ... ...
 
B bucketstove Fantastic!! Thank you for the links to the other DIY goniometers.

The edge finish makes a huge difference in how the refracted dot/smear appears. I'm trying to use that to my advantage to check my sharpening progress while also watching my angle. Today I used the setup to check my stone and stropping progression as I sharpened a factory edge knife. The refracted pattern became brighter and more focused as the grit got higher. I think it will also show when an edge becomes rounded during stropping.

I need to find better laser pointers. The laser bore sight drained it's tiny button-sized batteries in a matter of hours. I ordered a set of three laser pointer cat toys from Amazon, and one was dead on arrival and now a second one is starting to go. I've got another make of laser pointer on order.
 
Let us know which pointers work best for you.

After starting to think about designing one, I've also been browsing the net for small pointers. I want it to be as small as possible.

I am thinking that the cheap ones with button cells should be ok because once you've finished initial testing, experimenting and playing with it for hours, any future use would only require a few seconds of "on" time to use the goniometer.
I'll post here if I end up with one that works for more than a few days lol. The laser build quality must make a huge difference. I'm just buying mine from Amazon and the really cheap ones were junk. The Crimson Trace lasers on their pistol/revolver sights just work great and are reliable. They do use some type of button battery too.
 
I was meaning to add something -

One of the main benefits of shining the laser straight into the edge to split the beam instead of deflecting off of one side only, is the fact that you not only view the edge angle but you ALSO view the grind angle of your blade.

It's pretty cool to see the shadow behind the spine of your blade (representing your grind angles) and the second set of dots/lines (representing the edge angle) when you use a goniometer like this.
Yes, I should have two working lasers soon and will try a setup that splits the beam. With the one sided method, you can also get an angle reading of the entire grind by moving the blade left and right. With a hollow grind, I think that is especially interesting.
 
There is no magic, you just need a way to center the blade and center the angle of the blade to the laser. Mirror edges are easier to read. Seems like a good 3D printer project.

EaCfXtq.jpg
 
Here are some more pics for you d.cutting.edge d.cutting.edge

It is a Spyderco Manix 2 that I just did on my Leading Edge sharpening system, clamped in my Leading Edge rotating clamp holder with 2 Hapstone lite clamps.

You can see here, edge angle is spot-on 14.7 degrees per side (just over the 14.5 mark) and the full flat grind angle is 2.5 degrees per side (5 degrees inclusive) The 14.7 degrees was also confirmed with my digital angle cube for comparison while sharpening.

I used another light source from behind me in the second pic, to make the laser reflection stand out better. Easier to see exactly where the dots are.

IMG_20220323_104108.jpg

IMG_20220323_104040.jpg
 
Last edited:
Here are some more pics for you d.cutting.edge d.cutting.edge

It is a Spyderco Manix 2 that I just resharpened today on my Leading Edge sharpening system, clamped in my Leading Edge rotating clamp holder with 2 Hapstone lite clamps.

You can see here, edge angle is spot-on 14.7 degrees per side (just over the 14.5 mark) and the full flat grind angle is 2.5 degrees per side (5 degrees inclusive) The 14.7 degrees was also checked with my digital angle cube for comparison while sharpening.

I used another light source from behind me in the second pic, to make the laser reflection stand out better. Easier to see exactly where the dots are.

View attachment 1773374

View attachment 1773375
Looks great! Thank you for the close-ups. Kudos on the nice sharpening job and mirror finish to get those precise dots!
 
Right, I spent some time on this over the last couple days to finish up a design I started about a year ago. This thread made me revisit it!

Here is what I have come up with so far. I'm planning on using a mini laser pointer which I've designed a slot for (in the handle of the goniometer). I plan on sliding the mini laser pointer into the slot with a tight fit, and having the laser button/switch exposed in the recess seen in the picture. Your knife will then be held in the "V" slot with the edge facing the laser, and you should then see the edge angle reflected on the scale at the top. I've designed small "v" notches for every 2.5 degree angular change. Larger notches are 5 degree increments, with smaller notches at 2.5 degree increments in between.

Alternatively, I can make and print a scale on a piece of paper (I designed the goniometer to have a circumference that equates to 1mm for every 2 degrees of laser deflection so making a paper scale should be easy enough. I think I prefer the notches in the plastic to a paper scale, because they can never get dirty or get damaged.

Total size will be about 12.5cm x 12cm.

If this works well, maybe we can eventually sell a VERY affordable goniometer on Gritomatic... TBA.

Any thoughts or inputs from you guys, feel free to comment!

Untitled2.jpg

Untitled1.jpg
 
Back
Top