DIY Step Drill - pleasantly surprised

Cushing H.

Gold Member
Joined
Jun 3, 2019
Messages
2,714
In working on handles for a knife yesterday, it became stunningly clear to me that I was placing undue belief (read as "stupid") in thinking that I could drill out a central hole for corby bolts, then hand-drill the larger hole by sight. Second time I have tried this, and the second time I had a mis-alignment. so, away I go in looking at step drills from on line sites. they are EXPENSIVE, and I would need to wait for shipping. Lacking any local alternative to buy something, I started looking on line, and ended up studying Walter Sorrells "50 ways to make a step drill." (
). My guess is that this is an old discussion ... but as I ran across at least one old thread where people said "dont make your own, buy from the supply shop selling the bolts", I thought I would share this.

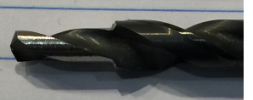
Given the low expense (just a few $$), and the alternative of a long wait for shipping from a supplier I decided to try my hand at making my own. If you look at Walter's video, he discusses making a "twiddle fixture" to hold a drill bit both parallel and at a uniform distance from a grinder belt, then turning ("twiddling") the bit so as to uniformly decrease the circumference of some section of the tip (so as to maintain concentricity of both the large and small diameters. Literally just a couple minutes to drill the "fixture", a couple minutes to set up markers (really tape) on the work rest, and something like 5-10 minutes grinding the drill bit, and I got this:
upload_2019-11-21_12-48-0.png

He is right - it could be really easy to overshot the grind and end up with too small a circumference - but this one I actually hit to the mil. He is also right that the shoulder is not perfectly flat ... but likely good enough - and he is also right that it would be pretty easy to take a dremmel grinding disk and flatten out that shoulder.

Really cool - saved something like $30, and I get to finish this knife this week!
 
The problem with every one of those methods is that none of them address relieving the cutting edges of the shoulder. It may work fine in wood where the compressability of the material is sufficient to overcome the lack of relief, but it's going to rub and drag and possibly tear out material.

Going in with a little diamond lap or stone and relieving the cutting edges will increase the performance greatly.

The yellow line is the "flat shoulder" you're talking about. Inconsequential to performance of the cutting tool (outside of the form it leaves in the part). The red line is the angle I'm talking about, which would be duplicated at the tip of the drill as well.

3w9eYPk.jpg


If it works for you without it, in the materials you're using it for, great. If it doesn't work as well as you hoped, this is probably why.
 
Before I had a step drill I would drill the bolt hole then follow with an end mill for the corby head.

Worked great and is cheap.
 
Before I had a step drill I would drill the bolt hole then follow with an end mill for the corby head.

Worked great and is cheap.

The problem with that is getting alignment / concentricity between the two holes - right? That is what I ran in to in trying to use two separate bits...
 
The problem with that is getting alignment / concentricity between the two holes - right? That is what I ran in to in trying to use two separate bits...

You clamp the scale and drill the small hole, remove the drill bit and chuck up end mill and then cut your pocket. Nothing moves and it stays centered
 
There are lots of ways to skin this cat. I used to drill the smaller pilot first, then use that pilot hole to center the larger drill it. If you keep a light touch, the bit will find it's own center. If you want, you can then carefully square the bottom of the larger hole with a brad point bit afterwards, though it's not entirely necessary. You still get a good mechanical connection with a 118 degree taper in the hole. You can also start the first hole with your larger brad point bit, and then just center punch the dimple left by the brad point, then just drill the smaller hole last.
You can also drill your small hole first, then clamp your scale to your drill table before you remove the bit, and that will leave it centered for the next bit size.

I did eventually buy a couple of "corby drills" from Jantz, but I can't find them on the website anymore. I think they were only about $12 at the time, but it's been so long I can't remember.

Next best thing is a counterbore with an interchangeable pilot. You can get the pilots for about $5 each, and I've seen the counterbores in that size range on amazon and ebay for about $10 to $15, or you might spend a couple more dollars at a place like McMaster-Carr, but they're a handy thing to start accumulating in your toolbox, and what's nice is that if the bit wears out, you can just keep the pilot and buy a new bit, or vise versa.

Looks like the homemade step drill will work just fine too, but I agree with kuraki. The outer portion needs a relief.
 
I used Sorrel's fiddle jig to make mine when I started and have used it on every western handle since. Works fine! :)
 
You clamp the scale and drill the small hole, remove the drill bit and chuck up end mill and then cut your pocket. Nothing moves and it stays centered
Yeah - but after experiencing a couple "challenges" with getting overall alignment between multiple holes (even for pins) between the two handles and the tang, I have decided to go with: use the tang as guide to drill holes in one handle, take the handle off the tang, and use that as a template to drill holes in the other side of the handle. Adding multiple changes of bits to that process, AND keeping everything clamped while doing that just seems like "too much" to me. Easier to drill the pilot (smaller) holes as above, then go in afterward with a step drill, and use the pilot holes to guide the drilling of the outer larger hole (and also set a uniform dept of drill on all holes. Hence the decision to go with a step drill.

Putting in the relief is a good idea: I will give it a go (carefully) with the dremmel tool (I dont have a diamond lap.....)
 
slight update. took my dremmel with a cutoff wheel, squared up the shoulder, and created a relief on the backside of the cutting edge. Seemed to work ok in a piece of scrap black walnut ... so went ahead and used it in Cocobolo (scales for the knife I am glueing up).

Kinda weird result (but not why you would expect). the resulting holes drilled cleanly, and apparently concentrically with the pilot hole. However .... nominally the drill bit I was using is 5/16". The holes I originally drilled with my original 5/16 bit worked just fine for the larger diameter of the corbys. However, when I drilled with this new step drill (which was made from a different drill bit, but the same 5/16" drill diameter from the same manufacturer ... the corbys did not quite fit. Turned out that the second drill bit (again, same mfg, same size) was actually about 0.004" smaller in diameter than the first one I used. A little spinning of each of the heads of the corbys on the grinder to decrease their diameter by something like 0.004", and all is fine and nicely concentric.

this slight (but critical) diameter difference between drill bits catches me a little by surprise ... but I think the lesson is that something like this could occur with any approach (two drill bits with the work piece clamped between changes, etc. In a thread a number of years ago Stacy said the best thing to do is to buy the step drill from the same place you buy your corbys. makes sense if a difference of 0.004" diameter is going to make such a big difference. At least now I know how to deal with it, so for now will stick with this approach (saves many $$'s). These corbys are something like 20 years old .... maybe ones I buy nowadays will have just slightly smaller a diameter?????? (wishful thinking....)
 
Accuracy is easy peasy

Drill all the holes you need to. Then you align each one with the drill bit.
Install the end mill and cut down the desired depth.

I did this to dozens of fixed blade before I bought a step drill and I still have to do it with shadow pattern bird eye slipjoints.

0oM3Xdp.jpg

qaPuWtl.jpg

6hd0Ejx.jpg

JQ2PHX9.jpg


works well if you do not have a step drill. This one was done that way
fczfeHt.jpg
 
Last edited:
Wherever you buy your step drill by your crorbies at the same place.

The dimension do vary at times, I know this first hand.
 
Counterbore from Pops knife supply 20 bucks, all that fiddling cost you how much in time.
LOL. I spent maybe 20 minutes total fiddling with this. My guess is that if i ordered from pops (who i love, and have bought several batches of stuff from), i would be waiting until the middle of nxt week to receive their step drill... which undoubtedly would be very well made .. but might still be off by a couple mils from where my corbys are (maybe, maybe not...we will never know). In which case i am still left with grinding down the OD of my existing corbys. As it is, the knife i am assembling is sitting downstairs with gflex in place .. and i should be able to start shaping the handle on sunday .. instead of something like next friday if i waited for an order from a supplier to come in sometime mid next week...
 
Wherever you buy your step drill by your crorbies at the same place.

The dimension do vary at times, I know this first hand.
Yeah. That, i think, is the point. I think what i am trying to address is - what do you do if that perfect match is not in your hands right now..... ?
 
Yeah. That, i think, is the point. I think what i am trying to address is - what do you do if that perfect match is not in your hands right now..... ?

That is where experience comes in.
You stop and wait until you have the right stuff.
 
That is where experience comes in.
You stop and wait until you have the right stuff.
Or, you improvise and adapt and forge forward? Often “experience” allows you to work with what you have ... it does not force you to wait until you have what you think you must have
 
Back
Top