I've come up with a method to dye bone scales.
I've had very good results with the following method, but please be aware if you decide to try this that there are many factors involved and something could go wrong and ruin your knife.
Please don't attempt this on a knife that has sentimental or financial value, and don't blame me if you damage your knife, I'm only relating my personal experience.
There are many reasons why you might want to dye bone scales:
You got bored with the color of a favorite knife.
You found a knife you really want, but it's not available in a color you like. (perhaps a Case CV peanut?)
You've seen all of those photos of vintage knives, and just can't understand why black or very dark brown scales are so ubiquitous on old knives, yet so rare on modern knives.
At some point or other, all of the above reasons have applied to me, and I'm sure there are many more.
In my quest to find a good way to dye bone, I came across an awful lot of posts on this forum and others like it by people who wanted to know how.
Unfortunately, I didn't find much in the way of useful answers.
I have experimented a great deal, and have come up with what I believe to be a satisfactory method of dyeing bone, with the following benefits:
The dye used is readily available, and safe for home use.
The dye is water based. The process uses no nasty solvents.
The bone scales can remain on the knife during the dyeing process.
The materials are inexpensive, and no special equipment is required.
The process is very fast. A lot of the methods I read about require long dye baths in the order of weeks to months, extensive pre-soaks in various oils etc.
This method achieves good penetration in minutes.
With that out of the way, some disclaimers are in order:
The process involves the use of boiling water, and also makes the knife hot.
The knife will not get hot enough to alter the properties of the steel, but will burn skin if touched before it has a chance to cool.
I have dyed quite a few knives without problems, but heating/cooling bone may possibly cause cracks, especially if the dye is accidentally allowed to boil.
This has not happened to me, but is a theoretical risk.
I did experience a broken backspring.
I put a knife in a stream of cold water to check the color, and plunged it back into boiling dye....
Ping!
The lesson here is that any temperature changes should be gradual.
I have modified the process to ensure that there are no abrupt temperature changes, and have not had a problem since.
Color. I have a 100% success rate, but it's possible that the bone will not turn out the color you expect.
I have only used black dye so far, other colors may be different.
Glued-in shields may become unglued!
The simmering weakened the glue on the knife in this article, and the shield fell out.
Glued-in shields fall out quite often anyway, so this isn't really a big deal.
If your shield falls out or becomes loose, simply clean off the old glue, degrease the shield and the hole, and glue it back in.
I found that gel-type super glue works very well for this. I had a shield fall out on another knife, and glued it back in with super glue gel. Unfortunately, I didn't get it quite straight, and I had a hell of a time getting it off.
Boiling didn't work, and I ended up heating it for several minutes with a soldering iron before I could prise it out.
If the shield does fall out, it may actually be a be a good thing because your repair may well be stronger than the factory glue...
With that lengthy preamble out of the way, the actual process of dyeing may seem a bit anticlimactic!
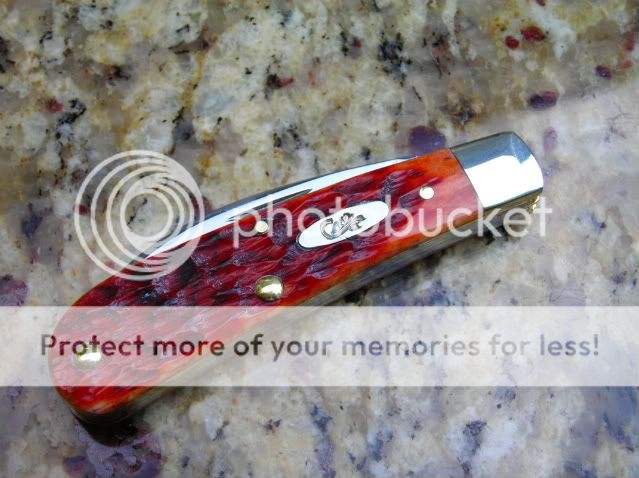
For this article, I dyed a Colt congress in stag bone.
It's a VERY nice knife, I love the congress pattern anyway, and this is a superb example.
Nice thick heavily jigged bone scales, perfect fit and finish, half stops on all blades, and beautiful long pulls and swedges. All for the princely sum of $15!
The only thing I don't really like about this knife is the color of the scales, but we can fix that
I actually bought this knife with the express intention of dyeing it.
So, without further ado, let's get busy dyeing!
Like an idiot, I forgot to take a 'before' photo, so I borrowed one from the internet.

Degrease the knife.
This may be as simple as washing with dish soap. Knives are oily, and this may hamper the dyeing process.
We want to get rid of any oil, grease, or wax so that the dye can penetrate the bone.
On the knife in this tutorial, I noticed that water would run off the scales as if they had a waxy coating.
I decided to degrease the scales with 'Easy Off' fume-free oven cleaner.
This is the type of oven cleaner that doesn't have sodium hydroxide in it (I thought NaOH might damage the metal parts of the knife) and it seemed to do a good job.
Edit: regular sodium hydroxide based oven cleaner works great too.

Put the knife to be dyed in the smallest saucepan you have that it will fit into, and add just enough water to cover the knife. Add a few drops of dishwashing liquid, brand is not important.

Slowly bring the water to a simmer.
Once the water is simmering (but not boiling), dump in the dye.
I used 'Tintex' brand dye, but any similar clothing dye should work.
I used the whole pack (2oz).
Tintex comes with salt added, but with some dyes you need to add your own salt.
If your dye instructions tell you to add salt, do not skip this- the salt is important. We'll wash the knife thoroughly afterwards anyway.
Cover, reduce heat and simmer for around fifteen minutes.

It's ok to check progress by lifting the knife out of the dye with tongs, but do not be tempted to rinse it off with water, as this may cause an abrupt temperature change and damage the knife.
Just have a quick look, and then put it back into the dye.

After fifteen minutes or so, turn off the heat and allow the pan and it's contents to cool naturally.
When the contents of the pan are reasonably cool, remove the knife with tongs and place it on a paper towel to finish cooling.

Flush the knife thoroughly with water to get rid of excess dye.
Carefully open all of the blades and use Q-tips to get into all the nooks and crannies.
Dry the knife thoroughly.
At this point, I suggest a good oil bath to condition the surface of the bone, and also to protect the metal.
I saturated my knife in mineral oil and let it sit for half an hour.

Give the knife a good rub down with a paper towel to get rid of the excess oil and dye.
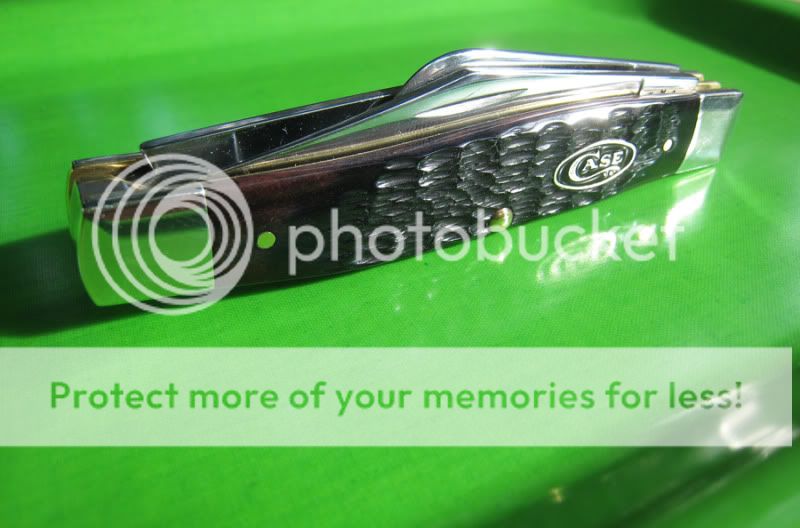
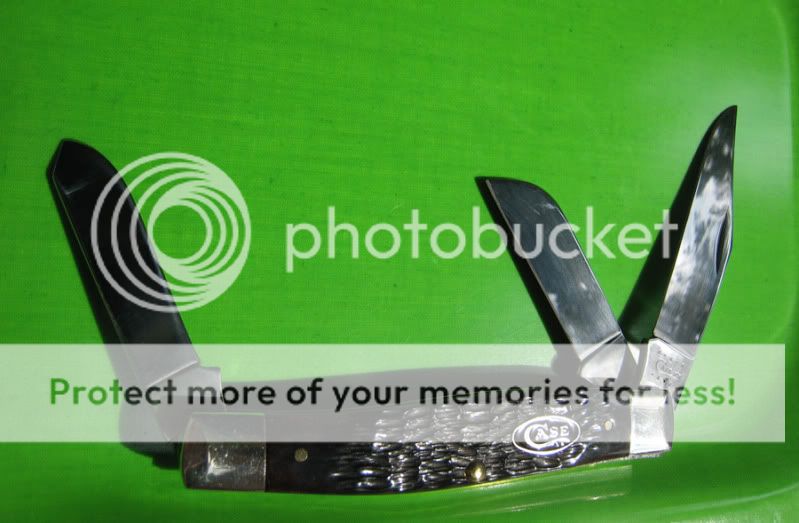
Admire your 'new' knife


This method can also be used to dye synthetic materials, BUT results are highly variable and the heat can damage many plastics!
If you try to dye plastic, you may get good results, but you do run a very real risk of ruining the knife.
I'd love to hear from people who try this for themselves, especially colors other than black, or materials other than bone, like stag for instance.
A google search will turn up loads of information about mixing colors, overdyeing etc.
I was only really interested in black, but I bet there are some really interesting effects that could be achieved with a little experimentation.
I hope you enjoyed this tutorial.
If you decide to try this, please post your results for others to see
I've had very good results with the following method, but please be aware if you decide to try this that there are many factors involved and something could go wrong and ruin your knife.
Please don't attempt this on a knife that has sentimental or financial value, and don't blame me if you damage your knife, I'm only relating my personal experience.
There are many reasons why you might want to dye bone scales:
You got bored with the color of a favorite knife.
You found a knife you really want, but it's not available in a color you like. (perhaps a Case CV peanut?)
You've seen all of those photos of vintage knives, and just can't understand why black or very dark brown scales are so ubiquitous on old knives, yet so rare on modern knives.
At some point or other, all of the above reasons have applied to me, and I'm sure there are many more.
In my quest to find a good way to dye bone, I came across an awful lot of posts on this forum and others like it by people who wanted to know how.
Unfortunately, I didn't find much in the way of useful answers.
I have experimented a great deal, and have come up with what I believe to be a satisfactory method of dyeing bone, with the following benefits:
The dye used is readily available, and safe for home use.
The dye is water based. The process uses no nasty solvents.
The bone scales can remain on the knife during the dyeing process.
The materials are inexpensive, and no special equipment is required.
The process is very fast. A lot of the methods I read about require long dye baths in the order of weeks to months, extensive pre-soaks in various oils etc.
This method achieves good penetration in minutes.
With that out of the way, some disclaimers are in order:
The process involves the use of boiling water, and also makes the knife hot.
The knife will not get hot enough to alter the properties of the steel, but will burn skin if touched before it has a chance to cool.
I have dyed quite a few knives without problems, but heating/cooling bone may possibly cause cracks, especially if the dye is accidentally allowed to boil.
This has not happened to me, but is a theoretical risk.
I did experience a broken backspring.
I put a knife in a stream of cold water to check the color, and plunged it back into boiling dye....
Ping!
The lesson here is that any temperature changes should be gradual.
I have modified the process to ensure that there are no abrupt temperature changes, and have not had a problem since.
Color. I have a 100% success rate, but it's possible that the bone will not turn out the color you expect.
I have only used black dye so far, other colors may be different.
Glued-in shields may become unglued!
The simmering weakened the glue on the knife in this article, and the shield fell out.
Glued-in shields fall out quite often anyway, so this isn't really a big deal.
If your shield falls out or becomes loose, simply clean off the old glue, degrease the shield and the hole, and glue it back in.
I found that gel-type super glue works very well for this. I had a shield fall out on another knife, and glued it back in with super glue gel. Unfortunately, I didn't get it quite straight, and I had a hell of a time getting it off.
Boiling didn't work, and I ended up heating it for several minutes with a soldering iron before I could prise it out.
If the shield does fall out, it may actually be a be a good thing because your repair may well be stronger than the factory glue...
With that lengthy preamble out of the way, the actual process of dyeing may seem a bit anticlimactic!
For this article, I dyed a Colt congress in stag bone.
It's a VERY nice knife, I love the congress pattern anyway, and this is a superb example.
Nice thick heavily jigged bone scales, perfect fit and finish, half stops on all blades, and beautiful long pulls and swedges. All for the princely sum of $15!
The only thing I don't really like about this knife is the color of the scales, but we can fix that
I actually bought this knife with the express intention of dyeing it.
So, without further ado, let's get busy dyeing!
Like an idiot, I forgot to take a 'before' photo, so I borrowed one from the internet.

Degrease the knife.
This may be as simple as washing with dish soap. Knives are oily, and this may hamper the dyeing process.
We want to get rid of any oil, grease, or wax so that the dye can penetrate the bone.
On the knife in this tutorial, I noticed that water would run off the scales as if they had a waxy coating.
I decided to degrease the scales with 'Easy Off' fume-free oven cleaner.
This is the type of oven cleaner that doesn't have sodium hydroxide in it (I thought NaOH might damage the metal parts of the knife) and it seemed to do a good job.
Edit: regular sodium hydroxide based oven cleaner works great too.

Put the knife to be dyed in the smallest saucepan you have that it will fit into, and add just enough water to cover the knife. Add a few drops of dishwashing liquid, brand is not important.

Slowly bring the water to a simmer.
Once the water is simmering (but not boiling), dump in the dye.
I used 'Tintex' brand dye, but any similar clothing dye should work.
I used the whole pack (2oz).
Tintex comes with salt added, but with some dyes you need to add your own salt.
If your dye instructions tell you to add salt, do not skip this- the salt is important. We'll wash the knife thoroughly afterwards anyway.
Cover, reduce heat and simmer for around fifteen minutes.

It's ok to check progress by lifting the knife out of the dye with tongs, but do not be tempted to rinse it off with water, as this may cause an abrupt temperature change and damage the knife.
Just have a quick look, and then put it back into the dye.

After fifteen minutes or so, turn off the heat and allow the pan and it's contents to cool naturally.
When the contents of the pan are reasonably cool, remove the knife with tongs and place it on a paper towel to finish cooling.

Flush the knife thoroughly with water to get rid of excess dye.
Carefully open all of the blades and use Q-tips to get into all the nooks and crannies.
Dry the knife thoroughly.
At this point, I suggest a good oil bath to condition the surface of the bone, and also to protect the metal.
I saturated my knife in mineral oil and let it sit for half an hour.

Give the knife a good rub down with a paper towel to get rid of the excess oil and dye.
Admire your 'new' knife


This method can also be used to dye synthetic materials, BUT results are highly variable and the heat can damage many plastics!
If you try to dye plastic, you may get good results, but you do run a very real risk of ruining the knife.
I'd love to hear from people who try this for themselves, especially colors other than black, or materials other than bone, like stag for instance.
A google search will turn up loads of information about mixing colors, overdyeing etc.
I was only really interested in black, but I bet there are some really interesting effects that could be achieved with a little experimentation.
I hope you enjoyed this tutorial.
If you decide to try this, please post your results for others to see
Last edited: