Edge Pro Sharpening Tips, Mistakes, and Lessons Learned

Joined
Nov 19, 2014
Messages
2,633
I have used Edge Pro Apex to sharpen my knives for 5 years or so now.
I think I can now create a nice keen edge that looks nice as well.

I was encouraged by a few members to put my sharpening procedures and use tips for Edge Pro together as a thread, with my "lessons learned" from ruining a few good knives along my development of sharpening skills.

Here I document a sharpening session, in which I reprofiled an obtuse factory edge to 15 DPS.

For basic sharpening concepts and practice, please see another very useful sticky thread.
(Other resources summarized by @Henry lombard)

Hopefully, this thread is helpful for some Edge Pro users.
Let me know if you have questions or need some clarifications.
Additional tips would also be appreciated.


Tentative PDF version available here
(Feb 19th, 2021)
 
Last edited:
The knife: Baladeo slip joint knife, stainless steel blade
System used: Edge Pro Apex with a small-knife attachment and stage magnet
Stones used: Venev diamond #150, Congress Tools Moldmaster silicon carbide stone #400 mounted on stone blanks, Edge Pro aluminum oxide stones #600 and #1000, DMT Aligner EEF diamond stone
(I use double-sided tape to secure Moldmaster on blank. You can remove it by torching the blank or dipping them in boiling water)
Tips4.jpg


Disclosure: In my regular sharpening, I use Venev diamond stone #150 and that alone, as I prefer a coarse toothy edge. Also, the fine aluminum oxide stones may not work for high alloy steels like S35VN, as carbides in these steels are harder than the abrasive. I would either stop at #400 or less, or use fine diamond stones for these steels.

Tips: If you use stones from different manufacturers, check and compare there grit rating systems. A finer stone from one source may have larger abbrasives than a coarser stone from another vendor (thanks jjg6319 jjg6319 !).
https://docs.google.com/spreadsheet/ccc?key=0Aj58bmHF7wCtdDg4RjBaOFJhZXI1RHFsM2F4N1JpVGc&usp=sharing
(Courtesy of @Komitadjie)

Hardest lesson learned: Do not sharpen your expensive knives until you know you can make good results with the system!! Just practice with cheap knives.
 
Last edited:
Sharpening Procedures

1. Inspect the stones

Make sure that all stones are reasonably flat by laying them on a flat surface and inspecting light penetration through the gap.
Tips3.jpg


Tips: If they are not flat, you can flat them using Edge Pro stone leveling kit or similar DIY bits. For Moldmaster, I just replace them with new ones, since they are cheap. Moldmaster stones may not come super flat (thanks jjg6319 jjg6319 !).
Lesson learned: Edge Pro #120 silicon carbide stone dishes fast. If you use dished stones, you know what happens......


2. Soak stones in soapy water

Tips: Some stones like the Moldmaster stones need soaking. But some others like Venev and Edge Pro stones not so much.


3. Protect the blade with masking tape

Tips1.jpg


Tips: Use good masking tape. Cheap ones leave some residues. It is a good idea to tape the table as well. The one used in the above picture was a crappy one. Ready Post clear packing tape of USPS was recommended by a member (see a post below).
Lesson learned: If you don't do this, you will have scratches on your beautiful blade!

Bullnose_edge.jpg

This carbon steel blade gets patina, so I did not care.....
 
Last edited:
4. Adjust the blade table

Tips5.jpg


In this example, I used the small blade attachment.

Tips: Find a position where the knife is stable. Make the edge sticking out enough of the table.
Lesson learned: There was a point where the edge was shy of the table, and stones grind the table instead of the edge, resulting in a weird edge line. Make sure the entire edge is sticking out of the table!


5. Measure the angle of the primary grind

Lay the blade on a flat surface and put an angle cube on the blade.
Tips2.jpg

(This shown number is off because the table was not flat. It was actually 6.6 degree)

The angle is inclusive, and half of it is the primary bevel angle, which is gonna be used in the next step.


6. Set the stone angle

Put the coarsest stone on the blade, and measure the angle using an angle cube.
Keep the number somewhere, as this is the angle you keep for all stones.
Tips6.jpg


The edge angle is calculated as follows.
Angle.jpg

My Edge Pro has the stage angle of 29.5 degree. Yours may be different.

So, for this blade (3.3 primary grind angle), if I want the edge angle to be 15 DPS, I need to set the stone angle to 11.2 degree (29.5-15-3.3).
Keep the number somewhere for future sharpening (I keep them in a text file, thanks M maximus83 !).

Tips: In this example, I sharpened at 15 DPS to amplify edge inconsistencies. But I do recommend to sharpen at the factory angle. To do so, paint the entire edge bevel with Sharpie (or several lines across the edge bevel at a few places). Attach a fine stone like #600 and set the arm angle at 18 degree on Edge Pro. Swipe the edge lightly and see how much Sharpie is taken off. If it is wiped for the entire edge bevel to the apex for most part, that is the factory angle. If not, put Sharpie again and find a setting to wipe it off. Then, measure the stone angle with an angle cube. Use that angle for all stones. You can also calculate the factory angle as the above illustration.
(A few more tips for the sharpening angle are available below)

Lesson learned: I just used the angle setting of Edge Pro. I realized that some stones do not reach the apex because they are thicker than the others! So, I tried an adjustment collar, and that failed. Angle cube is much better and consistent.

You can see only the top portion of the edge bevel is polished, but not near the edge.
Tolk_edge.JPG
 
Last edited:
7. Set the blade on the table

Again find a position where the knife can be held stably and comfortably. Edge Pro stage magnet helps tremendously in this regard. I cannot live without it! (thanks @krazichinaman for heads-up)

Tips: Remember how you hold the blade on the table and keep the position throughout the sharpening session.
Lesson learned: I shifted the position during grit progression. The tip was the most shifted point. That changed the sharpening angle at the tip (to greater angles over time). I ended up a dull tip because only finer stones touched the edge there.

Wasp_tip2.jpg


8. Initial grinding with the coarsest stone

I use back and forth motions to remove some metal from one side of the blade, probably like 10 strokes.
Just a tiny bit of pressure to the blade, in addition to the weight of the stone and the handle.

After 10 or so strokes, I check how far the scratches away from the edge.
If they are too far, I do 10 more strokes and check the scratches again.

As you proceed, you would notice areas where scratches are farther away from the edge than other areas.
Typically, you would have under-ground areas near the tip and heel (see 10).

Tips: Make sure that the stone grinds the heel area sufficiently. Do not drop the stone off the tip. This will round the tip. Stop the stone when the tip reaches the midline of the stone. Use light reflection or a loupe to spot these problem areas. Do not grind too much at this point. I would not let the stone to touch the edge yet.

Lesson learned: I have rounded the tips of many blades.....


9. Clean the stone

Rinse the stone with soapy water.
Wipe the stage and the blade with paper towel.
I do this every time I inspect the edge.

Lesson learned: If you are lazy and don't clean them, you will have scratches on the blade. Also, the final finish may not be clean because coarse grits may remain throughout the session, especially for polished finish.


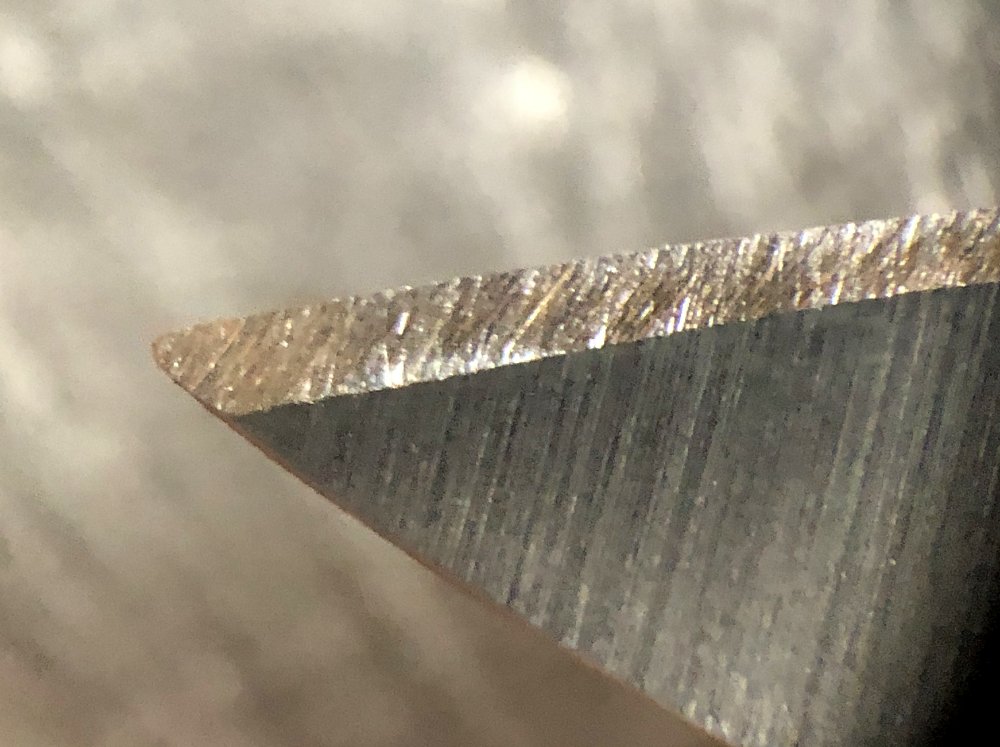
10. Aligning the scratch pattern

Now you know which areas need more attention.
So focus on these areas to grind with the coarsest stone.
The goal here is to make the scratches away the same distance from the edge.
Tips7.jpg

(What's visible here are the micro bevel, original edge bevel, and new scratches by the #150 stone from left to right)

Tips: These areas can be quite small. In that case, I use a corner of the stone to grind specific spots. When you have a sopt near the tip, use very short motions to grind and avoid rounding the tip.
Tips13.jpg

This is somewhat typical. You can see that the stone already grinds the tip but not the apex anywhere else.

Also, you tend to have issues near the heel. Again, use a corner of the stone. Sometimes you have to remove some materials off from the choil or ricasso. Below shows how I do it.

Stone_tilting.jpg

Left, the entire width of the stone grinds the blade. Right, by tilting the stone, one corner or edge of the stone grinds the blade. You can grind a small area this way. Sorry for the bad illustrations!

Also a video demonstration.

This is a video tutorial touching on the same issue (thanks M maximus83 !)

Lesson learned: I ignored these areas and just sharpened the entire edge bevel regardlessly. This resulted in removing more materials off from other areas and altered blade shape.
 
Last edited:
11. Raising a burr

Once the scratches are somewhat aligned in most parts, perform back-and-forth grinding from heel to tip to raise a full-length burr.
With a coarse stone, you can easily feel the burr with you nail or on the fingerprint.
It may even be visible (on another knife, another day).
Burr.JPG


You can also check if the stone grinds all the way to the edge using a loupe.
Tips14.jpg


Tips: I normally stop at this grit. To make the edge more aesthetically pleasing, I perform full-length single strokes from heel to tips about 10 times. This makes a nice uniform scratch pattern.
Tips11.jpg


Lesson learned: A few times, I did not check the edge and failed to raise a burr at the tip. I realized after cleaning up everything and had to set the system back again.....


12. Taking care of the other side

Repeat 8~10 for the other side.
I just flip the blade and do not measure the stone angle (to prevent my OCD from kicking in).


13. Burr removal

Once you raise a burr on the other side, you should deburr the edge.
I flip to the side I start with, on which the burr is now hanging, and run the stone from heel to tip in one single motion with just the weight of the stone and the Edge Pro arm.
You can feel the stone grind the burr off.
Then five more very light strokes.
Flip the blade and two light full-length strokes from heel to tip.
Flip again and a single stroke.
Flip and a single stroke.
Flip and the final single stroke.
After this, the blade should cut paper towel cleanly.
Tips15.jpg


Lesson learned: I did not deburr and just proceeded to a next grit. Ended up with a lingering burr raised by the coarsest stone after the finest stone. Not sharp at all!
 
Last edited:
14. Chasing the grit

Now the edge bevel is set and consistent, you can easily grind the apex with finer stones.
Just make sure the stone angle is consistent at each stone.
In this example, I did 20 full-length strokes on each side at each stone.
Deburr at each stone as described in 13.

During reprofiling (the stone had not ground to the apex yet)
Tips17.jpg


After #1000
Tips16.jpg

(You can see I removed some materials from the ricasso to grind the heel area)

15. Putting micro bevels

This is optional.
I run the blade a couple times for each side on DMT EEF stone with a slightly raised angle.
This will create small micro bevels, which allow you to revive the edge using this stone, even in the field, many times before full sharpening.

Tips: This particular stone refines the edge pretty well and eliminate the necessity of stropping. At this point, the edge should be hair-whittling sharp regardless of the finishing grit, even after #150.
(I stopped at #150 for this one)

Lesson learned: I used to use strops, either leather or balsa, loaded or not. Somehow it did not work well for me, especially for toothy edges. I ditched strops entirely.


16. Final edge refinement

There may be a lot of different ways to refine the edge, but this is my way.

Running the edge lightly on thumb nail a couple of times.
Cutting into cork a couple of times.
Run the edge lightly on hard wood surface or plastic a couple of times.
The cutting ability should be retained after these steps.
If not, I go back to DMT EEF.

Lesson learned: I got a seemingly sharp edge. I cut cardboard once and the edge was gone. I found flat spots, which I think a collapsed burr. Some burrs can be really sharp but weak!
 
Last edited:
Misc tips and lessons learned

For knives with insufficient sharpening choil or without it
For these knives, sharpening near the ricasso might be difficult. Spyderco knives without choil tend to have a "bump" in front of ricasso, which makes the heel hard to reach. I just remove the bump using a corner of a coarse stone first. Also, a stone might hit and ride the ricasso for some knives with insufficient choil. This may cause over-grinding of the area in front of the heel, as a corner of the stone grind more from that area. I made a few knives "recurve" that way.

Original with a continuous curvature. This knife has an insufficient sharpening choil.
Tolk-EdgePro.JPG


After "bad" sharpening.
Tolk_size.JPG

(You can see that the area below the logo became recurved, as the stone rode on ricasso and its corner ground the area more....)

The area near the heel is not sharp
Even for a knife with a proper sharpening choil, you can end up with the heel area unsharpened. The heel area tends to be ground insufficiently because a stone scratches there very transiently. So, when I put a stone at the heel to start motion, I purposely start with more of an upward motion rather than lateral motion to make sure the stone grinds the area enough.

Edge bevel became too wide after reprofiling
Most factory knives have edge angles like 18~21 DPS. Some of them may seem to have very small edge bevels and to be thin behind the edge bevel. But it is probably because the edge angle is quite obtuse. So, if you reprofile them to a much lower angle like 15 DPS, you will end up with a much wider edge bevel than the original.
Bevel_widened.jpg

(The original narrow bevel (top) was much widened after reprofile (bottom))

The blade shape is somewhat different after reprofiling
If you reprofile a typical factory edge to 15 DPS, you will need to remove a lot of material. When you remove a lot of metal at once, you tend to remove them from certain spots nonuniformly rather than from the entire edge uniformly. This is due to uneven factory bevels as shown above. If you use a fast-cutting stone, when you notice that unevenness, it may be too late, and the edge line is already deformed. So I do not recommend to reduce the edge angle too much in one single sharpening session. It it better to do that over a few sessions, for example 20 DPS at first, 18 DPS at second, and 15 DPS at third.

The edge bevel is wider on one side than the other
It is typical to have uneven primary bevel on factory knives and therefore to end up with uneven edge bevel width. For the uneven edge bevel, you have two options. One, you can sharpen the narrower side more than the other intentionally in future sharpening sessions, and the difference is going to be corrected over time. Do not try to correct the difference in one single sharpening session! Two, you can sharpen at different angles to match the bevel width.

The tip is not pointy!
Do not drop the stone off the tip. Edge Pro guide video says that it is OK to do it. But it is not, if you want to preserve the pointy tip. Stop the stone when the tip reaches the mid line of the stone. Also, try to reduce the pressure when approaching the tip because the pressure is focused to the small area. If you don't, the stone will remove more materials from the tip than the rest.

Edit: A few more tips available below.
 
Last edited:
Miso2,

Your post is well done especially with the pictures and i have some comments or tips for you or others to consider:

TAPE : I learned from ApostleP that a good tape to use to protect a blade is from the US Post Office. It is their Ready Post clear packing tape. It is 1.88in x 800in roll and it is $3.99. You can use this to cover a blade or even the blade table. It is a little heavier than the blue painters tape and holds up well. You can remove it and reapply back to the blade if needed.

Congress Tool Mold master stones. If you go this route you have to make sure they are level. I bought four stones and three were relatively level and the fourth was around 0.030" low on one end. Their tolerance on level is that amount and they apply the tolerance below the thickness you order. My stone was within specification and they would not replace it since the others they had in stock were similar and they would not be running a batch for a while. I dressed it on concrete with the 60 grit SiC powder from EP. Since these stones are SiC they are best dressed on level concrete to save your leveling kit from EP for the Aluminum Oxide Stones.

You choice of stones are a mix of different vendors. If a person is going to do that then compare the micron size on the chart sticky at this site to make sure your sizes line up.

https://docs.google.com/spreadsheets/d/1VaTf3MXuwuvH-QLwOci4f9B9Zhkbuu1wjoSCZIUsR-o/edit#gid=0

You cannot just use the number on the stone(s). I prefer to normally stay within a "family" of stones for consistency as some are sold to work as a system.

If your stones don't seem to be working like they once did them dress them to get the performance back.

I like to use the angle cube to make sure the angle stays the same over the various stones. Like you it seems more reliable than a stop collar.

I know you did not like using strops, but did you try a strop on a EP bank? You can control the angle better with the EP system than just by hand. You are probably less likely to convex the apex using a strop on a EP blank.

Removing a stone from an EP blank can be done by boiling it in water for ~10 minutes. You can then remove it and reinstall a new one just be careful to not burn yourself. Use 3M adhesive Super 77 from Home Depot or Lowes. It is easy to install stones on EP blanks.

Just some random thoughts to help you or others.
 
Thanks for putting this thread together, and with all the pics. Must have taken a lot of work but incredibly useful as stated. Good work!

ETA a couple misc Q's/comments for miso2 miso2 :

- Have you had a chance to try the #80 Venev, or anything in that similar grit range? I like the #150 a lot and is probably my most-used Venev. But when doing a total reprofile to a lower angle and removing lots of metal, was surprised at how much it speeded up my metal removal by switching to the #80. Which reminds me: wonder if we could get @FortyTwoBlades to make us an Edge Pro Manticore for hogging off metal fast? :D

- Great tip on how to fix uneven bevels.

- In step #6, not sure if it's just me but it looks like one image is missing/broken, where you calculate the angle.

- In terms of 'repeatability', thinking about how to sharpen a knife on your EP the next time you sharpen it (I mean actually sharpening/resetting the edge, versus just refreshing the micro-bevels on EEF): Are you doing anything such as writing down details about a knife, what angles and settings you used, or where/how you positioned on the table? Wondering if that is worth doing or unnecessary. I noticed that some of the competition, such as W.E., are providing tools for people to ensure repeatability in subsequent sharpenings. But maybe the delta would be so small it doesn't matter.
 
Last edited:
Execellent tutorial. This explains some of the issues I've been having. My question is can you explain how you got to the 11.2 degree angle for the 15dps? Thanks
 
Yep.
The image link was missing.
I fixed it and hope that now the calculation makes sense.

And thanks for the comments and additional tips.
I will add them to the above posts.
 
jjg6319 jjg6319

I have tried putting tape with compounds on a stone blank, but not directly on the blank.
I have been thinking of taping a piece of glass of a blank and apply diamond suspension.


M maximus83

I have not tried Venev #80.
Thanks for the heads-up.
 
Thanks Miso for putting this together, much appreciated. I was wondering if you show a picture of how you use the edge of a stone at the tip or heel as to not misshapen the edge of the knife. I’ve been struggling in the area. Also do you use any pressure when using the edge of the stone?
 
Bluemantra Bluemantra

I will try to take a video later.

I do not apply pressure just relying for the weight of the stone/handle.
Normally I grind a problematic area with a corner/side of a stone with half inch strokes about 10 times.
Then check the area with a loupe and repeat this until the problem is mostly resolved.
 
miso2 miso2

EP has blank for polishing tapes to give you the additional height to be similar to the stone heights:

https://www.edgeproinc.com/sharpening-accessories/polish-tapes-blanks/polish-tape-blank-p28.html

I was not sure from your above response if you were aware of that.

I tested them and and diamond lapping films.
I even applied diamond suspension to a worn polish tape.
They work some extent, but I did not like the result very much.
It’s probably just me.
Thanks.
 
miso2 miso2 , another item helpful in your write-up was some of your close-up photos. I know from having done a fair amount of photos for my own posts, it can be tricky getting a quality close-up of a knife blade that shows the nuanced edge details, but without being either too dark, or showing excessive glare or reflection. Sometimes I can get mine to come out the way I want using my phone cam on the macro setting, but it's a crap shoot. A couple of your close-up photos turned out pretty nice and show lots of detail (and a couple turned out kinda' blurry too, which MOST of my edge pics do and I have to discard 3 or 4 bad pics for every good one :eek:). For example your 2nd photo in step 3, the first one in step 7, and a couple of those in step 11.

What basic setup and approach were you using to get the close-ups that turned out well?
 
The ones you mentioned were taken with my phone.
I tend to get good ones when I have good secondary sunlight, good blade angle, and good focusing.
I have also tried burst shots and image averaging, which worked fine.
I got lazy this time and just used a loupe in front of my phone.
That is why some photos are blurry.

Edit: Oh, also I fix the focus and move the phone/camera to get the perfect focus.
 
Last edited:
Back
Top