• The BladeForums.com 2024 Traditional Knife is ready to order! See this thread for details: https://www.bladeforums.com/threads/bladeforums-2024-traditional-knife.2003187/
    Price is $300 ea (shipped within CONUS). Now open to the forums as a whole. If you live outside the US, I will contact you after your order for extra shipping charges. If there are customs issues? On you.

    User Name
    Serial number request
  • Merry Christmas and Happy Hannukah from all of us here on BladeForums! We hope that your holidays are filled with cheer!

Faux tiger stripes in maple?

Joined
Jul 26, 2008
Messages
1,006
I read somewhere that in order to get that really high contrast striped look on maple, some gun makers will start off with maple that has very little natural figure and basically paint in the individual stripes with dark brown dye and a fine brush. Has anyone used this on their knife handles for maple?
 
A block of stabilized maple with fiddleback figuring costs 25-45$. Wouldn't be worth my time to do something like that. On top of that I find my own highly figured wood and get it stabilized...costs me about 6$/block.

I have a fair bit of experience with woodworking and I know of a variety of ways to get grain to pop, but I've never heard of painting on figuring with stain like this. Maybe they do it. I've just never heard of it.
 
I did that once on a .22lr as a teenager because I wanted to mimic a laminated stock. It didn’t turn out terrible but never again.
I know people enhance tiger or curly maple with aqua fortis, could be the look you are after ?
 
Some of the old muzzle loading mags used to talk about wrapping a cord around stocks with some flammable on it and setting it on fire to stimulate tiger stripes
 
I suppose you could do it, but why?
I mean you can't sell it and say that it's curly, or tiger stripe...
 
If you dye the curly maple with dark amber, brown, or diluted black first, steel wool it, then apply an amber dye, it looks a lot like aqua fortis. This is common with luthiers to bring out the figure in mid grade wood.

This was done with this technique, I got 2a curly maple from Windsor plywood. Finished with Tried and True varnish oil. (Quite similar to Tru-Oil.)

4953C1A4-CF3B-44FF-B1EB-A2D1CF1C7D67 by Wjkrywko, on Flickr


3C89F831-4BB3-4C6F-A9A9-45DCEA063B73 by Wjkrywko, on Flickr
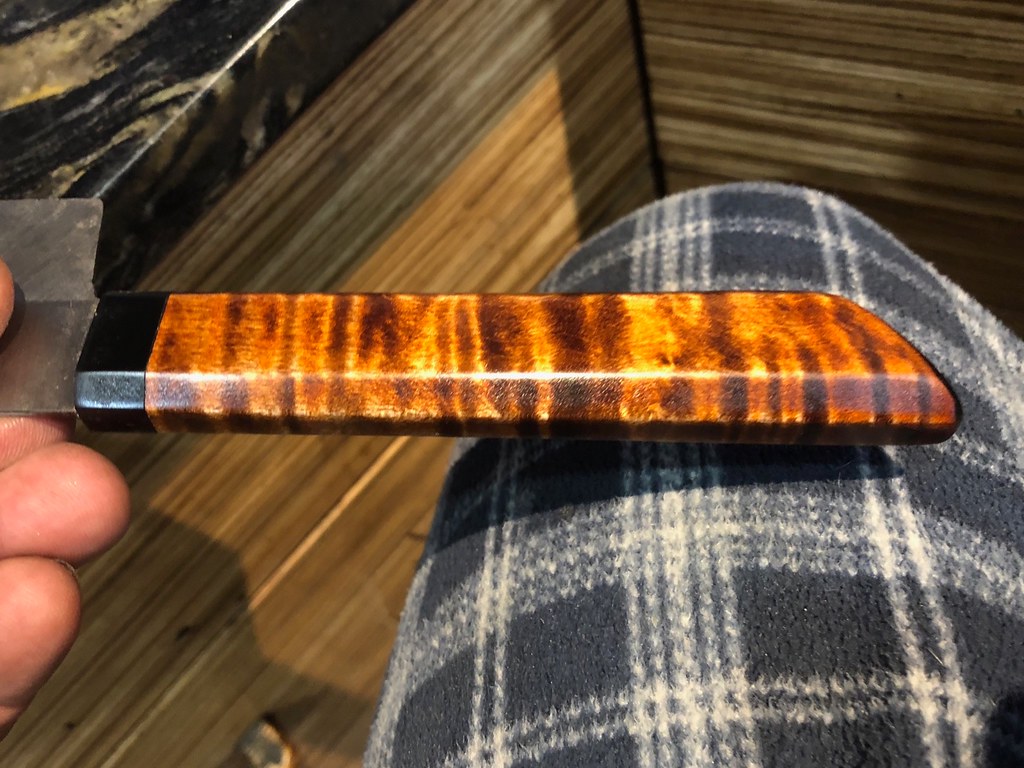

2A68FB33-4504-4CFD-81D9-0D3702FF6A8C by Wjkrywko, on Flickr

Happy camper:

1F4B0D6A-219D-4DFC-ACA3-F377E0DBA448 by Wjkrywko, on Flickr


The wood had curly figure in it to start with, but it was brought out with a few tricks.

The paring knife was done the same way. It came out a hair darker, but when side by side with the first knife made last year, it’s pretty close. The lighting in my shop is really bright, so the camera on auto adjust darkens the pics. It’s much closer in person.

488F3CE5-902A-46B9-A736-EF1BB498261F by Wjkrywko, on Flickr
 
I do a similar process to what Willie71 Willie71 described on rock and roll drums. Started with figured wood, apply heavy coat of dark analine dye. Sand back and dye will come out of the harder parts of the grain, but stay in the softer parts. Then dye with a lighter coloured stain. Works really well on quilted or fiddleback maple.

Process is here.

This wouldn't work with stabilized wood? I think it wouldn't accept dye/stain the same way that unstabilized wood would.
 
Last edited:
If you dye the curly maple with dark amber, brown, or diluted black first, steel wool it, then apply an amber dye, it looks a lot like aqua fortis. This is common with luthiers to bring out the figure in mid grade wood.

This was done with this technique, I got 2a curly maple from Windsor plywood. Finished with Tried and True varnish oil. (Quite similar to Tru-Oil.)

4953C1A4-CF3B-44FF-B1EB-A2D1CF1C7D67 by Wjkrywko, on Flickr


3C89F831-4BB3-4C6F-A9A9-45DCEA063B73 by Wjkrywko, on Flickr


2A68FB33-4504-4CFD-81D9-0D3702FF6A8C by Wjkrywko, on Flickr

Happy camper:

1F4B0D6A-219D-4DFC-ACA3-F377E0DBA448 by Wjkrywko, on Flickr


The wood had curly figure in it to start with, but it was brought out with a few tricks.

The paring knife was done the same way. It came out a hair darker, but when side by side with the first knife made last year, it’s pretty close. The lighting in my shop is really bright, so the camera on auto adjust darkens the pics. It’s much closer in person.

488F3CE5-902A-46B9-A736-EF1BB498261F by Wjkrywko, on Flickr


Thanks! That looks great!
 
Back
Top