- Joined
- Mar 25, 2014
- Messages
- 2,010
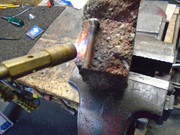
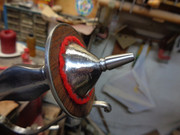
Mrs. Martino, I have been silent again for a while, but did get some work done a few weeks ago before spending some time with a couple of Doctors again. Here are a few photos that may be of interest to you. The first three photos show the bolt being replaced with a much more robust one. It definitely locked the blade into position. The hand guard was modified to accept the new bolt and then mounted. Images 4-7 show the handle/grip/finial dressed up. After examining several swords on the Internet and seeing the variety of styles and embellishments--well, you can see the results. A black walnut disc was installed and a steel finial turned by hand and attached. A red felt disc lies under the cone for the finial. The last photo is the completed sword. Look closely at the ends of the cross guard and you will notice additional red felt. The gap between the blade and the side guards was filled with the felt simply to dress the sword up and hide the handles guts. Over all, it is in fine shape, perhaps not as it may have been originally, but it is an eye catcher....and it COULD be used! Have about 42 hours in the project over all.