You are using an out of date browser. It may not display this or other websites correctly.
You should upgrade or use an alternative browser.
You should upgrade or use an alternative browser.
Frame handle hunter WIP...hope this isn't a disaster
- Thread starter Bob Ohlemann
- Start date
- Joined
- Mar 4, 2010
- Messages
- 661
Bob, I like where this is heading. Good plan to do the 2 blades. Any time I start with something new I will do 2 or 3 and pick the best one.
Staying tuned in
Bing
Staying tuned in
Bing
timos-
Knifemaker / Craftsman / Service Provider
- Joined
- Oct 22, 2012
- Messages
- 2,142
nice wip started , looking forward to seeing this finished out. Also, I have been told by at least one experience guy that you can grind bevels post heat treat and the hamon will be there, Id like to hear others thoughts on that. Cant wait to see the finished results.
- Joined
- Oct 13, 2011
- Messages
- 1,774
looking forward to this one too.. glad you took the advice you did. i think that blade style and curved guard are gonna look spectacular with this set up... now lets see some more pics!
Willie71
Warren J. Krywko
- Joined
- Feb 23, 2013
- Messages
- 12,214
Ok, the W2 did a little U.S. tour thanks to FedEx but it is finally here. I ordered the bronze from McMasters and it is here as well and I just got a shipping notice from High Temp Tools that my Satanite has shipped. I've read several threads discussing HT of W2 and watched a couple good Youtube vids on creating the hamon. Still, I have questions. With the stainless steels I am accustomed to working, I grind the bevels after HT. I assume I will need to grind my bevels first on this knife in order to be able to develop a good hamon. My question is, will the pre-HT edge thickness have any effect on the hamon? I'm thinking that I will grind down to about .030" edge for HT and then bring it down to around .005" after.
Another question, edge quench or submerse for the best hamon? I'm of the mind that submersing will give more reliable edge hardness but edge quenching may produce a more striking hamon.
Still have about a weeks worth of other knives before I get started on this one. Just trying to make sure I have a good plan.
Bob
I'm no expert, but have been playing with a lot of W2 for the past 9 months or so. Here is the explanation I gave on another forum of how I heat treat my W2. Don Hanson III is the go to guy with this steel.
Here's what I do. Its what works for me, and you will find what works for you may be different, as it is for each smith.
I rough grind the knife. I get the edge to about 0.040", and have the blade evenly sanded to 120g. The clay doesn't pop off too early for me when I stay at 120g. It was hit or miss when sanded at 400g. Clean all oil, wax, fingerprints before applying clay. Make sure there are no rough edges or gouges, especially around the plunges/ricasso. Make sure there are no leftover scratches from the 60 or 36g belts. They may rear their head during the etch. Some people coat the entire blade with a wash of clay. That doesn't work with me for the brand I use. Try it with and without to see for yourself which you prefer. You don't need a lot of clay, max 1/8" at the thickest.
I let the clay set while I bring the oven up to temp. I use 1460f for W2 and 1095, 1465 for 15N20, and 1440for Hitachi White. I have only done two blades in 1075, and am still experimenting. I found 1450 too cool, and 1475 a bit on the warm side. My next one will be 1460. As a note, the 1075 blades are 1/4" thick, compared to the much thinner kitchen knives. This will affect soak and quench times. I use Maxim DT-48, which is similar to parks 50. In the kitchen blades, I use very thin clay, and I quench 2 seconds, out for three, in for three, out for 5 then finish the quench. I find this really enhances the drama in the ashi. Its safer to use a slightly thicker clay and just quench, but the drama is more subdued. The top kitchen knife in my previous post was done this way. It gives a mix of clay and time/temp activity, with extra cloudy action. You can do the same thing without a commercial oil, by using brine for the first quench to beat the pearlite nose, then subsequent dips in heated canola oil. You will risk a cracked blade every so often, but its mostly safe, maybe...
As the steel gets thicker, it gets a bit easier as a wedge cross section will try to naturally form a hamon. You will need to adjust the heat, amount of clay, and time in and out of quench to get the desired effect.
After tempering. I go back to 120g on the grinder, and clean everything up, then go to structured abrasives in u200, u100, u65, then u45. (approx 150, 220, 320, 400g) I can see the hamon clearly as soon as I get through the decarb in steels that do a hamon well. The 15N20 shows between 220 and 400g, depending on something I haven't quite figured out. The finer you hand sand, the more detail that will come out. The kitchen knives were only sanded to 1000g, as they are users. The finer you go in the kitchen, the more you have problems with food stiction.
I do the first etch in heated white vinegar, about a 15 min soak, then neutralize with windex. Polish with the powdered abrasives mixed with water to a toothpaste consistency. Clean then etch with a makeup pad and heated lemon juice. Focus on the fully hard parts of the blade. Oh, I forgot, put a few drops of dishsoap in the vinegar and lemon juice, it acts as a surfactant. Repeat until you are happy, or are worried you are losing your mind. If you don't have powdered abrasives, you can use rubbing compound from the auto store.
- Joined
- Dec 5, 2013
- Messages
- 1,180
Thanks guys. Warren, really useful stuff there!
Haven't been able to get back in the shop the last couple days but, I did this morning. I got the bevels ground on both blades with the 50grit Blaze then sharpie'd them.
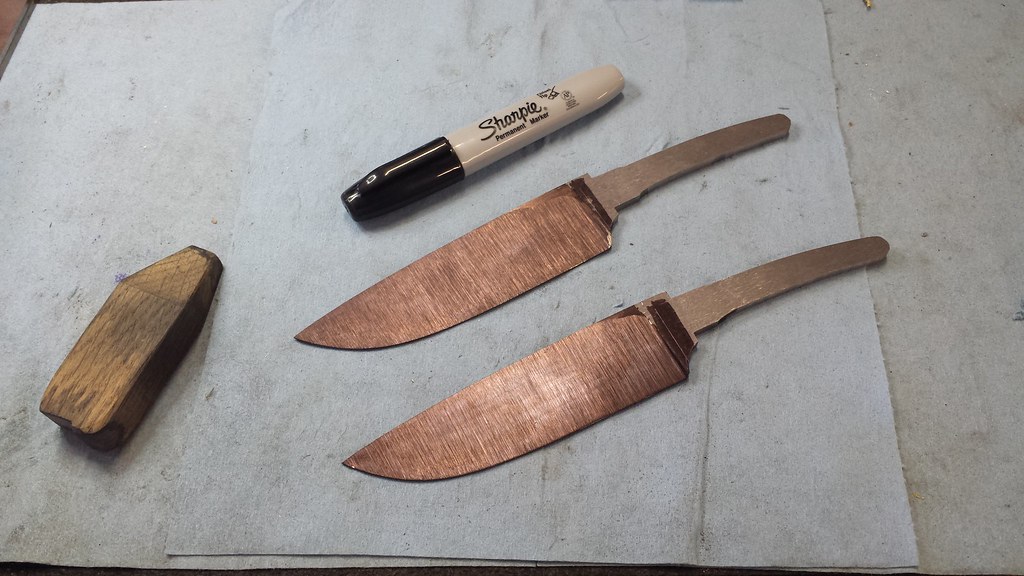 Untitled by Ranger_Bob, on Flickr
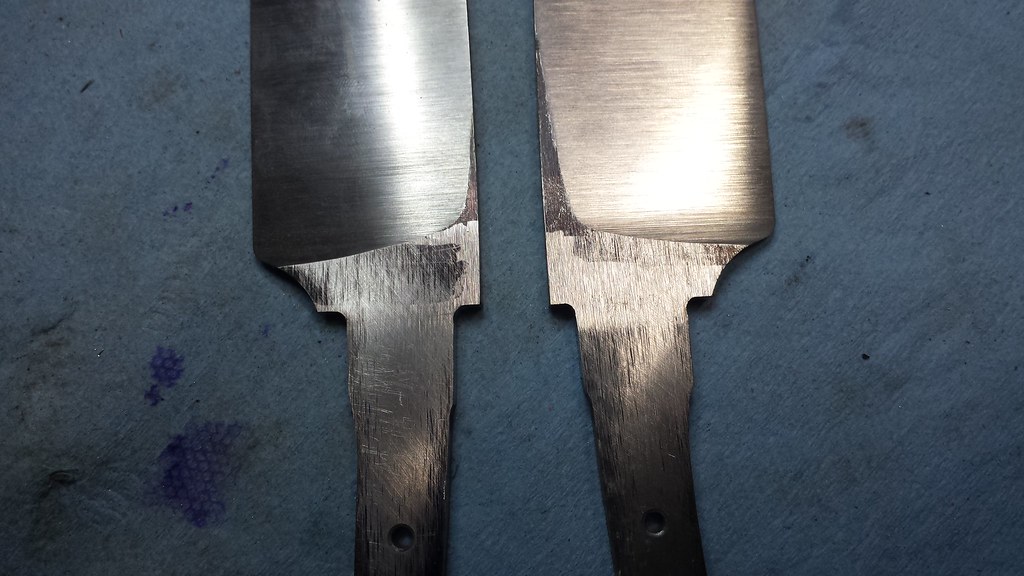
Cleaned the 50grit up with an A160 Gator and called it good for now.
 Untitled by Ranger_Bob, on Flickr
Then I marked and punched for two 1/8" pin holes and drilled and chamfered them. After I put the holes in, I started wondering if they are going to cause any issues during HT such as warping or cracking. I'm thinking they'll be ok since I won't be quenching the tang but, honestly I don't know.
 Untitled by Ranger_Bob, on Flickr
My Satanite showed up the other day but, I still don't have quench oil. I just got off the phone with Maxim and they are shipping me a pail of Parks 50. Even though I live on the edge of DFW, it is worth it to me to have them ship it from Ft. Worth. The traffic between here and there is just a mess with all the construction. I think I'm going to pick up a toaster oven this weekend as well. Everything I've read says to get the W-2 into temper immediately after quench or risk a broken blade. My Evenheat takes a long time to cool down and I don't want to risk it. It will be nice to have the option to temper in a different oven anyway.
Haven't been able to get back in the shop the last couple days but, I did this morning. I got the bevels ground on both blades with the 50grit Blaze then sharpie'd them.
Untitled by Ranger_Bob, on FlickrCleaned the 50grit up with an A160 Gator and called it good for now.
Untitled by Ranger_Bob, on FlickrThen I marked and punched for two 1/8" pin holes and drilled and chamfered them. After I put the holes in, I started wondering if they are going to cause any issues during HT such as warping or cracking. I'm thinking they'll be ok since I won't be quenching the tang but, honestly I don't know.
Untitled by Ranger_Bob, on FlickrMy Satanite showed up the other day but, I still don't have quench oil. I just got off the phone with Maxim and they are shipping me a pail of Parks 50. Even though I live on the edge of DFW, it is worth it to me to have them ship it from Ft. Worth. The traffic between here and there is just a mess with all the construction. I think I'm going to pick up a toaster oven this weekend as well. Everything I've read says to get the W-2 into temper immediately after quench or risk a broken blade. My Evenheat takes a long time to cool down and I don't want to risk it. It will be nice to have the option to temper in a different oven anyway.
- Joined
- Mar 19, 2012
- Messages
- 7,863
Bob I cant tell you how many times I have read, by not making these inside corners a radius that you may develop stress fractures during the quench, I would really hate to see one of your handles snap off while the buyer was using it for a crowbar
Or worse yet the dreaded "tink" noise when you drop the blade in the quench oil

Or worse yet the dreaded "tink" noise when you drop the blade in the quench oil
Last edited:
- Joined
- Dec 5, 2013
- Messages
- 1,180
Bob I cant tell you how many times I have read, by not making these inside corners a radius that you may develop stress fractures during the quench, I would really hate to see one of your handles snap off while the buyer was using it for a crowbar
Or worse yet the dreaded "tink" noise when you drop the blade in the quench oil
John, I appreciate you bringing that up. I think I should make sure I have at least a little radius in there. I think I've still got plenty of meat to work with and will remedy this oversight. Thanks.
I sure hope this knife doesn't get relegated to "crowbar" duty.
Bob
- Joined
- Dec 5, 2013
- Messages
- 1,180
- Joined
- Mar 19, 2012
- Messages
- 7,863
No problem, no thanks required, It boils down to I wouldnt sleep very good tonight if I didnt say something ;0)
I would guess-ta-mate there is a 30% probability that you will sell a knife to someone someday that will use it as a prybar at some point LOL
I would guess-ta-mate there is a 30% probability that you will sell a knife to someone someday that will use it as a prybar at some point LOL
Willie71
Warren J. Krywko
- Joined
- Feb 23, 2013
- Messages
- 12,214
nice wip started , looking forward to seeing this finished out. Also, I have been told by at least one experience guy that you can grind bevels post heat treat and the hamon will be there, Id like to hear others thoughts on that. Cant wait to see the finished results.
Yes, you can get a hamon with flat stock, but a wedge geometry really helps. I try to put even a slight bevel on kitchen knives to help them along.
- Joined
- Dec 5, 2013
- Messages
- 1,180
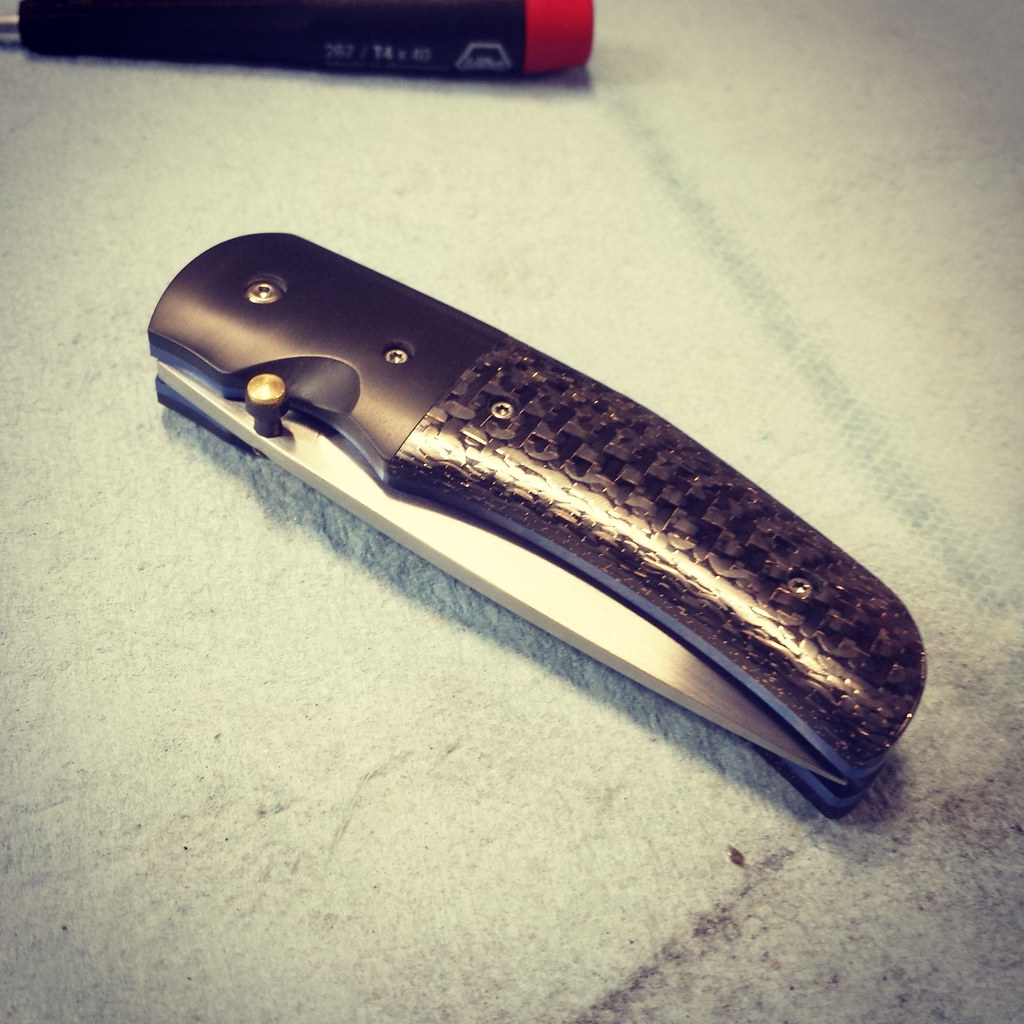
So...I'm still waiting for my quench oil. Not really much I can do until I get the blades HT'ed so I cleaned the shop and re-organized some and did some work on this little linerlock.
AEB-L blade, Titanium liners & back spacer, Zirconium bolsters, and Bronze Lightning Strike Carbon Fiber
 Untitled by Ranger_Bob, on Flickr
AEB-L blade, Titanium liners & back spacer, Zirconium bolsters, and Bronze Lightning Strike Carbon Fiber
Untitled by Ranger_Bob, on Flickr- Joined
- Mar 4, 2010
- Messages
- 661
Bob, Kind of sucks waiting on the quench oil. But looks like your making good use of time waiting. How do you like the Zirc? Looking fantastic so far. I just finished one up for Seattle with Damascus / Zirc and CF.
Thanks for taking us along
Bing
So...I'm still waiting for my quench oil. Not really much I can do until I get the blades HT'ed so I cleaned the shop and re-organized some and did some work on this little linerlock.
AEB-L blade, Titanium liners & back spacer, Zirconium bolsters, and Bronze Lightning Strike Carbon Fiber
Thanks for taking us along
Bing
- Joined
- Dec 5, 2013
- Messages
- 1,180
Bob, Kind of sucks waiting on the quench oil. But looks like your making good use of time waiting. How do you like the Zirc? Looking fantastic so far. I just finished one up for Seattle with Damascus / Zirc and CF. Thanks for taking us along
Bing
Hey Bruce, I kind of like the hold up since it does let me work on a folder. I like the zirc quite a bit. I find it more forgiving to machine than Ti and it grinds easier as well though, the light show is really something and a bit hard on the eyes. The fireballs definitely burn very hot! I saw your knife in the Seattle show thread. Really nice; sure it will go quickly! Thanks for the encouragement.
Bob
- Joined
- Dec 5, 2013
- Messages
- 1,180

- Joined
- Mar 4, 2010
- Messages
- 661
Bob, This is very nicely done. You need to make more folders.
Thanks for sharing
Bing
Thanks for sharing
Bing
- Joined
- Dec 5, 2013
- Messages
- 1,180
...Need my quench oil to show up. Really don't see why it takes two weeks to ship across town. Folder is almost done though...
 Untitled by Ranger_Bob, on Flickr
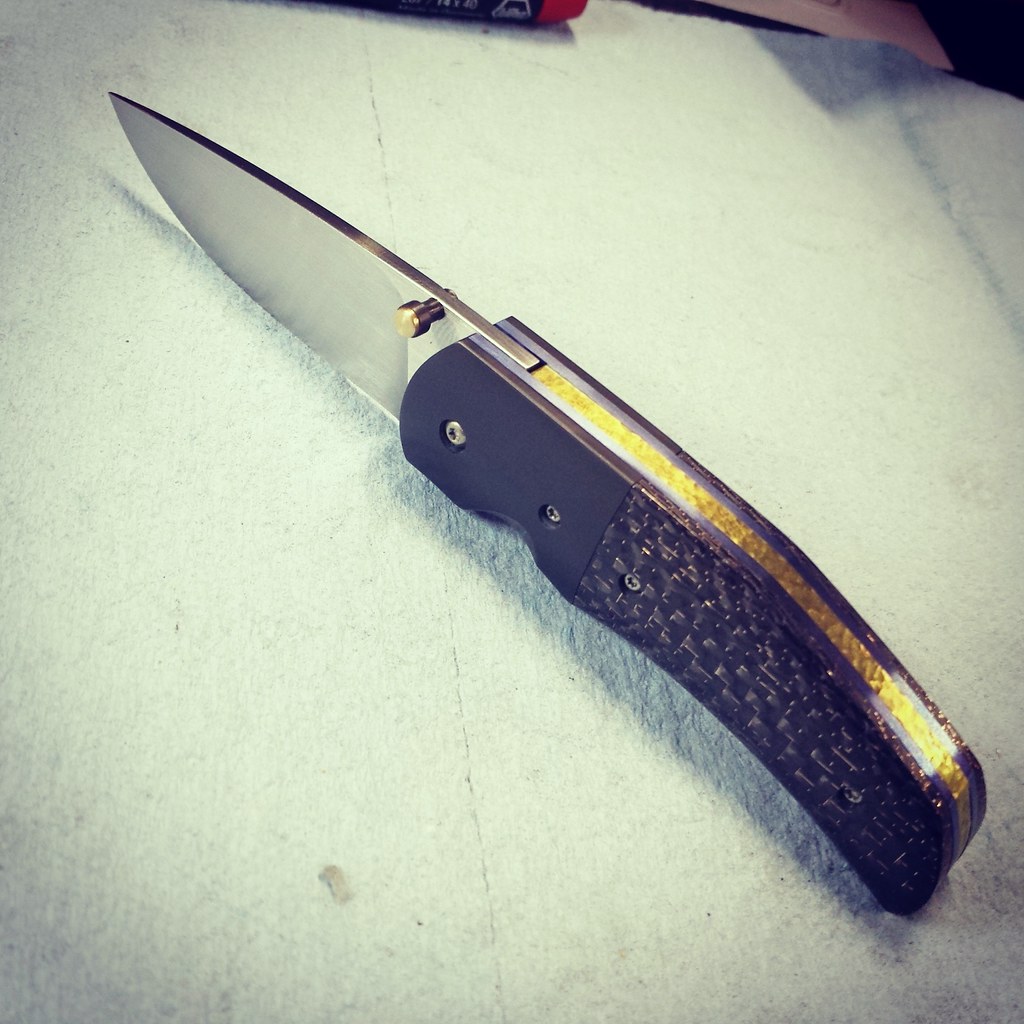 Untitled by Ranger_Bob, on Flickr
Not sure on the color of the backspacer (anodized Ti). It matches the brass insert in the zirc thumbstud and the wire in the CF but, it just seems too bright. Maybe a low voltage bronze would be better. Hoping to get back to the frame handle this week.
Bob
Untitled by Ranger_Bob, on FlickrUntitled by Ranger_Bob, on FlickrNot sure on the color of the backspacer (anodized Ti). It matches the brass insert in the zirc thumbstud and the wire in the CF but, it just seems too bright. Maybe a low voltage bronze would be better. Hoping to get back to the frame handle this week.
Bob
Last edited:
- Joined
- Mar 4, 2010
- Messages
- 661
Bob, Looks good Pal.
For some reason the second photo is not available.
Sending you an email
Bing
...Need my quench oil to show up. Really don't see why it takes two weeks to ship across town. Folder is almost done though...
Untitled by Ranger_Bob, on Flickr
Not sure on the color of the backspacer (anodized Ti). It matches the brass insert in the zirc thumbstud and the wire in the CF but, it just seems too bright. Maybe a low voltage bronze would be better. Hoping to get back to the frame handle this week.
Bob
For some reason the second photo is not available.
Sending you an email
Bing