Hammered finish

Joined
Apr 8, 2015
Messages
25
Hi guys,

Ive been making knives for just under a year. Most of my pieces are a combination of stock removal and hand forging. Most of my learning has came in the way of online forums and youtube. One thing I have been wanting to experiment with is putting a hammered finish on my blades but I really haven't found much info online about the process. Do any of you have much experience with this? And how do you go about it? Heat it, use a ballpein hammer, and then grind your bevel? Thanks.
 
I saw a guy doing it on stock removal knives. He took a hammer, welded some random beads on the head, heated up the blade and hammered away. It looked pretty good when he finished. It was a video and didn't go in to a lot of the details but that's the gist.
 
That would be a cool way to go about it. Pre weld up a special hammer for it. I may have to give that a try.
 
That would be a cool way to go about it. Pre weld up a special hammer for it. I may have to give that a try.

There is a much simpler way to do it.

This is on copper:

A4773396-E16D-4E5C-A44B-D69F33B6C42B_zpstbjunqry.jpg
[/URL][/IMG]

This is on S.S.

1974F6C2-91A3-4883-99C1-A10259EF48C7_zpsgwqaqdn9.jpg
[/URL][/IMG]

Use a dremel with a 9901 or 8803 depending on the divots you want. I used to hammer copper but I deformed some pieces, this method does not deform them. I tried hammering Ti & steel which did not turn out well.

I bought these bits and use the dremel at about a 60 degree angle, dropping the point with light pressure. It takes about 5 minutes and you can get a really good hammered look.
 
You can "carve" them in with carbide ball burrs, of forge them in in hot steel. Carving has its uses and on some projects is the only way. It requires some degree of skill, tools, and polishing ability.

Forging is far simpler.
I use a 16oz. ball peen that I have narrowed the ball into a sort of ball end cone. The ball end is about 3/8" across. Polish the ball each use, so it makes smooth divots. If you don't every defect in the ball will be transferred to the steel...and darn hard to get rid of.
 
That looks pretty good. Have you tried this method on steel?

that pivot in the last picture is steel. It works for all the metals, you just have to change the pressure a little and the application speed (wrist movement). I spent a lot of time doing the ball pen hammer technique and wound up with a deformed piece and it took a ton of time. This method is faster and I have more control of the texture.
 
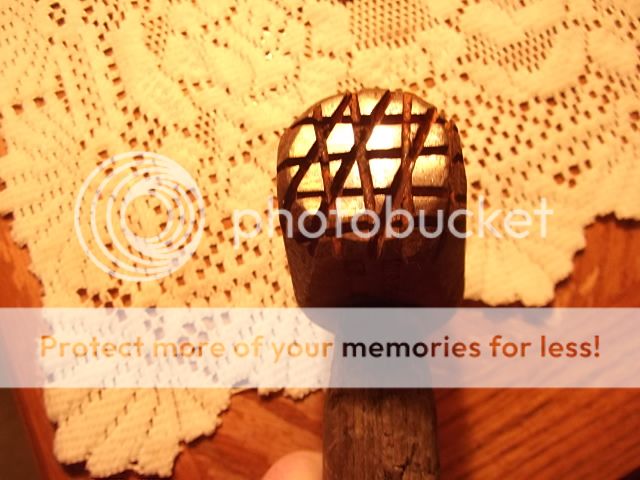
Take an old smaller sledge or an old ball peen hammer and use a cut off wheel on an angle grinder to grind on the flat face of the hammer a bunch of hash tag or tic tac toe type marks in it, and grind some diagonally across those as well. This is just a simple decription and preferably you grind them so they're a bit more random, which looks better IMHO.. Then if you don't forge, you can profile your knife blade, drill the holes in the tang, and then hammer the blade and ricasso area before grinding the bevels. I like to texture mine after I get the profile forged in for the most part. But for heavier texture, I took a 1"x 3"x 1/2" thick piece of scrap steel and made it fit a hardy hole (very crudely) and did the same texture on the face of that which I will use than as a bottom die. In other words, I'll lay the blade on top of that small chunk of steel with it's face textured ("the die") while I hammer in the texture of the other side. I do this so I don't end up flattening out the texture I just hammered in due to the flat anvil surface. Here is a pic of the hammer I use for texuring...


Here is a side shot to show the depth of the cuts made. IMHO I'd say about 1/4" deep cuts are better than shallower, and give better texture..


And here is a kiradashi type blade I used the bottom texture die on so I could get some "gnarly" texturing :D .. This was done at a high forging temp..


A bit closer up on the texture...


Again, there are many ways to go about this and there are many different textures you can make. Using the ball on a ball peen hammer, welding random bumps of weld build-up on the face of an old hammer etc etc etc..

Hope this helps some :)

~Paul

My YT Channel Lsubslimed
 
Last edited:
Take an old smaller sledge or a lot of guys use old ball peen hammers as well and use a cut off wheel on an angle grinder to grind on the flat face of the hammer a bunch of hash tag or tic tac toe type lines in it, and grind some diagonally across those as well. This is just a simple decription and preferably you the grinde so be a bit more random, which looks better IMHO.. Then if you don't forge, you can profile you knife blade, drill the holes in the tang, and then hammer the blade and ricasso area before grinding the bevels. I like to texture mine after I get the profile forged for the most part. But for heavy texture, I took a 1"x 3"x 1/2" thick piece of steel and make it fit a hardy hole (very crudely) and did the same texture on that face which I will use than as a bottom die. In other words I'll lay the blade on top of that small chunck of steel with it's face textured (the die) while I hammer in the texture of the other side so I don't end up flattening out the texture on the flat anvil surface. Here is a pic of the hammer I use for texuring...


Here is a side shot to show the depth of the cuts made. IMHO I'd say about 1/4" deep cuts are better than shallower, and give better texture..


And here is a kiradashi type blade I used the bottom texture die on so I could get some "gnarly" texturing :D .. This was done at a high forging temp..


A bit closer up on the texture...


Again, there are many ways to go about this and there are many different textures you can make. Using the ball on a ball peen hammer, welding random bumps of weld build-up on the face of an old hammer etc etc etc..

Hope this helps some :)

~Paul

My YT Channel Lsubslimed


That's pretty awesome. Im going to try that out on a few scraps this weekend.
 
I have a dog's head hammer like that one for doing Japanese small utility blades. The thing to remember in making one is that the size of the slots is as important as the size of the "pattern" flats. The wider the slot, the wider the raided pieces of metal on the surface.
 
I have a dog's head hammer like that one for doing Japanese small utility blades. The thing to remember in making one is that the size of the slots is as important as the size of the "pattern" flats. The wider the slot, the wider the raided pieces of metal on the surface.

Good point. So then the wider the slots are cut, the deeper the texture can go and the more aggresive it will feel and look due to the less surface area... I'll probably end up widening them up on mine since I like the texture like that.. Thanks for the tip Stacy! :) .

~Paul

My YT Channel Lsubslimed
 
I did one blade where I hammered with just a regular ball peen hammer on the cold steel prior to grinding the bevels and prior to heat treat. It worked ok but required a bit of straightening.
 
Hammering cold steel is a recipe for failure. It created grain boundary disruptions that lead to weaknesses and possible cracks/breaks. As a rule, never hammer any steel below 1600F.
 
Hammering cold steel is a recipe for failure. It created grain boundary disruptions that lead to weaknesses and possible cracks/breaks. As a rule, never hammer any steel below 1600F.

Good to know. How is it different than say a logo punch? Just the amount of hammering/grain disruptions? It's too bad, it actually made for an interesting finish.
 
If you have access to a welder, you can just build up blobs of weld on the face of a hammer and then grind it a bit flat. Makes a nice finish as well. I may try the sawn slots some time too.
 
Good to know. How is it different than say a logo punch? Just the amount of hammering/grain disruptions? It's too bad, it actually made for an interesting finish.

Hammer stamping a blades cold can make the blade split at the ricasso during HT. I have had this happen several times. Stamping a very warm ( 400F+) blade gets better results. I think some smiths stamp the blade at dull red heat. The disruptions on a stamp are much smaller than a hammer blow. Generally they are pressed in with a hydraulic press that applies 10T of pressure while the blade and stamp are locked in a jig. This makes the stamp displace the steel evenly and gradually ( relatively). A hammer blow is uneven as well as a sudden shock. Also, the surface area displaced on most stamps is a fraction of the surface displaced by a hammer.

If you are a stock removal guy and want hammer marks, work the blade at 400F and use a hammer with a small polished head. That will create the least internal damage. A full normalization series (cycling) at HT will help, too.
 
Back
Top