• The BladeForums.com 2024 Traditional Knife is ready to order! See this thread for details: https://www.bladeforums.com/threads/bladeforums-2024-traditional-knife.2003187/
    Price is $300 ea (shipped within CONUS). Now open to the forums as a whole. If you live outside the US, I will contact you after your order for extra shipping charges. If there are customs issues? On you.

    User Name
    Serial number request

Heat Treat Oven Build

kuraki

Fimbulvetr Knifeworks
Joined
Jun 17, 2016
Messages
4,679
Ok, I read the stickies. Read a number of searched threads. I'm now posting for some confirmation of assumptions or conclusions I've made from trying to collate all that information before I start buying components.

Goal: Two, independently controlled 220V heat treat furnaces with 8x8x22.5" chambers. When used separately, I'd like to use one for austenitizing and one for tempering. However, they're designed to join together end to end for a single 45" chamber that I could harden and temper sword length objects in.

Fabrication Plan:
14 gauge steel shell, K23 firebrick insulation with some wool to fill open corners. Bolted connections for putting both ovens end to end, as well as covers for using them independently. Welded/bent with exception of the top cover, so it can be removed for maintenance, brick replacement, etc.
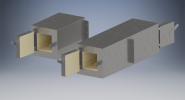
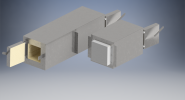
Assembly3.png Assembly3-1.png

Wiring components:
(2) PID controllers like this:
http://auberins.com/index.php?main_page=product_info&cPath=1&products_id=4
(4) SSRs like this:
http://www.auberins.com/index.php?main_page=product_info&cPath=2_30&products_id=30

(2) Thermocouples like this:
http://auberins.com/index.php?main_page=product_info&cPath=3&products_id=39

(Unsure yet of quantity) Heating elements like this:
http://www.budgetcastingsupply.com/product-p/7101-002.htm

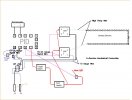
Additional wiring components like fuses and signal wire, heavier wire, switches to wire up each of these unit like the following diagram:
Capture.JPG

Ok. Specific questions- How do I figure how much heating element for this setup? How do I route the elements to avoid running them along the rear wall, while also avoiding the need for additional circuits? Does this plan seem reasonable to those of you who have built your own furnace?
 
1. assuming you are using INSULATION brick, not fire brick, and assuming it is the same or similar to Even Heat or Paragon's brick, take the wattage of one of their knife making kilns and divide it by the surface area of the cavity on the same kiln. This will give you watts per square inch (assuming you don't go metric) multiply the surface area of the inside of your kiln by this figure to get the watrage you need to have similar temperature and warm up times.

My kiln has a 6.5" x 6.5" x 19" cavity. This yields 494"
It draws 18amps @220Vac for a wattage of 3960 this is rouly .8 watts per "sq.
For an 8x8x22.5 you get 720"sq. assuming you want it to come up to temperature in say 20 minutes you would need 5830 watts or a current draw of about 26.5 amps. If you don't need the large cavity cut it down if you want to use less power,

2. Your diagram may work as drawn, but I suggest you change it as follows: on your wiring diagram, come off SSR (1) on pin 2 to one end of the heating element, and off the other end of the heating element to pin 1 of the SSR (2), pin 2 of SSR(2) would go back to the switch.

3. You may find moving the heavy sections to put them together or take them apart a royal pain in the butt, especially if they are hot. I would suggest spending the extra bucks and building one long and one short.

4. To increase the efficiency of the insulation brick, you can wrap it with fiberglass insulation. Unless you have a magor heat leak, the fiberglass can take the heat.
If you wrsp the brick in the door with a layer of i swook or similar insulation blanket, it will act as a seal on the door, cutting down on heat loss.

5. before you buy the controller, I suggest you download the manual/documentation and see how you program it. I have one controller that uses arcane symbols for the abbreviations for the functions (they utilize a partial 8 segment display). Luckily it has an interface I can hook to a computer and ues software, so I don't have to use the front panel for setting it up.
Hope this gets you pointed in the right direction.

6. cut ditches in the insulation brick on the side wall to put your heating element in. Use small pea sized pinches of high temp mortar to hold the element in place.
If you want to custom make heating elements, you can buy the Kanthal A1 wire and use a wooden dowl and a battery operated drill to wind your own.
Jim A.
 
Last edited:
Thanks Jim.

Re #3, I don't intend to make many sword length objects, I only want the ability to make some, and I don't want to heat such a long chamber up for the majority of my work. If it becomes something I do more often than not, I will likely take your advice and build a third, long furnace. It did occur to me that this might be a royal pain to switch back and forth and that has me considering hinging them together on wheeled carts. But, like I said, it would happen rarely, and only after they've cooled down.
 
for thermocouples, thermocouple wire and connectors try https://www.mcmaster.com/#thermocouples/=18vdbeq the 14 gauge work well. cheaper than auberins
for elements and related hardware try http://www.duralite.com/index.htm may or may not be cheaper, just a reference.
also look at http://www.joppaglass.com/elements/mainelpg.html read Dudley's element paper on that page for furnace ideas, sizing, and how to run elements. he also sells elements.
once you figure out wattage and current, browse eBay for SSRs. I found industry grade Allen-Bradley and Siemens there cheaper than auberins
 
Last edited:
I wonder if you could build a full length 45" unit with a front and rear controller. Use a firebrick stop that can be slid into place so you can just use the front unit or remove it to use both.
Call me crazy if you want, it's only an idea.
 
I would insulate much heavier than the paragon/evenheat type kilns. They're hobby grade and extremely under-insulated IMO. Every industrial grade oven I've owned or checked out for real professional use is insulated 3-4 times as much, holds temp much better, and isn't dangerous to touch the shell of.

Insulating firebrick are cheap, so is kaowool, I'd recommend a minimum of two insulating brick or one layer of brick and 2" of kaowool.

You'll be more power efficient, get to temp better, and have less swing, consider using some split hard bricks to face the door area, sides etc.

I've got a commercial Blue M furnace I converted to PID, it's about 10x better than an evenheat or paragon, has a 6x6x18" chamber, but the shell is about 24x36x40ish, stays cool to the touch, but only loses a few hundred degrees of temp after cutting off over night unless I leave the door open. Also has independent element modules on both sides and the top, which is really nice. If one burns out, I don't have to replace them all, and it has very even heat distribution.
 
I've done pretty much what you are intending with only slight differences: 27"L x 7"W x 6"H chambers, different controllers (Omega CN7823/AutomationDirect Solo), different wiring diagram due to UK 230V mains power, angle frame instead of bent sheet. I think any write-up I did has been probably lost with the apparent demise of the BritishBlades forum. Your plan seems entirely reasonable to me.

Your controllers will work fine.

Your SSRs will work fine, though they seem expensive; I use "Fotek" brand bought off ebay and they've been good for me. Don't skimp on the heatsinks.

The thermocouples should work fine, assuming you can locate them sensibly. I use Type N Mineral Insulated transition joint thermocouples myself. Take a look at the Omega NMTXL-125U-12.

I used 3 kW of elements for each of my ovens. It's entirely possible to do a load of math, based on assumptions about how things will behave, but it's a lot simpler to look at what works and do something very similar. You'll want a pair of those elements for each oven. I went for element grooves with 4 runs and 3 U-bends per side to accommodate the elements. It's much easier to pin them in place with bent-wire staples if you have a good stretch on them.

I took my element tails out through the sides and used heavy copper cable under the ovens to get from one side to the other. I should have given this a lot more thought. It works fine, but it was much more effort than it should have been due to my lack of planning and use of normal cable, rather than going for a high-temperature insulated type.
 
John,
Give Euclid's a call and explain your build design the service rep will do all the math for your 220v set up this is their specialty. I had my last element die after 5 years in service(it was my back up element I like to have a spare)explained my situation and had one in the mail 2 days later. I now have 2 back-ups!!!
 
Excellent info, thanks everyone. I have to table starting this for a month or two but I am going to proceed and I intend to document the build, hopefully into something one could follow step by step if they wanted.
 
I agree with javand ... insulat twice as much as you think is enough. A fiberglass heat wrap around the whole brick assembly will do a lot, too ( insider outside the metal cabinet). All this will make a larger unit, but will keep the radiation and surface temp down a lot.
Foil backed Roxul is a good choice for making the insulation pieces for in-cabinet insulation. It is firm and rated to 1200F.
 
Last edited:
Back
Top