Hidden tang deer antler handle tutorial?

Joined
Sep 27, 2014
Messages
1,104
I want to learn how to do a hidden tang deer antler handle. I have read tutorials on doing hidden tang handles with wood. Basically start a hole at one end, flip handle over and pin that hole that is started on your drill press and drill through from the other end and your hole will match up. Lots more to it, but I get that. I have a nice shed and I want to use that as a handle on a nice hunting knife.

I am not coming up with much in the way of how to do it with an antler...maybe I am searching the wrong terms. Thanks for any help.
Randy
 
I think antler is one of the easyest handle materials to use as it has pith which comes out very easy. You must remove all the pith (porous sponge looking stuff in the center) as it is not very strong. Then you need to decide if your wanting to do a tang that goes all the way through and has a threaded butt cap or not. Eather way you will need a cap on the end to cover the now open end of the horn.
 
Do you have to go all the way through or can I just go part way in and epoxy it in place without a butt plate? I watched a couple youtube videos of people just drilling part way through but they were just weekend warriors who weren't using a bolster. I want to do a good job with this. I see an antler handle on Shane Alexander's website but I can't see if it has a butt cap or not.

I want to use the part that attached to the deer's head as the but and use the rest of the antler up to a copper bolster. Similar to what Shane has here minus the leather layers.
http://s1328.photobucket.com/user/Greg_Jusulak/media/IMG_3848_zpsjw4bx155.jpg.html

If I have to use a butt cap can I make a copper one and then have a threaded nut that keeps it all together?

Randy
 
You don't have to go all the way through but where the tang of the knife is you need to remove all the pith. You will then need to seal up the butt end of the antler as like I said the inside of the antler is very porous. Here is one I made a few months ago. Tang does not go all the way through but the butt cap seals the end. It's made out of water buffalo horn. The butt cap was drilled out and a short bolt was JB welded into the cap. Then the bolt was jbwelded into the butt of the antler. Blade was forged from a ball bearing.

10583830_10209002420404716_5397027709609617656_n.jpg


10245452_10209002420164710_776879366535073489_n.jpg
 
If you're using an antler crown you don't have to worry about the pith on the crown end. I didn't use a butt cap on that one. I just dyed the end to match the rest of the antler.

If you're using the middle section of a piece of antler like on JT's knife, then a butt cap looks and functions better.
 
Yah, I want to use an antler crown. But the basic is to remove the pith to the depth of the tang and then epoxy it in....don't need to be too exacting in the way of center things when drilling it out. Just remove the pith. Can center on the glue up, I can do this.
 
Yeah not to difacult just make sure befor you glue up that everything is square. Also good idea to notch the tang, gives the JB weld somthing to lock onto. By notching you are not relying on the actual bond of the epoxy but also have a physical lock which are very strong.
 
Here is one I did. I am a weekend warrior with this but it worked.

Had the blade made for me and I did the handle. Drilled through the antler, epoxy and then a finishing bolt at the cap that was sanded down.

Was not difficult at all, as this was one of my first knife handles I did.

fb091bae9bb141d909413e986a9a3183.jpg
09a2aa46da5644266f543ed3f8c01f6c.jpg


I just winged it and had fun. Came out great. Take the time on clearing out te antler, it's goes fast and yet can quickly take to much out with large drill bits of that's what you're using.

And measure multiple times if you will put a pin in to hold the blade in.

Good luck! Post pics of the k ice you're going to use! I love wip pictures.

VP
 
I have a nice large piece of antler that is curved just right for a bowie or a fighter. But I would need to curve the tang to use it which would mean making the blade as opposed to purchasing a ready made one. At some point I will give that a go I guess.
 
When I said "weekend warriors" I wasn't trying to put them down. I was trying to say the two videos were of guys doing handles that were quite raw and unfinished. One was a 17 yr old kid who just drilled a hole big enough for the tang and epoxied it in....no bolster, pith or how to line it up. Other guy was a survival guy showing how to replace a handle with antler. Didn't mention soft center either and his finished product was very rough. Yours looks much nicer Vpetrell. Did you make that sheath? Cool design.

Tell me about lining up the pin guys. After I get the bolster on is it just a lot of careful measuring? I assume I use a pin that is smaller than the hole in the tang so I have some wiggle room and then the epoxy just holds it all in place. If I am putting a notch in the tang then I don't need a pin? Personally I think I would like the look of a handle without a pin more.

O no offense taken. I was just saying it's possible with minimal experience. Just patience and trust your instinct I guess.

Whe I did mine, the pin was the most nerve racking part because it was the easiest to screw up.

I but the guard and leather spacer together on the tang and traced where it was on the outside of the antler. Put a dot where it is.

Do that a few times until you feel it is where you want it then drill through and hope for the best.

I used a pin the same size as the hole and tapped it in. If you have a notch to grab the epoxy that could work, I like the look of the pin personally.

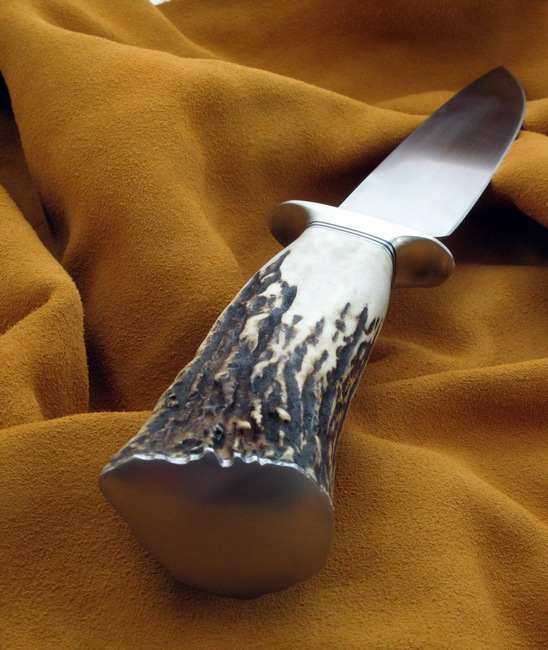
Leather spacers look great with the antler

My hole came out crooked, but worked great. I used jb weld for epoxy and just wiped Clean

The tough part for me for the pin was that the antler isn't symmetrical on both sides so it requires a little more patience with it.

Just take your time and measure twice and drill once.

Let us see how it goes!


And yep I made the sheath. It's a kydex liner wrapped in leather.

Super easy as well

Good luck!

VP
 
Last edited:
I just skimmed through this thread, but I created a tutorial years ago and it could prove to be very helpful to you . . . especially if you want to have a butt cap.

The web page is HERE.

A few photos are attached below to give you an idea.

IMG_3885-650.jpg


IMG_3862-650.jpg


IMG_3790-650.jpg


IMG_3666-650.jpg
 
Oooh, that looks really good Logen. I didn't like the idea of a butt cap, but that one really fits nice and looks great. Wow. Thanks for the link.
 
Can antler be stabilized? If yes, you would not have to remove the pith, correct?

Is there something here, maybe in the Stickies, that gives a good explanation for doing a through tang?
 
Back
Top