Homemade Hydraulic Press Recap - Plans - Parts

Joined
Nov 15, 2005
Messages
1,201
Allrighty guys, for history I wanted to post this build with it's own thread. Especially for those looking to build their own press. Big thanks to K Ken H> Stacy E. Apelt - Bladesmith Stacy E. Apelt - Bladesmith fitzo fitzo weo weo N Natlek 1 12345678910 for being a sounding board during the build.

We've been discussing some parts of the build here - https://www.bladeforums.com/threads/how-long-do-hydraulic-lines-last-😅.1798920/

Back Story:
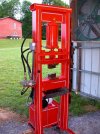
I build this press based off of Ron Claiborne's H-Frame design back in 2006. Being a teenager I cut some corners here and there. The press sat out in elements with a tarp on it for about 14 years.... unused... I was recently able to get it back into my shop and this video is the restoration. I replaced just about every component on this press other than the motor, pump, and control valve.

PDF Plans / 3D CAD Files / Cylinder Force Calculator - https://www.patreon.com/posts/hydraulic-press-55107545

------------------------

There is a full parts list of the components I used in the description of this YouTube video:


I'm stoked to start making some Damascus with this guy! Getting the press back up and running has been a long time coming....

What do yall think?


Edit #1: Fixed broken link to plans.... While this link does take you to Patreon, note they are 100% free... I just used Patreon to host them.
 
Last edited:
Some Pictures of Ron's original design and presses:
 

Attachments

  • press.jpg
    press.jpg
    73.9 KB · Views: 14
  • press-gregcovington.jpg
    press-gregcovington.jpg
    56.6 KB · Views: 13
  • pressing.jpg
    pressing.jpg
    45.9 KB · Views: 11
  • ron-press.jpg
    ron-press.jpg
    74.3 KB · Views: 12
  • yellowpress.jpg
    yellowpress.jpg
    44.8 KB · Views: 11
  • yellow-press.jpg
    yellow-press.jpg
    57.7 KB · Views: 14
Nice video, Mr Keeton. Have fun with the new tool. Looks like it's a good one!
As an aside, watching you "test" the press on the can, I feel I need to warn folks that crushing a can under a power hammer can be very dangerous. When I lived up in WA, a smith I know had a piece of a beer can imbedded in one of the posts in his shop from squishing a can under his 250# power hammer. The flat dies apparently trapped some air in the can and it popped like a balloon, sending a metal shard into the post ~10 feet away. Luckily nobody was in the path. But might not be an issue under the slower moving ram of the press.
 
I'm watching the video now - GREAT job on video and press is looking good. One comment, on the idea of a horsemat below press - won't the HOT scale, and possible dropped billet do a lot of damage to the mat? OR, perhaps you're thinking of just a small section of mat under the feel only, not a large mat under complete press?

You really got Fusion 360 down pat - good work there.

Any reason you used 10 AWG wire on a 15 amp breaker?

It seems the 3 hp motor pumps to 2700 psi with no problem.

That is a very good video - and the project really grew from the simple question of "do I need hew hoses", to a full blown rebuild. You did good. Thanks for taking the time to put together such a good video. I never seem to be able to do photos or video work while working on a project.

GREAT job. I admire your work.

After thought, now I see the full video the horsemat under press should be a problem - the hydraulic tank and stuff mounted directly below the press will protect the horsemat. I've got my motor/tank assembly mounted to one side of press and hot scale falls to the ground.

Thanks for the video and all the drawings.

Ken H>

Thanks Ken!

- I've found that the horse stall mat is pretty resilient. Even to dropping hot steel on it. But I could cut it and put it just under the feet sections and not in the middle if it was a problem.

- Yes sir the 3HP motor and 11 GPM pump got to 2750 without an issue. I set the limiter @ 2750... it seems like it could go higher.

- You know how it is... when you get in the middle of a "quick projects" it goes from "I could do this quickly" to "well.... if I really want to do this right, I'd....."


-------------

On thing we talked about in the original thread was the enlarging of the pin holes. It looks like my pin holes are a little larger than the pin. I think you can see this @ 29:43 in the video. The cylinder moves slightly when changing directions.... I'm not sure if this is an issue or not....
 
Yep, I can see a tad of wiggle in the ram pins - it would be a simple job to wrap pin with thin shim material to remove the slack.

edit: Not at all sure the tad of wiggle is any big deal, I tossed the shim stock as an idea.
 
Last edited:
That is a great video and a very cool diy project. This forum and the people in it is great. I spent a couple years asking questions and slowly building my first grinder. Everyone was super helpful and patient as I asked a million questions and slowly collected the knowledge and parts I needed but did little to put it all together for close to two years. But I got it together finally and have had a blast learning to grind blades.
It's pretty cool that these guys invested the time to talk a teenager through making a press that required some serious "doing it right" effort.
Thanks for posting this video....inspiring.
 
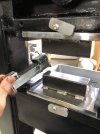
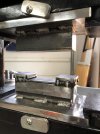
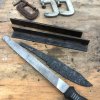
Working on my first damascus billet this weekend with the press... I quickly realized a stop block die was needed! Made this guy:

IMG_6763.JPG

IMG_6764.JPG


I'm... die-ing to use it....
 
With the power of your press, and the speed of the ram, and how narrow your dies are I can see why you've got to have kisser blocks in place to prevent squishing the billet too thin. You gonna enjoy that press.
 
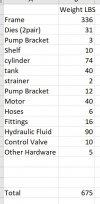
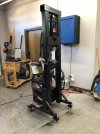
I've calculated the total weight of this unit to be conservatively ~675LBS... I'm going to put it on casters.


weight.JPG
 
That's a good looking blade you did - pattern comes thru nicely.

I can see where casters would be handy - it would allow you to put press in best place for forging, then when not in use, move completely out of way. You sure got a detailed list of parts and weights, 336 lb for frame - did you include the amount of welding metal added? 15.5 lbs for a set of dies? My first take on that was "no way", then I thought about the size of the dies and how much metal goes into making them and realized that's a very realistic number.

Again, I thank you for all the work you did in presenting the project. I've learned a lot from reading and watching your videos.

Ken H>
 
K Ken H> Tanks Ken. I included two sets of dies in that weight. I did not include the weight of the welds.

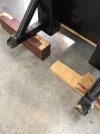
I found a set of 4 - 3”casters rated to 1000 pounds that I’m going to try out. My plan is to weld on some support plates to the 1/4” angle “foot tabs” then mount the stem casters in the holes… we’ll see!
 
While metal wheels might be best, you've got those wheels and they look like they'll be easy to roll around the shop. I'll bet it will be a long time before you'll develop any flats spots to cause rolling problems.

James, you've done good work there. Thank you again for all the work to document your project.

Ken H.
 
Back
Top