How I photograph knives

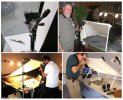
Don’t think you have to reinvent the wheel to find the lighting setup that best fits your needs. Pictured below are four setups, each different, each proven to get consistant and quality results. They are from left to right, top to bottom; my setup, Murray White, Eric Eggly and Jim Cooper.

In each case you will notice that the light comes from behind the subject knife and is reflected into the camera. The knife lies flat on the table. The light source in my case is a window with open shade, the other three use artificial lighting with a diffused screen to prevent harsh direct light on the knife. Three out of four setups show small reflectors by the knife to help open up the shadows caused by the rear lighting.

Design your setup with these basic guidelines and you should have something you can work with.
 

Attachments

  • setups.jpg
    setups.jpg
    68.3 KB · Views: 66
Last edited:
Thanks Phill.
The fact is I don't have a setup, I make pictures beaucause I love knives and I want to share with my friends on youtube.
Now I want to learn about objects photografing, your advices are excellent; I need a better photo camera, a trepied, some lights, good background, reflectors and editing the pic with photoshop.
I actualy like the shadows:rolleyes:
Take care man, here are some old pics, when I'll make a decent setup I'll let you know.
Regards,
John


57.jpg

05-1.jpg

090.jpg

36.jpg
 
Thanks Phill.
Now I want to learn about objects photografing, your advices are excellent; I need a better photo camera, a trepied, some lights, good background, reflectors and editing the pic with photoshop.

John, don't stop being creative with your photography, and don't think you need any more than you have right now to take good photos. Your photos are fine and show a good eye for composition. The second Spyderco photo actually comes very close to my basic window light setup. Keep in mind that's all it is A Basic Window Light Setup. It's a starting place not the be all and end all of knife photography.
 
Yes man, thanks for the tips. I want to have my own style, but i want to start with the basics and go from there.
Yes, the 2nd, and 4th picture were taken after i've read your comments, the shadows are beaucause it was cloudy and i used a bad lamp; i olso like the pictures to be a little on the dark side.
 
This one is lit pretty much the same way. Sunlight coming in through the window and lighting the white walls. I took this leaning over the second floor balcony, hoping I didn't fall over.

picture.php
 
Well done Ted.
Interesting pieces, nice composition and good overall lighting.
I'd say you nailed it.
 
Very nice available light photograph.

I don't know why, but your photo just reminded me of Jim Weyer's work, particularly the work he does for AG Russell.
I hope you don't mind, but I thought I would render your photo 'alla' Weyer.

367255008.jpg
 
Last edited:
Phil,
That looks great. I don't know Jim Weyer's work, but I'll definitely look for it. Nice effects, I'll see if I can come up with anything similar. By the way, its actually artificial light, but I tried to make it look natural.
 
Phil,
Thanks. I'd seen the photography in the AG Russell Catalog (and website), and always liked it, but didn't know who the photographer was. He does some fine work.
I like the way you mimicked his style with the blur, bevel, etc. Can you outline your Photoshop method? Did you just do this with Layers? Did you use a Mask?
Thanks.
 
Doc, let me see if I can walk you through it.

I opened your photo of the knife in Photoshop CS.
With the Rectangle tool I selected the section I wanted to bevel & emboss, I copied and pasted it onto a new layer.
Then from Layers > Layer style > Bevel & Emboss, and a Drop Shadow.
I then did a selection of just the knife (from the background layer) and put it on another layer on top of the rectangle layer.
I wanted to fade the background, so I copied it, deleted the Original Background layer so that I could add a White layer below it. I then reduced the opacity of the background copy layer.
Finally I added a white halo layer above the background to fade it even more.

I’ve attached a screen shot of the image with the Layers palette, so you can see how it was put together. If you would like the whole .PSD file just send me an email to:

philip.labarbera@gmail.com

367343367.jpg
 
This is the knife selection (shown in the Quick Mask mode) and the Paths palette.

367348055.jpg
 
PhilL, you are a pro.
You even label your layers.
Good mini tutorial :D
 
I use a small homemade lightbox as well, which I find works quite well. I have noticed some somewhat harsh shadows, though, especially when I use a plain white background. Here's some examples:

2972734992_76e496de43_b.jpg


2967338471_a94600506e_b.jpg


3181284774_b438deabe9_b.jpg


I've found that using different backgrounds can help remove shadows and make pictures more interesting all around, although I still keep it simple:

3129078333_b00d76b8e4_b.jpg


3155484951_b0a09a8c71_b.jpg


2967438731_4538cb7e5e_b.jpg


3602823318_fd053a8798_o.jpg


3602015567_24fd9dbb96_b.jpg


3041433509_059c83df4f_b.jpg


The lighting takes a bit of setting up sometimes, but overall it's very easy to control the lighting and angles, and I'm sure some more post processing could improve these. I usually just adjust the white balance and exposure a bit, so I don't know the extent of improvements I could make.
 
This is the knife selection (shown in the Quick Mask mode) and the Paths palette.

367348055.jpg

Wozer! Thanks Phil. I really appreciate the detailed tutorial. What is your method for selecting the item (knife). Do you use magnetic lasso, Extract...? or just what. I have some difficulty making accurate selections (though I am only using a mouse - don't yet have a digitizer pad).
Here is my attempt at a variation of your method (though not a knife).:
SmithWessonSS357magcopy.jpg
 
Doc, let me say first of all your photography is great. If you're going to get serious about your image editing (and you should) get a Wacom tablet, a mouse just can't cut it. However the selection you made on the pistol looks real clean.

Nice work on your Weyer pic. It's a little too subtle in my opinion. Meaning it's kind of hard to see the effect. The background has to be a lot more washed out, and there has to be better seperation between the rectangular layer and the background.

How do I do seperations? Depends on the subject. For knives and on the Kershaw I used the Pen tool and made a Path, I think it's the most accurate when the subject has hard edges. When the subject is a little out of focus a Path selection can sharpen up the edge. Not that I ever take out of focus pictures ;)

Once I have the path done I will often open the selection in Quick Mask to really fine tune the selection. Like with the Kershaw the thumb ramp was fixed in Quick Mask, not with the Path.

I suppose I make a selections in about 5 or 6 different ways, depending on the subject. I never use the Lasso tool. I do use Extract for portraits and soft edge subjects. Back when I did use a mouse I would just use the Eraser, starting with a big brush and then zoom in closer and closer with a smaller and smaller brush.

Keep up the good work, and thanks for sharing it here.
 
Phil,
Thanks for the kudos, and helpful suggestions. I've been using Photoshop for quite a while, but still have ALOT to learn. As you know, Photoshop has SO much power and complexity. There is no end to what you can learn to do with it - Limited only by ones creativity. I appreciate you sharing your methods. I keep on planning to get a tablet (eg: Intuos3), but other wishes and expenses end up taking precedence.
Regarding my photo. I wasn't trying to exactly reproduce Weyer's effect, just a variation. I will however, play with some of my photos, and see if I can faithfully reproduce his style.
I'll try the pen tool/path method and see how I can do with it. I appreciate the suggestion. You'll notice some imprecise selections (see the bullet) in my photo.
I'll also have to learn more about Quick Mask.
Again, THANKS!!
 
Doc, I've been using Photoshop for quite a while and I too have a lot to learn. I'm constantly reviewing my Photoshop books and looking online for new PS tutorials.

A good bunch you may want to look at are here:

http://www.photoshopkillertips.com/

I also hope you'll take a look at my Photoshop Painting thread here on BFC:

http://www.bladeforums.com/forums/showthread.php?t=573183

The only real way to get better is keep on doing it. That's why when I see a good photograph I'll kind of play with it, see what I can do with it. I think that's how Jim "Sharp by Coop" Cooper and I became friends. I kept messing with his photos when there was really nothing wrong with them...LOL

Probably my favorite Photoshop book is, "The Photoshop CS book for Digital Photographers" by Scott Kelby
 
Back
Top