Is this normal? Stabilized wood issues.

Jesse Latham

Gold Member
Joined
Jul 4, 2010
Messages
836
I am making kitchen knives for my two daughters for Christmas. One has stabilized black palm and other than the normal issues the wood works fine. The other has "stabilized" spalted maple which I bought at the Eugene knife show. The maple block was polished on all sides, looked really good and felt heavy as you would expect. The issue is when sanding the handle shape the wood is very soft in places. So much so I started applying liquid super glue which soaks in like water on the ground. The lighter color areas seem soft and the dark parts seem harder. I have not used spalted maple before, does it normally act this way or is it more likely it's not at all or poorly stabilized? Jess
 
Soft and hard spots are normal with spalted wood. The more the spalt, the more the rot ( soft areas). The stabilization may take care of that ,depending on who does it. Thin CA is used by most folks using these woods to firm up the punkier places. When down to the final shape, flood the whole handle with CA until it will take no more, then do the final sanding.
 
Sounds to me like it wasn't stabilized properly. I use a lot of salted wood, some that is very soft before sending out and it comes back rock hard throughout. probably one of the reasons I'm particular about who I send it to. I've used WSSI for years. I have recently tried some from another stabilizer but have only used one piece and do not want to comment yet on them
 
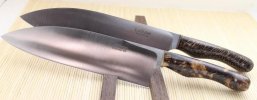
Thanks Stacy And Cory for your replies. That's pretty much what I thought was going on. I remember the vendors for both blocks of wood. I was hoping the soft spots happen sometimes and I didn't but a fake stabilized peice. The black palm came from Mark @ Burl Source, the other from a different vendor. Nuff about that. I did fill with CA and acheived a decent finish. This will make me more careful where the wood comes from in the future. Here are the knives. Thanks again Jess

T & S santokus.jpg
 
That can happen even with the best stabilizers and vendors. We're dealing with inconsistent, weird, imperfect wood. That's what makes it so pretty, but it also causes problems even when professionally stabilized.

If you want super stable handle material that's easy to work with, buy G10. When you want gorgeous stabilized or "plain" natural woods, go with proven cats like Burl Source and follow Stacy's advice above when odd spots show up :)
 
Last edited:
My experience is that - The better looking the wood, the more you have to deal with defects.

What makes burl happen is twisting and stresses, or tumors. The sheer weight of a large tree can cause the root ball to start to twist.
What makes spalt happen is a fungus, AKA - rot. Leave a pretty curly maple log on the ground in the forest after it dies and falls, and get spalted maple. ( leave it a bit longer and you get rotted wood)
What makes the colors in many woods is all sorts of things, often a combo of several extremes.
Some wood has to be heated or steamed to get pretty. Others have to be left on the ground for a year or more.

None of these things are conducive to straight and tight grain. You will get eyes, voids, soft spots,....sometimes completely rotted wood.....in any promising piece of material. The stabilization will make them resist soaking up more moisture, and in some stabilization methods, can make the soft woods much harder ( buckeye burl for one), but the "defects" that make the wood beautiful will also make it more challenging to use.

A large bottle of thin CA and a smaller bottle of medium CA are a requisite for getting a good finish on these woods.
Once you get the handle about 90% shaped, start applying the CA and then immediately sanding. You MUST wear a respirator and face shield doing this, as the vapors are pretty annoying. I use an external air source hood for these tasks, as the whole shop can make your eyes burn when grinding wet CA. Bigger holes can be filled with medium CA and have sanding dust from earlier sanding packed into the resin while still wet. Once the dust is packed tight and sanded lightly, flood with thin CA and continue as before. (TIP - Place a cookie sheet under the grinder for a minute to collect some dust on any project that may need filling. Put the dust in a zip-loc bag and label the wood type.)
Keep sanding in the grinding dust as you apply more CA and the cracks/holes,/punk/etc. will all seal up and become solid with the wood. It will then sand and polish very well. Repeat as needed if new places show up.
When the handle gets shaped to the final dimensions, give it a complete flooding with CA and let it dry. Repeat as needed until no more will absorb. Then sand to the final finish.


I had a batch of extreme old growth redwood stabilized, and as expected, the twisting grain pulled apart a bit throughout the blocks. This leaves "splits" and "voids"in the lovely wood. Someone said that it was a shame it was all ruined. I showed him a handle with the same wood finished as abover with CA and he could not believe how curly and full of eyes it was. All the fill areas and features become darker lines and dots.
 
Stacy, on furniture projects, when working with Mesquite for example, some workers will fill cracks, voids and soft spots with black tinted epoxy. Does tinted epoxy also work with knife handles?

BTW: Merry Christmas!
 
Last edited:
im new to the knife forum and making. made custom pool cues for years tho. i always used nelsonite and stabilized my own wood. never have had a cue come backed warped either.
 
Crank - Nelsonite is a different type of "stabilizer". It will not work for knife handles. The stabilizing done on handle wood is a catalyzed acrylic polymer.

221 - Yes, Black epoxy will work for filling larger cracks. I had a piece of mammoth tusk core material that had a lot of delaminations. I wrapped it tight with saran wrap, and taped a bottomless cup on the large end. I filled the cup with fiberglass bar top resin dyed black. With the aid of a vibrator and a vacuum chamber, it ran down to fill all the voids. The final material when ground down was black and cream striped. Not too bad looking. Cactus is done the same way.
 
I don't understand why it wouldn't work. can you link me to an explanation plz. and ty.

I appreciate you telling me before I wasted my time trying it as well. because in about 1 hour I was going out to cut some scales from some amboya burl. guess ill figure out a diff route now lol.
 
Last edited:
While regularly used in woodworking as a "stabilizer", Nelsonite's prime use is to prevent splitting and end grain opening up on wood furniture and turnings ( like pool cues). Items stabilized with Nelsonite are always coated with paint or a finish to seal in the Nelsonite. It is a chemical solvent with a dissolved high solids content. The solvent soaks deep into the wood, and then slowly evaporates from the exposed surfaces. It leaves behind the solids that fill the pores and grain of the wood fibers. Inside, it remains a dissolved liquid.....often for many years....that will displace any moisture and make the wood resist swelling and warp from temperature and humidity changes.
The reasons not to use it on a knife handle are the smell may never fully go away, and it is a filler type stabilization, not a catalyzed impregnation of the wood fiber. Stabilized handle materials can be sanded and buffed as-is to a high gloss with no finish over it at all. There are similar stabilizers to Nelsonite and things like "cactus Juice" that will help stabilize a knife handle, but they do not come even close to what proper stabilization with mono-acrylic resins will do.

I remember a free-form bowl turning in spalted maple where I used Nelsonite to stabilizing the block before turning. It was a year before I got around to turning the block. When I cut into the wood, it smelled like fresh Nelsonite. The project was left in a natural sanded state.....and it took a good while to get to the point where the chemical smell wasn't unpleasant.
 
yea I usually wait at least a year after using nelsonite before I turn anything. ty for the explanation makes more sense now. I am thankful for so many knowledgeable people on here. ty to everyone of you, who take time out to help a newbie like me.
 
I hope no one minds if I tack on a question?

Stacy, I've been thinking about using a caning jar with a automotive brake bleeder and Minwax wood hardener. Now it's clear that it's no K&G treatment, but do you think it would be okay for porous woods that are fairly stable to begin with? Also, I make scoops and other kitchen items from poplar. Any idea if this method is a good way to seal the wood from moisture? Right now I don't finish them with anything, but the ones I have now are mostly dry use items other than the baby's first spoon, but that has held up very well. I sometimes use Danish oil, but I don't like how it darkens my work. Either way I'll probably try the pump/hardener since it's so cheap and easy to try. If I do I'll test the wood. Suggestions for testing would be helpful too.
 
I am not a fan of the Minwax wood hardener on knife scales. It isn't the same. I also warn folks about using a jar that isn't made to take pressure/vacuum and pumping 20" of vacuum in it. This can cause an implosion...which is a bit of a misnomer, as it can send glass flying.

That said, a lot of folks have used Minwax. I don't think it is all that good, but it is better than nothing. How much....IDK?

BTW, please do not use the boiling minwax with acetone and then seal the jar system you will find on the internet. This is just plain dumb from a safety standpoint.

Thanks for the safety tips. I've never heard of the method you describe at the bottom, but I'll steer clear.

I'm sure you've seen the videos with the jar, and vacuum pump + minwax. I believe a Mason jar should be strong enough to use, but I'll use ppe just in case. The videos show a lot of bubbles escaping from the wood, but how deeply the minwax actually penetrates is not known by me. Maybe I can try a few thicknesses of wood, then cut them up. I imagine that the stuff is (food) safe once dry, but I'll look for the msds sheet.

Thanks for your insight Stacy.
 
Just so you know how crazy some ideas get, I will give the basics of the Minwax stabilization method that was popular a while back.
PLEASE DO NOT FOLLOW THIS PROCEDURE. IT IS STUPIDLY DANGEROUS.

Minwax wood hardener was mixed with acetone to make it thinner. The mixture was put in a jar ( often just a cheap mayonnaise jar!) and placed in a pan of water ( or sometimes on a hot plate!) and the heat was turned on ( some folks said they used a camp stove outside to be safe???). The wood was put in with a weight on it to make it sink, and the minwax/acetone was boiled. After a certain amount of boiling time, the lid was screwed on the boiling jar and the jar was allowed to cool, thus drawing a vacuum.
Now, if the idea of boiling acetone on a camp stove doesn't make bells go off in your hear, think about your high school science class when you took that gallon paint can with some boiling water in it you crushed by screwing the lid on in then cooling it . A jar of imploding acetone/minwax is also not a good thought.

The only minwax treatment I can say looks like it should work is the one Ariel Silva uses. He drills a hole in the wood block center and attaches a tube to it. Then he puts the wood and the minwax in a plastic bag and vacuums it by connecting the hose to the pump. This sucks the minwax deep into the wood. After a long suction draw, he releases the vacuum and lets the minwax drain and cure. Not nearly the same as catalyzed resin, but probably a workable method.
 
I realize knifemakers are DIY types by definition, and some of us are just plain cheap. But there's a point where "penny wise, pound foolish" comes into play, and this is one of those times.

Professional stabilization just isn't that expensive, and it gives far better results than any home method.
 
It is very common for people to think they can do a good job and save money doing the wood stabilizing themselves.
Several years back you couldn't tell me otherwise.
I tried all the over the counter chemicals that were available as well as resinol 90c direct from loctite.
I probably poisoned myself as well as spending a ton of time to get less than perfect results.
I spent a lot of money too. Only took me a few years before I decided to go with the professionals.
I am a slow learner but eventually I catch on.
As mentioned above, some of the methods shown on You tube are very dangerous.
Not a question of whether you will get injured, but how soon and how bad.
Just my 2 cents worth of opinion. But it is based on a lot of experience trying out all the wrong ways to stabilize wood.
 
I actually do remember the paint can Stacy. :)

James, you're right, it's all about trying to make something work that I can do myself. It's not about money though.

Mark, in looking around (if I'm not mistaken) I came across an old thread from 09 where you kind of introduced yourself. Gene Martin mentioned that he'd been using your wood for many years. I've used his stabilized wood and can appreciate both, professional stabilizing as well as the quality of your wood. Indian George and Ed Caffrey chimed in on the topic too of Minwax stabilizing. Maybe in a different thread, can't remember.

Back then, after reading about it, I probably would have tried an acetone concoction. I guess it further points out how far the standard has risen. Pretty neat.

In any case I can't see having the poplar and bass wood professionally stabilized. I'd just like to make them more water resistant. Punky burl, if I ever come across some that isn't already stabilized, I'd send to K&G. ;)
 
Back
Top