Kiln questions.

KnuckleDownKnives

Time to make the doughnuts..
Joined
Feb 12, 2015
Messages
1,715
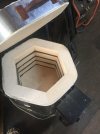
So I just bought a kiln, it's not exactly what I wanted, but the price seemed fair enough and for the blades I do is large enough. And looks like it's in really good shape. For $200 I think I can make it work for my needs rather cheep.

Currently it has a manual kiln controller and it's a 110v unit. I'm not so much concerned with the controller as I'm just going to build my own. Can the coils in it be used for 220v or do I need to keep it 110v?


IMG_3723.JPG
 
If those existing coils are designed for 120vac, then you should NOT put 220vac to the existing coils. Most likely they would burn out in very short order, If you're lucky they might just blow fuses. Any idea of wattage?

What type of controller do you plan? Use something like an Arduino programmed for PID control? OR, build up from an existing PID controller?

Honestly I have no idea, not sure if it's ever been reworked or not. If I need to stay with 110v for now that's no problem, of course I'd rather have 220. I'm thinking of just going with PID for now. Keeping it somewhat simple and cheep. I didn't really have the money to spend, but these don't come up often around here for $200 or at all for that matter. I just want to be able to do some sort of stainless ht for now.
 
I would have bought it for 200. I would convert it over to a pid control and punch a hole in the lid and hang my Q3 blades in it. You sure that’s 120v. Can you get to the ends of the heating element and get an ohm meter on it and measure it’s resistance?
 
I would have bought it for 200. I would convert it over to a pid control and punch a hole in the lid and hang my Q3 blades in it. You sure that’s 120v. Can you get to the ends of the heating element and get an ohm meter on it and measure it’s resistance?

It has a 12oV plug whip coming off of it, so best guess would be it's 120V. That's my plan I think, just to convert it to PID control. I'm pretty familiar with wiring them up after the controls I've built for my forge, quench tank and tempering oven.

At this moment I have zero working knowledge of the elements or about elements. I've read some posts here but haven't paid much attention to the element details since I haven't been in the position I am now, so the journey begins. It was kind of an impulse buy, these things don't pop up locally very often at all, or at least not the last 3 years I've been watching for knife making related equipment.
 
Well, I don't know but I think the elements don't care whether you put 120 or 220 to them. The relays and what not that send power to them need to be rated for the voltage and amperage you're going to draw, but all of the element calculations I've seen use wattage as a variable with time to temperature as a result. Meaning maybe it's wired for 120v and 15a right now, or 1800w. So if you want to use 220 you can either use half the amperage for the same wattage, or more than half the amperage and the coils will heat up faster.
 
Hey folks, think of it this way - what happens to a 120vac light bulb if you plug into 220vac? Won't last long will it? If the coils are rated for 120vac, they won't blow hardly as fast as a light bulb, but it sure won't be good for them. If it's already got a 120 vac plug, plug in and see if the elements glow red/orange. If they only get to a mild red, they might actually be 220, but if they glow a bright orange, they're 120 vac. There isn't a label or anything showing voltage, wattage, etc?
 
Got the answer I needed instead of guessing. The Manufacturer said the coils need to be converted to 220V coils which I may just order from them since they're only $95 and a direct fit.
 
There's your answer - did they say how many watts the replacement 220vac coils would be? If the same 1800 watts, wouldn't worry about changing them. No advantage to 220 vs 120 with same 1800 wattage. If the wattage is a good bit more with 220 vac, then it will heat up faster which is a big plus.
 
There's your answer - did they say how many watts the replacement 220vac coils would be? If the same 1800 watts, wouldn't worry about changing them. No advantage to 220 vs 120 with same 1800 wattage. If the wattage is a good bit more with 220 vac, then it will heat up faster which is a big plus.

I didn't think to ask them that question. I think what I'm going to do since I already have a pid and ssr for 120V for my forge is wire it up to the kiln and test drive it and see how it works. I only use it to monitor my forge temp currently, so all I'd need to do is wire the ssr to the elements and put a heavier power cord on it. The control box is built and wired up so all I had to do if i decided to finish making my forge controlled by it was get a solenoid plumbed in and hook it to the ssr.
 
Thought I had the ssr for my forge control box but guess I never bought it. I thought it was already in the box. Oh well. No luck wiring it up this weekend and test driving it. That being said, think I'll just build a whole new control unit for this. So it sits for a bit till finds are available.
 
just wire up a 120v plug and see what you get. here are two good sources. first is Joppa Glass, http://www.joppaglass.com/elements/mainelpg.html read the element paper, good advise on wiring and figuring out power required. they also sell elements and all the mounting stuff. second is Duralite http://www.duralite.com/kiln-furnace-studio.htm they sell exact replacement elements and upgrade elements so you can go from 120v to 240v.

Went ahead and hardwired it and so far it's 1:06 minutes and it's up to 1500. How does this compare to other kilns? I'm going to keep it running and see if it will get up to 2200. It's supposed to be able to get up to 2381 according to the sticker on the original controller.
 
by 1:06 you mean 66 minutes? to compare, you need to figure capacity in cu ft and such. main thing is it got there, 66minutes isn't too bad. if you have a power adjust knob, see if it will hold temperature.
 
by 1:06 you mean 66 minutes? to compare, you need to figure capacity in cu ft and such. main thing is it got there, 66minutes isn't too bad. if you have a power adjust knob, see if it will hold temperature.

Yeah, not a good time to try and measure as it's almost up to 1600. I'll have to post back later. No control knob at the moment to see if it'll hold temp. The original controller has something wrong with it. The relay kept kicking on and off like it was trying to maintain temp but I had it set to wide open. I took off the controller and hardwired the pigtail to the elements and just have my thermocouple stuck in the hole where the old cut off switch went in. It's a manual type where you stick the cone temp wedge and when it bends cuts the power off.

It's climbing very slow now and at 90 mins is just up to 1640 at 100 minutes. 40 additional mins to go another 140 degrees.
 
I believe that has an analog controller. The dial runs an ON/OFF timer. At 1 it is ON 10% and OFF 90% .... at 9 it is ON 90% and OFF 10%. On HI it is on all the time, and at OFF (zero on some controls) it is off all the time. There is a loud CLICK as the high current relay slams open and closed when heating. It does not measure temperature ... just timing of the power on/off cycle.
IT also probably has a "kiln sitter" which is two rods sticking inside to hold a firing cone. When the cone melts, the rods move and shut off the kiln. Some have a firing timer, too. This runs the firing for a set number of hours and shuts things off. All this is pretty useless for knife HT. Most can be stripped out and the new stuff put in the control box.

You will want to change the controller to a PID for knife HT. There are two ways:
1) Make a separate control unit with a power cord/power switch/PID control/ SSR/heat sink/socket. This will allow the kiln to be plugged into the controlled socket.
Mount the PID stuff in a project box and place near the kiln.
Place a new TC in the forge and connect it to the PID.
Plug the control box into the wall socket, plug the kiln into the controlled socket, turn the kiln power switch to ON, and set the dial to HI.
Turn everything on and off from the PID box power switch.
When the PID is turned on and running, it will control the kiln.
If you want to shut off the coils while moving knives in/out, just flip the Kiln power switch off and then turn it back on when the door is shut again.
Leave the old TC in the kiln, as that will still read on the scale on the kiln.

2)The timer has two AC wires. One in from the main switch, and the other out to the relay. This is the relay control line. There may be other wires, but they shouldn't be needed to convert to PID.
Remove the dial and timer after identifying and tagging these two wires. At this point there should be two main power wires going to the relay/coils and the two relay wires you just identified, plus a couple wires to the red light.
Cut out the box and fit the PID control where you removed the dial ( if it will fit inside the space).
Mount an SSR in the box . If you use a 40 amp SSR and mount it to the box metal with heat sink grease you won't need a heat sink.
Connect AC power to the PID directly from the main switch, and connect a common line to the PID from the power cord common buss.
Wire the PID SSR out +/- wires to the SSR. Connect the SSR #1 and #2 terminals to the two rely control wires you identified earlier that was coming from the timer control.
Run a new TC from the chamber to the TC terminals on the PID. Both will read in use.
When the kiln power switch is turned on, the PID is energized. When the PID is in the RUN mode, it will turn the old relay ON and OFF as needed to control the temperature.

NOTE:
TCs are polarized and any wiring, plugs, and sockets used to connect them must be matching type TC wire. We normally use type K TCs. Figure all this out before hooking up any TC circuits.
 
Last edited:
I believe that has an analog controller. The dial runs an ON/OFF timer. At 1 it is ON 10% and OFF 90% .... at 9 it is ON 90% and OFF 10%. On HI it is on all the time, and at OFF (zero on some controls) it is off all the time. There is a loud CLICK as the high current relay slams open and closed when heating. It does not measure temperature ... just timing of the power on/off cycle.
IT also probably has a "kiln sitter" which is two rods sticking inside to hold a firing cone. When the cone melts, the rods move and shut off the kiln. Some have a firing timer, too. This runs the firing for a set number of hours and shuts things off. All this is pretty useless for knife HT. Most can be stripped out and the new stuff put in the control box.

You will want to change the controller to a PID for knife HT. There are two ways:
1) Make a separate control unit with a power cord/power switch/PID control/ SSR/heat sink/socket. This will allow the kiln to be plugged into the controlled socket.
Mount the PID stuff in a project box and place near the kiln.
Place a new TC in the forge and connect it to the PID.
Plug the control box into the wall socket, plug the kiln into the controlled socket, turn the kiln power switch to ON, and set the dial to HI.
Turn everything on and off from the PID box power switch.
When the PID is turned on and running, it will control the kiln.
If you want to shut off the coils while moving knives in/out, just flip the Kiln power switch off and then turn it back on when the door is shut again.
Leave the old TC in the kiln, as that will still read on the scale on the kiln.

2)The timer has two AC wires. One in from the main switch, and the other out to the relay. This is the relay control line. There may be other wires, but they shouldn't be needed to convert to PID.
Remove the dial and timer after identifying and tagging these two wires. At this point there should be two main power wires going to the relay/coils and the two relay wires you just identified, plus a couple wires to the red light.
Cut out the box and fit the PID control where you removed the dial ( if it will fit inside the space).
Mount an SSR in the box . If you use a 40 amp SSR and mount it to the box metal with heat sink grease you won't need a heat sink.
Connect AC power to the PID directly from the main switch, and connect a common line to the PID from the power cord common buss.
Wire the PID SSR out +/- wires to the SSR. Connect the SSR #1 and #2 terminals to the two rely control wires you identified earlier that was coming from the timer control.
Run a new TC from the chamber to the TC terminals on the PID. Both will read in use.
When the kiln power switch is turned on, the PID is energized. When the PID is in the RUN mode, it will turn the old relay ON and OFF as needed to control the temperature.

NOTE:
TCs are polarized and any wiring, plugs, and sockets used to connect them must be matching type TC wire. We normally use type K TCs. Figure all this out before hooking up any TC circuits.

I've already completely removed the kiln sitter. If you noted I was just hard wiring to test if the elements worked or not, how hot it would get and to see if they needed replacement. I've already built 3 pid control systems for my tempering oven, forge and quench tank. Considering it barely gets to 1700 I'm going to replace the elements with 240 elements and either build and Adriuno based one or just purchase a ramp master or such.
 
Back
Top