Lowering Forced Air Forge Temp via Burner Design?

Joined
Nov 15, 2005
Messages
1,198
UPDATE - (7-27-19) - New Build and Results Finished on Page 2 Post #24!
:D


Original Post:
--------------------------------------------------------------------
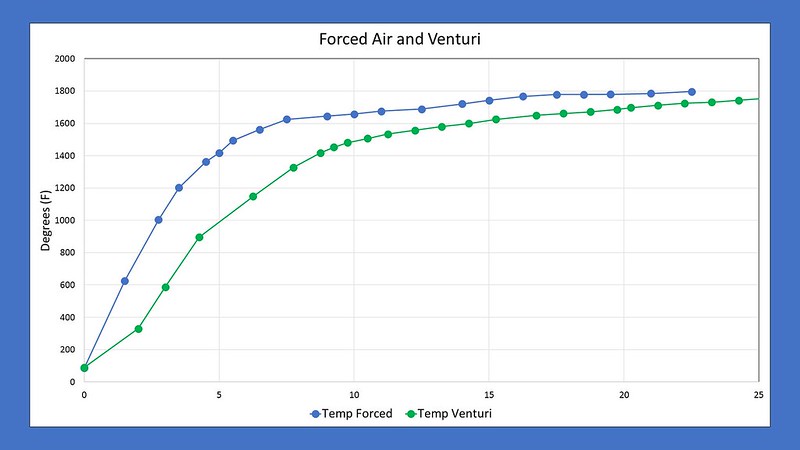
So... I recently rigged up a thermocouple in my forge in order to measure the temperature in my muffle pipe in an effort to aid in nailing some heat treat temperatures.

I quickly found that neither of my burners would perform much lower than 1800 F (results below). My forge is constructed from an air tank with 2 layers of kao-wool, satanite, and ITC-100.

Do yall have any ideas on how to modify my current forced air burner or suggestions on sizing to build a new burner that can get me in the 1500-1600 range?


Supporting Pictures and Video of my Setup:


Trying to show the tip (disregard the old wooden cart):


Cheers,
JK
 
Last edited:
I found I was having the same problem with my forced air burner. I couldn't get it to stay under 1600f. It would go up in temp or down in temp, never stay at a temp below 1600f. I have a ball valve(sucks) instead of a gate valve on my air supply. I figured I couldn't reduce my air supply good enough. I added a "damper" to my blower (just a piece of sheet metal on the intake of the blower) and I found if I take the fire brick doors off I can get it to stay at 1500f.

I didn't notice if you have a "damper" right on your blower. If you don't maybe try that in combination with your gate valve.

Jason
 
I found I was having the same problem with my forced air burner. I couldn't get it to stay under 1600f. It would go up in temp or down in temp, never stay at a temp below 1600f. I have a ball valve(sucks) instead of a gate valve on my air supply. I figured I couldn't reduce my air supply good enough. I added a "damper" to my blower (just a piece of sheet metal on the intake of the blower) and I found if I take the fire brick doors off I can get it to stay at 1500f.
I didn't notice if you have a "damper" right on your blower. If you don't maybe try that in combination with your gate valve.
Jason

Hey Jason, good tips! I do ahve a "damper" on my blower. I have it 100% closed. I also have a gate valve on my air supply. You can kinda see when I opened the front door of my forge the temperature stopped increasing on the forced air graph above.. It didn't decrease though!

I was thinking there could be a way to modify my burner tip so that it could run at lower pressures? Maybe smaller pipe, but with a flare? Not sure if that would work!
 
Use lower gas pressure, and close your needle valve almost all the way. Then adjust your airflow til it stays lit.

Doing this I can get mine to stabilize around 1400... but I’m also running a pretty big vertical forge, so that might have something to do with it, bigger area being heated and all that.
 
What A.McPherson said. ( There is no fear in a McPherson :D)

Lower gas pressure ( 1 pound or less) and lower air flow will make the forger run down into the HT range. A pressure gauge just after the needle valve helps a lot.

Make a reducer for the burner by unscrewing the burner tube and adding a second reducer to allow a smaller burner tube will help, too. Pack the burner port with strips of kao-wool to close it up.

There are some issues with your burner design:
The gas line should enter the manifold as a 1/4" pipe and not be flared up to the larger size with a bell reducer. This may create too much pressure drop and lead to incomplete gas mixing. If you can't find a 1.25" to 1/4" reducer, an easy way to make one is get a 1.25" plug and drill and tap it for 1/4" pipe.
I also see your burner tube is very short. Try changing it to one about 6" long.
 
Last edited:
What A.McPherson said. ( There is no fear in a McPherson :D)

Lower gas pressure ( 1 pound or less) and lower air flow will make the forger run down into the HT range. A pressure gauge just after the needle valve helps a lot.

Make a reducer for the burner by unscrewing the burner tube and adding a second reducer to allow a smaller burner tube will help, too. Pack the burner port with strips of kao-wool to close it up.

There are some issues with your burner design:
The gas line should enter the manifold as a 1/4" pipe and not be flared up to the larger size with a bell reducer. This may create too much pressure drop and lead to incomplete gas mixing. If you can't find a 1.25" to 1/4" reducer, an easy way to make one is get a 1.25" plug and drill and tap it for 1/4" pipe.
I also see your burner tube is very short. Try changing it to one about 6" long.

You're the man Stacy! I'll spec out some changes and get it done. Thanks for the critique of the burner!
 
Last edited by a moderator:
Hey Stacy E. Apelt - Bladesmith Stacy E. Apelt - Bladesmith , Is this what you had envisioned?

Starting at the forge:
  1. 6'' of 1'' pipe to a 1''x1-1/4'' elbow
  2. then onto 1-1/4''
  3. the gas will come in to a 1/4'' x 1-1/4'' T
  4. From the regulator you'll have a guage, then an ESD incase of power failure, then a needle valve, then another guage.
  5. I'll either connect the 1-1/2'' to the 1-1/4'' with an elbow or get some hose.

 
That is good. An elbow is a good choice for the drop from 1.5" to 1.25".

You can also put a gauge on each side of the needle valve so you know if you need to lower the regulator more. This is because you can't always see the one at the regulator when adjusting the burner.
 
A little tip for mixing propane into the air is to extend the orifice into the air stream. You can end up with a mixing problem where the propane does not mix as it just travels down the side of the tube. This is a problem we had at the boiler I use to run. Chemicals where being injected into the vessels at the surface of the tanks and just ran down the inside. We had to add a stinger that would introduce the chemical into the water away from the vessel wall.
 
That is good. An elbow is a good choice for the drop from 1.5" to 1.25".

You can also put a gauge on each side of the needle valve so you know if you need to lower the regulator more. This is because you can't always see the one at the regulator when adjusting the burner.

Excellent idea, and thanks for looking it over.

A little tip for mixing propane into the air is to extend the orifice into the air stream. You can end up with a mixing problem where the propane does not mix as it just travels down the side of the tube. This is a problem we had at the boiler I use to run. Chemicals where being injected into the vessels at the surface of the tanks and just ran down the inside. We had to add a stinger that would introduce the chemical into the water away from the vessel wall.

I like this. I’ll see if I can fashion up a mig tip to be used as the gas injection port just like on a Venturi burner. Maybe that will help increase the gas velocity and aid in mixing?

J. Keeton J. Keeton In your drawing what does ESD stand for? Some kind solenoid valve or something?

Sorry about that. I’m using it for “Emerency Shut Down”. It’s a failed closed solenoid for when the power goes out.
 
Would there be any advantage to putting some sort of flare or bell reducer (from 1’’ to 1-1/4’’) to act as a flame holder at the inlet to the forge? (In regards to running at ultra low temps gas and air rates)
 
ESD = Emergency Shutoff Device

This is usually a NC solenoid that is activated when power is turned on. In case of a power failure it automatically shuts of the gas.
 
Would there be any advantage to putting some sort of flare or bell reducer (from 1’’ to 1-1/4’’) to act as a flame holder at the inlet to the forge? (In regards to running at ultra low temps gas and air rates)
No not in a blown forge. My personal opinion is that flares are just for show. I don’t think thy provide any real benefit inside a forge. Thy are used if the burner is to be used outside the forge. AKA look how cool my burner is. Your forge should be designed so the refractory acts as the flare. You want a nice smooth tapered opening in the refractory that blends into the chamber. If your burner is far enough in the forge that your relying on a flare to keep it burning then your forge has issues and the flare is not going to last long.
 
This is the one I’m using J Jason Volkert :

BACOENG 1/4" DC12V Electric Solenoid Valve (NPT, Brass, Normally Closed) https://www.amazon.com/dp/B010LT30HE/ref=cm_sw_r_cp_tai_vlInDb29PD1Y4

That acronym works too! I’m used to the oilfield terminology since our facilities ESD on various triggers.


No not in a blown forge. My personal opinion is that flares are just for show. I don’t think thy provide any real benefit inside a forge. Thy are used if the burner is to be used outside the forge. AKA look how cool my burner is. Your forge should be designed so the refractory acts as the flare. You want a nice smooth tapered opening in the refractory that blends into the chamber. If your burner is far enough in the forge that your relying on a flare to keep it burning then your forge has issues and the flare is not going to last long.

10-4, thanks!

What do yall think about adding a mig tip for where my gas enters the 1-1/4'' chamber? Will the increased velocity add in the mixing?

Edit: I may be over thinking this...
 
Last edited:
To be more clear with my though process...

I was thinking of :

Mig Tip threaded into the 1/8'' MIP side of a 1/8 MIP x 1/4 Flare union... Then threaded into the 1-1/4'' where ever I want the gas to come in. Like the Frosty T Venturi Burner.


After the Flare union it would go:

1/4 Flare Couple
1/4 Flare to 1/4 FIP
1/4 close nipple
1/4 T for the Gauge (all FIP)
1/4 Needle
1/4 close nipple
1/4 Solenoid
1/4 MIP to 3/8' flare to gas line
gauge #2
regulator
tank
 
In a blown burner you use no MIG tip. The 1/4" pipe is what the gas enters the manifold with.
 
In a blown burner you use no MIG tip. The 1/4" pipe is what the gas enters the manifold with.

Yes sir, I get that historically an orface hasn’t been used on blown burners. I was just wondering if there would be an advantage to increase the gas velocity right where it enters the mixing tube.
 
Back
Top