You are using an out of date browser. It may not display this or other websites correctly.
You should upgrade or use an alternative browser.
You should upgrade or use an alternative browser.
My rehandle and shield projects (with tutorials)
- Thread starter waverave
- Start date
- Joined
- Jun 7, 2018
- Messages
- 3,145
Ok so I made a minor process improvement to prevent the shield/pin setup from breaking when I use it to test the fit.
I went ahead and drilled all the way through the shield and then chamfered a little bit.
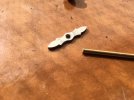
I peened the end of the brass rod and slid it through the shield before applying super glue to keep it in place.
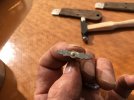
Once the glue dried, I grinded down the peen flat with the shield.
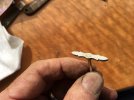
With this new design, I will be able to pull the shield up without having to worry about it.
I went ahead and drilled all the way through the shield and then chamfered a little bit.

I peened the end of the brass rod and slid it through the shield before applying super glue to keep it in place.

Once the glue dried, I grinded down the peen flat with the shield.

With this new design, I will be able to pull the shield up without having to worry about it.
- Joined
- Jun 7, 2018
- Messages
- 3,145
Well... got to spend some time this weekend on my next project. In the end, things did not go quite as planned but I learned a lot.
I took apart one of the new RR swaybacks and rehandled in cocobolo with a pinned shield. It was turning out great so I took a photo of my progress and sent it to a friend.
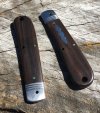
Neither of us realized at the time the major mistake I made. It wasn't until I was in the final polishing stages putting the final touches on the fully assembled knife that I noticed it. At that point, I was so happy to get the pivot pin right I thought I was in the home stretch...I even managed to center the blade! Then...two things happened...
1. I lost hold of the knife on the buffing wheel and it spun up and jammed the whole thing...damaging my knife with several deep gashes and scratches. It was all cosmetic though and I was able to touch it up somewhat.
2. I realized that I inlayed the shield on the wrong freaking side!
It was definitely a face palm moment...but that is EXACTLY why I am learning all of this on RRs and other cheap knives. I was so wrapped up in the details and lessons learned from my first go at it...that I totally overlooked the most obvious of things. It happens.
There were several other lessons learned from this attempt. It was my first time working with cocobolo and it behaves a little different than acrylic. In fact, I busted two of my 1/32" bits trying to inlay the shield. Sanding and shaping it was a lot more work than acrylic and, as with most materials, you definitely want to wear a mask when working with it.
Luckily, I still have another RR handy so I am going right back at it...this time I'll take some in-process photos of the disassembly and rehandle process along the way to share. I took it apart tonight and will post the first part of the rehandle project.
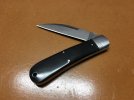
This is what it looks like out of the box...
Here it is in pieces (notice the odd spring with only one hole)...
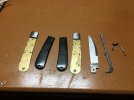
To take one of these apart...it is really helpful to use a center-punch. If the pin head is domed, you will want to flatten it before drilling. The idea is that you mark the center of the pin with the center-punch and then drill out the tip of it with a drill bit no bigger than the pin diameter (unless you don't care about the material...then drill away with whatever to get the peened end off enough) before punching the pin through the other side.
I have been starting with the middle pin to release the spring tension and then I'll remove the bottom pin before working on the pivot. I find that having all of them removed except the pivot allows you to move the blade and scales around a bit to expose the pivot pin location on the bolster. Sometimes it is well blended together and difficult to see otherwise.
Once the pins are out, you will have an opportunity to clean up the liners, spring and blade completely. There will be glue on the liner surface so make sure to get as much off as you can. You want the surface to be as flat as possible for the best purchase to your scale material and for uniformity once assembled.
Next, cut your material to a slightly bigger size than you need to allow some room for error and placement as needed. At this point, make sure the fit at the bolster is decent. You will want to make sure the scales are tight up against the bolster line and this is the time to tweak it until it fits right.
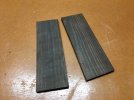
These look a little rough but I was able to salvage a remaining piece of the cocobolo block I had used for the last project. I should be able to make it work.
...to be continued...
I took apart one of the new RR swaybacks and rehandled in cocobolo with a pinned shield. It was turning out great so I took a photo of my progress and sent it to a friend.

Neither of us realized at the time the major mistake I made. It wasn't until I was in the final polishing stages putting the final touches on the fully assembled knife that I noticed it. At that point, I was so happy to get the pivot pin right I thought I was in the home stretch...I even managed to center the blade! Then...two things happened...
1. I lost hold of the knife on the buffing wheel and it spun up and jammed the whole thing...damaging my knife with several deep gashes and scratches. It was all cosmetic though and I was able to touch it up somewhat.
2. I realized that I inlayed the shield on the wrong freaking side!
It was definitely a face palm moment...but that is EXACTLY why I am learning all of this on RRs and other cheap knives. I was so wrapped up in the details and lessons learned from my first go at it...that I totally overlooked the most obvious of things. It happens.
There were several other lessons learned from this attempt. It was my first time working with cocobolo and it behaves a little different than acrylic. In fact, I busted two of my 1/32" bits trying to inlay the shield. Sanding and shaping it was a lot more work than acrylic and, as with most materials, you definitely want to wear a mask when working with it.
Luckily, I still have another RR handy so I am going right back at it...this time I'll take some in-process photos of the disassembly and rehandle process along the way to share. I took it apart tonight and will post the first part of the rehandle project.
This is what it looks like out of the box...

Here it is in pieces (notice the odd spring with only one hole)...

To take one of these apart...it is really helpful to use a center-punch. If the pin head is domed, you will want to flatten it before drilling. The idea is that you mark the center of the pin with the center-punch and then drill out the tip of it with a drill bit no bigger than the pin diameter (unless you don't care about the material...then drill away with whatever to get the peened end off enough) before punching the pin through the other side.
I have been starting with the middle pin to release the spring tension and then I'll remove the bottom pin before working on the pivot. I find that having all of them removed except the pivot allows you to move the blade and scales around a bit to expose the pivot pin location on the bolster. Sometimes it is well blended together and difficult to see otherwise.
Once the pins are out, you will have an opportunity to clean up the liners, spring and blade completely. There will be glue on the liner surface so make sure to get as much off as you can. You want the surface to be as flat as possible for the best purchase to your scale material and for uniformity once assembled.
Next, cut your material to a slightly bigger size than you need to allow some room for error and placement as needed. At this point, make sure the fit at the bolster is decent. You will want to make sure the scales are tight up against the bolster line and this is the time to tweak it until it fits right.
These look a little rough but I was able to salvage a remaining piece of the cocobolo block I had used for the last project. I should be able to make it work.

...to be continued...
Last edited:
JohnDF
Gold Member
- Joined
- May 14, 2018
- Messages
- 28,337
As soon as I saw the picture I thought, "Isn't that shield on the wrong side"I realized that I inlayed the shield on the wrong freaking side!
Sorry about the mistakes, it sure was looking great in the progress pictures.

- Joined
- May 25, 2018
- Messages
- 616
Eager to see the next part of this tutorial Darren!
The rehandled RR looks great. Can you cut a new nail nick on the shield side?
The rehandled RR looks great. Can you cut a new nail nick on the shield side?
- Joined
- Jun 7, 2018
- Messages
- 3,145
Technically, yes I could and just make it a left handed knife. But this is all just for practice so I can learn. That knife will be funny to look at one day down the road to remember my learning experience. Honestly, losing the knife into the buffing wheel was equally dishearteningEager to see the next part of this tutorial Darren!
The rehandled RR looks great. Can you cut a new nail nick on the shield side?
I'll work on the new project some more today and post part II tonight
 I had to order some more router bits so won't be able to finish it today though.
Modoc ED
Gold Member
- Joined
- Mar 28, 2010
- Messages
- 12,919
You know Darren, back in the day not all knife makers/manufactures completely set the shield into jigged bone or stag covers. They would lightly router the shield cavity and actually set the shield partially on top of the covers. It's hard for me to give a clear explanation but if you ask some builders they can explain the procedure completely. I have several knives with shields that are proud or partially proud of the covers.
Nice work so far.
Nice work so far.
RayseM
Platinum Member
- Joined
- Feb 18, 2010
- Messages
- 8,050
NOT a "ROOKIE MOVE" - having something get away from you on the buffer. All too common. Yes - the rookies are more likely to get bit but even pros can, and do, get caught off guard. The buffer and edge tools (in particular - but also nearly everything else) are potentially lethal combinations. Any operation on a fast turning buffer requires complete attention to the task and situational awareness - no phones, no tourists, no loose clothing or other danglers or gloves but certainly wearing safety shields.
Darren, waverave
- you know all this. I'm just talking out loud for others who might not appreciate the risks associated with buffing wheels - whether grinder motor types or even the dremel types. Those little guys can wrap around the wrong side of a blade and in a second your knife is airborne. You are lucky if you only drop the knife.
Anyway - your work is inspiring. You are a good teacher and your modesty is endearing

Take care.
Ray
Darren,
Anyway - your work is inspiring. You are a good teacher and your modesty is endearing

Take care.
Ray
- Joined
- Jun 7, 2018
- Messages
- 3,145
Thanks Ed. I can see that and have had to consider the thickness of the handle material w.r.t. the thickness of the shield. I could potentially inlay the shield such that it is only partially in there...then grind off the extra if needed. I think for harder or thinner materials I might take that approach...simply to avoid having to route out more materialYou know Darren, back in the day not all knife makers/manufactures completely set the shield into jigged bone or stag covers. They would lightly router the shield cavity and actually set the shield partially on top of the covers. It's hard for me to give a clear explanation but if you ask some builders they can explain the procedure completely. I have several knives with shields that are proud or partially proud of the covers.
Nice work so far.

NOT a "ROOKIE MOVE" - having something get away from you on the buffer. All too common. Yes - the rookies are more likely to get bit but even pros can, and do, get caught off guard. The buffer and edge tools (in particular - but also nearly everything else) are potentially lethal combinations. Any operation on a fast turning buffer requires complete attention to the task and situational awareness - no phones, no tourists, no loose clothing or other danglers or gloves but certainly wearing safety shields.
Darren,waverave - you know all this. I'm just talking out loud for others who might not appreciate the risks associated with buffing wheels - whether grinder motor types or even the dremel types. Those little guys can wrap around the wrong side of a blade and in a second your knife is airborne. You are lucky if you only drop the knife.
Anyway - your work is inspiring. You are a good teacher and your modesty is endearing
Take care.
Ray
Thanks Ray I appreciate that
Your message of safety and awareness cannot be overstated! Buffing wheels are one of the most dangerous tools in the shop, in my opinion. I grew up in my grandfather's shop with WWII-era lathes, presses, saws, grinders, etc...a whole bunch of high-speed, spinning mechanisms of death
 I was luckly to only ding my knife up as a result.
Last edited:
- Joined
- Mar 25, 2012
- Messages
- 9,252
- Joined
- Jun 7, 2018
- Messages
- 3,145
I put the swayback project on pause until I get more router bits...so I filled the time with another project I've been wanting to try. I'm a big fan of the Peanut...but just don't use the secondary blade and I always find myself wishing for more variety in configuration. So I am converting one to a single blade bare end with a hollow pin (for a small lanyard...fit right it will provide additional leverage when grabbing and holding the knife). It has proven to be a bit more involved than I anticipated but not bad at all...every work-around I tried has worked (so far).
Taking a Peanut apart is relatively easy. Now that I've done a few it is much easier, in fact. I am almost at a point where I can take a knife apart and reuse the material if I want.
Standard springs, liners, etc. on this one...as you'd expect.
The first thing I had to do, however, was modify the spring to fit the hollow pin I am planning to use.
This is what it looked like originally...
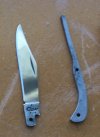
...and this is what I had to change....
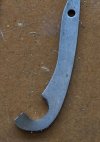
Interestingly enough, it was the RR swayback project that gave me the idea because that is how the spring on that one is already shaped (roughly)...designed to simply rest against the hollow pin and not necessarily wrap all the way around it. With the main blade in place and the spring under tension, it sits firmly against the pin.
I decided to try bone for this project so I could get a feel (and apparently smell...whew!!!) of it. Seriously though, if you've ever had your teeth drilled at the dentist and know that smell...that is exactly what is smells like to work with bone.
Here you want to cut the piece rough but get the fit against the bolster snug...then glue to the liners.
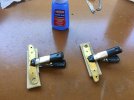
Go ahead and drill out the holes at this point and make sure all your pins fit properly. You may need to drill them a slightly different size depending on what you have available. In this case, I had to drill out the pivot pin a little, same with the center pin and then I had to drill out the hollow pin hole as well. Keep in mind, that by doing so I also had to drill out the pivot hole in the main blade and the center hole in the spring (both hardened steel).
EDIT - Do not drill out the pivot or spring holes to fit the pins you have...make the pins you have fit the existing holes!!! I was able to make my project work doing that but it was a rookie mistake. File down a thicker pin stock to fit the holes so you don't alter the action of the spring. Furhtermore, blade tangs and springs are both hardened steel
At this point you can rough shape the edges to the liner and start sanding things down. Once the thickness of the scale is correct, you are really just rounding off the corners and making sure the fit at the bolster is smooth.
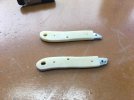
Got one side done and feelin' pretty good...with appropriate battle wounds for this hobby...
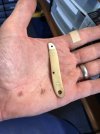
The very first thing I noticed when I took this knife apart was how easy the bone scales cracked...it should have been a warning! I ended up cracking the other side. It was just one or two tiny little whacks too many apparently. Luckily, I have more of this material (discount undyed bone) and it won't take long to redo it...but another lesson learned for me when working with bone...it is BRITTLE! Aside from that and the smell though, it is very easy to work with
...to be continued...
Taking a Peanut apart is relatively easy. Now that I've done a few it is much easier, in fact. I am almost at a point where I can take a knife apart and reuse the material if I want.
Standard springs, liners, etc. on this one...as you'd expect.
The first thing I had to do, however, was modify the spring to fit the hollow pin I am planning to use.
This is what it looked like originally...

...and this is what I had to change....

Interestingly enough, it was the RR swayback project that gave me the idea because that is how the spring on that one is already shaped (roughly)...designed to simply rest against the hollow pin and not necessarily wrap all the way around it. With the main blade in place and the spring under tension, it sits firmly against the pin.
I decided to try bone for this project so I could get a feel (and apparently smell...whew!!!) of it. Seriously though, if you've ever had your teeth drilled at the dentist and know that smell...that is exactly what is smells like to work with bone.
Here you want to cut the piece rough but get the fit against the bolster snug...then glue to the liners.

Go ahead and drill out the holes at this point and make sure all your pins fit properly. You may need to drill them a slightly different size depending on what you have available. In this case, I had to drill out the pivot pin a little, same with the center pin and then I had to drill out the hollow pin hole as well. Keep in mind, that by doing so I also had to drill out the pivot hole in the main blade and the center hole in the spring (both hardened steel).
EDIT - Do not drill out the pivot or spring holes to fit the pins you have...make the pins you have fit the existing holes!!! I was able to make my project work doing that but it was a rookie mistake. File down a thicker pin stock to fit the holes so you don't alter the action of the spring. Furhtermore, blade tangs and springs are both hardened steel

At this point you can rough shape the edges to the liner and start sanding things down. Once the thickness of the scale is correct, you are really just rounding off the corners and making sure the fit at the bolster is smooth.

Got one side done and feelin' pretty good...with appropriate battle wounds for this hobby...

The very first thing I noticed when I took this knife apart was how easy the bone scales cracked...it should have been a warning! I ended up cracking the other side. It was just one or two tiny little whacks too many apparently. Luckily, I have more of this material (discount undyed bone) and it won't take long to redo it...but another lesson learned for me when working with bone...it is BRITTLE!

...to be continued...
Last edited:
ea42
Knifemaker / Craftsman / Service Provider
- Joined
- Jan 1, 2006
- Messages
- 3,887
You know Darren, back in the day not all knife makers/manufactures completely set the shield into jigged bone or stag covers. They would lightly router the shield cavity and actually set the shield partially on top of the covers. It's hard for me to give a clear explanation but if you ask some builders they can explain the procedure completely. I have several knives with shields that are proud or partially proud of the covers.
Nice work so far.
Ed, they did this so that they could sand the peened shield pin smooth without damaging the covers. You'll find this on most of the old jigged bone and stag pocketknives, in some cases more pronounced than others.
Darren you're doing an amazing job, I'd say you're a natural for sure!!!
Eric
Nooooooooo! Do everything you can to get the right sized pins or go the next size up and file down the pins. If you drill the holes bigger you can end up changing the tension on the spring and weakening the pulls. I tried to drill out a spring to corespond to the size I drilled the liner but it heated up the spring until the metals color changed which I’m sure messed with the heat treat on the spring (I was waiting for it to break every time I used it) the bit broke off in the spring and wasn’t easy to get out and it barely made a dent in the spring. They sell drill bits on amazon that are in .05 mm increments (you have to buy 12 but they aren’t that expensive) I got 2.15mm ones for gec 15s and they seem pretty close 2.2mm might be right on the money. In my experience everything just works better if the pins are as close to original as you can get.Go ahead and drill out the holes at this point and make sure all your pins fit properly. You may need to drill them a slightly different size depending on what you have available. In this case, I had to drill out the pivot pin a little, same with the center pin and then I had to drill out the hollow pin hole as well. Keep in mind, that by doing so I also had to drill out the pivot hole in the main blade and the center hole in the spring (both hardened steel).
Sacto
Gold Member
- Joined
- Jun 27, 2017
- Messages
- 2,991
but another lesson learned for me when working with bone...it is BRITTLE!Aside from that and the smell though, it is very easy to work with
...to be continued...
I learned the same lesson about wood with some walnut slabs I made. I probably broke 3 sets of handles trying to pin them before I gave up. It probably wasn’t a good choice for my first project. Since then I’ve been working with micarta and it’s much more forgiving.
- Joined
- Jun 7, 2018
- Messages
- 3,145
Message receivedNooooooooo! Do everything you can to get the right sized pins or go the next size up and file down the pins. If you drill the holes bigger you can end up changing the tension on the spring and weakening the pulls. I tried to drill out a spring to corespond to the size I drilled the liner but it heated up the spring until the metals color changed which I’m sure messed with the heat treat on the spring (I was waiting for it to break every time I used it) the bit broke off in the spring and wasn’t easy to get out and it barely made a dent in the spring. They sell drill bits on amazon that are in .05 mm increments (you have to buy 12 but they aren’t that expensive) I got 2.15mm ones for gec 15s and they seem pretty close 2.2mm might be right on the money. In my experience everything just works better if the pins are as close to original as you can get.
 I didnt consider grinding down the pin but not sure how that would turn out. It was basically a micron bigger hole I had to drill and it didn't take long or heat up much.
Id like to find other size pin stock to match some of the oddball sizes I am coming across.
- Joined
- Jun 7, 2018
- Messages
- 3,145
I put the swayback project on pause until I get more router bits...so I filled the time with another project I've been wanting to try. I'm a big fan of the Peanut...but just don't use the secondary blade and I always find myself wishing for more variety in configuration. So I am converting one to a single blade bare end with a hollow pin (for a small lanyard...fit right it will provide additional leverage when grabbing and holding the knife). It has proven to be a bit more involved than I anticipated but not bad at all...every work-around I tried has worked (so far).
Taking a Peanut apart is relatively easy. Now that I've done a few it is much easier, in fact. I am almost at a point where I can take a knife apart and reuse the material if I want.
Standard springs, liners, etc. on this one...as you'd expect.
The first thing I had to do, however, was modify the spring to fit the hollow pin I am planning to use.
This is what it looked like originally...
View attachment 1190263
...and this is what I had to change....
View attachment 1190264
Interestingly enough, it was the RR swayback project that gave me the idea because that is how the spring on that one is already shaped (roughly)...designed to simply rest against the hollow pin and not necessarily wrap all the way around it. With the main blade in place and the spring under tension, it sits firmly against the pin.
I decided to try bone for this project so I could get a feel (and apparently smell...whew!!!) of it. Seriously though, if you've ever had your teeth drilled at the dentist and know that smell...that is exactly what is smells like to work with bone.
Here you want to cut the piece rough but get the fit against the bolster snug...then glue to the liners.
View attachment 1190265
Go ahead and drill out the holes at this point and make sure all your pins fit properly. You may need to drill them a slightly different size depending on what you have available. In this case, I had to drill out the pivot pin a little, same with the center pin and then I had to drill out the hollow pin hole as well. Keep in mind, that by doing so I also had to drill out the pivot hole in the main blade and the center hole in the spring (both hardened steel).
At this point you can rough shape the edges to the liner and start sanding things down. Once the thickness of the scale is correct, you are really just rounding off the corners and making sure the fit at the bolster is smooth.
View attachment 1190266
Got one side done and feelin' pretty good...with appropriate battle wounds for this hobby...
View attachment 1190267
The very first thing I noticed when I took this knife apart was how easy the bone scales cracked...it should have been a warning! I ended up cracking the other side. It was just one or two tiny little whacks too many apparently. Luckily, I have more of this material (discount undyed bone) and it won't take long to redo it...but another lesson learned for me when working with bone...it is BRITTLE!Aside from that and the smell though, it is very easy to work with
...to be continued...
So the good news is that I didn't crack the other side and got the knife together ok. Snap is good and the blade is centered.
However, the hollow pin is just a hair too big and the tip of the blade hits it a little bit. I have some hollow pin that is one size smaller that I will try next time because I otherwise really like how it turned out and will make another.
Will post pics tonight

Message receivedI didnt consider grinding down the pin but not sure how that would turn out. It was basically a micron bigger hole I had to drill and it didn't take long or heat up much.
Id like to find other size pin stock to match some of the oddball sizes I am coming across.
I’ve done mostly GECs and have yet to find correct pin sizes, it seems like the drill each hole a different size just to mess with you 3/32 is a little too big, 2mm is a little too small, 12 gauge isn’t it either. I use a hand drill and a file to do it at this point but before I was working around it in a vise and just making my way around, it’s not as round or uniform that way but it works very well.
- Joined
- Jun 7, 2018
- Messages
- 3,145
Ahhhhh...that seems like the way to do it.I use a hand drill and a file to do it at this point...
You mentioned the drill bits of various sizes...are you suggesting to use drill bits for pin stock? Or just saying there are bits the same size as various pin stock (insinuating that existing holes would indeed need to be drilled out). Sorry a little confused by that.
Ideally, Id like to have all the various sized pin stock....seems easy for brass but not so much the nickel silver.
