'No Frills' $75.00 home studio tent/lightbox

knives 280.jpgknives 279.jpgknives 282.jpg
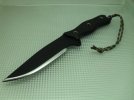
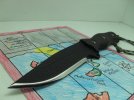
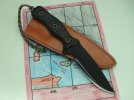
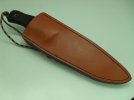
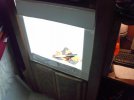
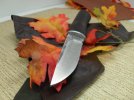
Thanks Coop for posting this tutorial, i just finished building my built in light box, and am begining to explore the possibilties of taking better pictures of my knives, i have just a basic digital camera with a macro function, and have only thought about using the photoshop program, my computing skills arent the best but as with everything we have to start somewhere. My next step will be using some mirrors to reflect light back, im using foil and it does brighten the edge a bit. Heres some pics comments and suggestions welcome.
GHaile
 

Attachments

  • knives 273.jpg
    knives 273.jpg
    41.5 KB · Views: 65
  • knives 274.jpg
    knives 274.jpg
    59.1 KB · Views: 40
Last edited:
I'm a mere beginner like you, especially compared to Coop and some of the other guys. But here's something you can fix easy and fast:

attachment.php


There's a reflection (of the photographer?) on the dark blade. A quick fix is to strategically hold a piece of white board in the blade's reflection. I shoot with a tripod and timer or remote, so I simply hold the board in my hand tilted and positioned so that the knife blade is reflecting the board. Even a piece of plain notebook paper can work.

Needhamsmallsenator.jpg


Not my best picture, but a good example. These blades are very shiny and, if given the chance, would reflect a flyspeck on the opposite wall. :(

I definitely need more practice with the lighting and exposure though.
 
Thanks Bob W, makes sense, i need to figure out how to post bigger pics as well, im gonna get a tri pod this weekend.
 
^^^ Good eye, Bob. It was the first thing that jumped out at me. Reflections of the photographer/camera/walls are the norm on newer artists.

Take your shots and study them. All it takes is to reposition the knife, or yourself. I find it next to impossible to shoot at a 90 degree angle, so you will find my knife images all to have a slight angle of approach.

The purpose of that diffuser above is twofold: To soften and spread the light, and to provide a well lit surface to reflect shiny objects. Rather than hover a white reflector back at it (which, I'll tell you made a nice difference above), MY preference is to change my angle of the knife or diffuser or me so the blade is 'seeing' the diffuser. Too bright there? Now, move the lights.

The possibilities are many, but you must study the sources of reflections/highlights/lows, in your proofs, to understand WHERE you need to add or reduce light. Whether you move you, the object, or the lights is all part of the challenge. And there is no one method that doesn't have an effect.

Stay on it! :) Keep showing examples!

Jim
 
Thanks for the tips Coop, I think the tri pod will allow me to take some time, and examine all the elements that have been mentioned, again thanks for the post! Ill keep updating my progression, im gonna hunt down some wallpaper samples.
Heres some pics of a friends knife.
Greg
 

Attachments

  • knives 290.jpg
    knives 290.jpg
    60.4 KB · Views: 36
  • knives 286.jpg
    knives 286.jpg
    64.1 KB · Views: 33
  • knives 288.jpg
    knives 288.jpg
    64.7 KB · Views: 23
  • knives 292.jpg
    knives 292.jpg
    28.9 KB · Views: 20
I gotta say, this site has been a wealth of info, from knives to sheaths to sharpening to stuff like this (enough that I am ordering a paid subscription). Being right after the holidays and being on a single income, I had to take the BAWB (broke a$$ white boy) route, but with ideas gleaned off the posts in here...it's truly barebones, but the only thing I really use it for is knives, guns, and the bracelets to list on ebay...definitely gives a better showcase than sitting the stuff on a sheet & using the factory flash :)
I took a box, and took out the sides, covered with tracing paper to diffuse the light. For the top light, I used a 100 watt "reveal" bulb, with 2 40 on either side as needed. I also took some leftover felt from one of my kids school projects to line the bottom (white for dark objects, blue for light stuff). Camera is an older digital Canon Rebel. so without further adoo (and please don't laugh....gotta make do when money is tight):
DSCF1377.JPG


With the blue:
DSCF1378.JPG


Heres the pics Im getting from it:
IMG_5327.JPG

IMG_5229.JPG
 
Thanks to everyone posting tips in this thread! Knives are not easy to photograph well I am learning.
 
Hey guys, I am currently using a softbox with three point lighting. I use the daylight CF's. I am getting decent pics, but wondering if Coop's rig would be an upgrade or not to take my shots to the next level. His lights from the back and does not have lights on the sides. My set up has a light on each side and one on top, all diffused. Do you guys think his set up would give me better lighting? Here is a sample set of pictures I took recently

orig.jpg


orig.jpg
 
My set up has a light on each side and one on top, all diffused. Do you guys think his set up would give me better lighting? Here is a sample set of pictures I took recently

I think your picture's pretty good. But I think you could make the lighting more 'dramatic' and 'artistic' by not having light flooding in from every direction.
Instead of re-building your entire light tent, maybe start by just turning off one of the side lights and see what difference that makes.

Also, just something to try, stick something under the blade so that it's not resting directly on the background. I use kneeded eraser, but just about anything will work. That'll create a shadow and give your knife some 'depth'.

Not a great picture overall, but it demonstrates the effect of creating an even shadow along the blade length.

DSC_2269.jpg
 
Last edited:
Thanks, Bob. Can I ask how you use the eraser, and what kind? Do you put little balls of it under the blade in two places and one under the handle, something like that?
 
I think in the above picture the handle is resting on the table and the blade is elevated to be even with the handle. It's difficult to elevate an entire large knife, and you lose the ability to make small angle adjustments when shooting if you've got the knife delicately balanced.

Regarding the kneeded eraser, yes you just ball it up and put it under the object. It's a bit like PlayDough if you've never used it, only the eraser won't dry out.

It works better with smaller knives, allowing them to be tilted and angled in any direction, generally without worry of them falling over like a heavier knife would.

DG2b.jpg
 
Regarding the kneeded eraser, yes you just ball it up and put it under the object. It's a bit like PlayDough if you've never used it, only the eraser won't dry out.

Ive used the playdoh...handy when one has kids, they don't miss the little bit missing :)
 
Last edited:
I am in the process of changing my lighting setup and would like a few suggestions along with a critique.

I updated to one of the diffuser boxes and for now have it mounted on a tripod. I feel the diffuser should be mounted more horizontal than what It is now. The problem is that I must be able to set this up on the kitchen table as I have no permanent spot for it. Can any one suggest a quick and easy way to mount this diffuser higher, and more horizontal?

DSC00249.jpg

DSC00248.jpg


Here is one of the first photo's I took with this set-up. Please feel free to critique. Do you feel its over Photoshopped? My thoughts are that the light is too close, leaving hot spots, washing out detail around my makers mark etc.

DSC00075_edited-1.jpg


Here is the photo before editing in Photoshop.
DSC00074.jpg
 
I would like to thank you Jim for sharing knowledge that you did here.

I spent lots of time to read and try to translate all that...

In proposing to Sam to make the photos in 2009, I was far from idea of the adventure that awaited me. Thanks to you again..."MERCI Jim"...


2009

Hunting Show Rambouillet Fr.


2012


Thanks, Coop, for the great ideas and tutorial. I'm going to have to try it.

Bob W, that girl scout knife sure brings back memories - but mine never looked so good!
 
Thanks, Coop, for the great ideas and tutorial. I'm going to have to try it.
I'd been wondering what I could do to improve my exceptionally crappy photos. Using ideas from this thread and pieces lying around the garage, I used a leftover 1.5" slab of Ikea countertop, a couple TV tables, a bunch of 1/8" styrofoam, some aluminum foil, tape, staples, and 3 500w halogen worklights. Didn't cost me a dime (because I have a LOT of leftover stuff from other projects hanging out in the garage.)
Anyway, my pics went from this:
micarta_sheath_side_pb.jpg


to This:
3amigos-sheathed.jpg


Still not professional, and I'm still working on figuring out my camera, but much improved. I always knew folks on this site were the greatest, most generous, helpful souls around.
Thank you!
 
I am in the process of changing my lighting setup and would like a few suggestions along with a critique.

Hi Ken, I am COMPLETELY remiss in not seeing your post till now. (six months later. Uggh.) Your evaluations are exactly right. There is simply too much light on the blade. I attempt to solve this with a system of dual lights on my current setup:

orig.jpg


From a distance you can see one unmuffled light on the right and the identical light enclosed within a softbox on the left. Still behind a diffuser. Both have power output adjustments, too. Blades are HIGHLY reflective and handles often are dark. THey need different levels and angles. It takes two lights (plus a bevvy of mirrors) to do it well.

I would like to thank you Jim for sharing knowledge that you did here.
Berno (Norbert), you are an immediate learner and are making me smile with how well your images look. Maybe even a little uncomfortable... LOL! ;)

I'd be proud to show either of these images. Crisp!

Still not professional, and I'm still working on figuring out my camera, but much improved. I always knew folks on this site were the greatest, most generous, helpful souls around.
Thank you!
^^^ Case in point. They look clear, warm, and inviting. Unlike the common harsh image of your first attempts. That was my experience as well. How frustrating, and I started paying attention to how the 'pros' did it.

Nicely done. Keep the good work up.

Coop
 
Does anyone know the dimensions of the various pieces in Coop's set up? I'm trying to build a replica. Thanks
 
Norbert: I brought WAYYY too many, but spending time sorting through them for users takes too much time also. So I brought almost all 500... ;)

The flashes I use are Dynalite Twinkle's @ 400w per side. No longer available, but they've probably upgraded them.

Balislinger: I use a PVC frame which accommodates the Art-store-bought acetate tracing papers, which are 32" x 40". I wish for bigger, but I make do with this.

Coop
 
Back
Top