Fixall
Brian
- Joined
- Mar 26, 2018
- Messages
- 5,401
Last week I posted about how easy it is to break down sheets of Micarta and G10 with a track saw to cut in to scales and slabs on the table saw. Since I had so many questions about the process on Instagram, I thought I would post my full process for cutting the long strips into scales. Buckle up, this is kind of a long one, lol.
Before I get started, I just want to make one thing clear. Using this process requires removing the riving knife off of your table saw. This can be very dangerous. I only remove the riving knife when I am cutting phenolic and glass because it has less tendency to close up on you. I also only cut short material this way. Use this process at your own risk! That being said, I consider this to be very safe, and EXTREMELY cost effective process.
I'd probably just watch the video rather than read my wall of text.
I personally use a sled system by Incra since I already had the miter gauge and fence for my big saw in the shop. There are a million instructions on how to make a sled and sacrificial fence on Youtube if you decide to make your own though. There's not a lot to it. Most people like to install the sled on the right side of the blade when using a jobsite saw so that they can use the table saw's fence as added support. I install mine on the left instead for a few reasons. One, I like to use the sled on my big table saw (which requires me to have it mounted to the left of the blade)... But more importantly (to me) it saves time. By having the sled mounted on the left of the blade it allows me to use the rack and pinion fence to very quickly adjust my stop block. Most stop blocks mount on the fence of the miter gauge of the sled. By having it mounted on the left side of the blade on the table saw fence, I don't have to bother with flipping the stop block up every time I make a cut since it stays in place, rather than moving with the miter gauge.
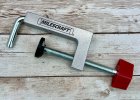
For a stop block, I just use a piece of 2x4 with a hole drilled into it so that a clamp will fit. This is the clamp I use. It's made by Milescraft but there are dozens of similar clamps on the market.
Now for the important part, and what I do different than most people. The blades. This is also the reason a riving knife can't be used with my process. I use circular saw blades instead of a 10" table saw blade for this process for several reasons. For phenolic/Micarta 1" thick or under, use 7-1/4" circular saw blades. For phenolic/Micarta over 1" and up to 2" I use 8-1/4" circular saw blades. For glass I use diamond tile saw blades.
A 7-1/4" has a tooth speed that is nearly 30% slower than the tooth speed of a 10" blade, which helps prevent burning the material. The circular saw blades I use are also significantly thinner than the thinnest 10" blade and have an ultra thin kerf which results in less friction and less wasted material. A smaller blade also increases the torque of the blade which can be really beneficial with the underpowered 120v saws, especially when cutting dense composites.
Best of all? I can get a 7-1/4" carbide circular saw blade for $7 a pop, compared to about $50 for the Freud 10" table saw blades I use. I can get hundreds of clean cuts out of a single circular saw blade.
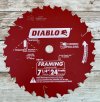
For 7-1/4" blades I like these thin kerf, 24 tooth Diablo blades. They cost just under $7 each from the big box retailers.
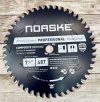
When I need to make a particular clean cut on something really spendy like Westinghouse ivory paper, rag Micarta, etc I like to step up to either the Norske 48 tooth composite decking blade, or the Diablo 40 tooth ultra thin kerf blade. Both make cuts that are a bit cleaner than the 24 tooth blade, but they cost about $15 each.
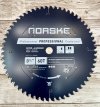
For cutting thick stuff, splitting phenolic/Micarta blocks into scales, or ripping scales, I use the 8-1/4" Norske 60 tooth thin kerf Miter-Aluminum blade. Aaron from MMS actually suggested this one to me and it has performed better than any other blade I've used for this task so far. It makes a ridiculously clean cut. I can usually get these for around $25 each.
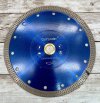
For glass I use these GoYonder diamond tile saw blades. There are a ton of different companies that make these, but I've had bad luck with some of the others not coming with the spacer so that they'll fit in a table saw. These have a VERY thin kerf. I use a 4.5" blade for thin glass, and a 7" blade for thicker glass.
Alright... That's all I've got for you! I hope this is helpful to at least someone out there.

Questions, comments, input very welcome!
Before I get started, I just want to make one thing clear. Using this process requires removing the riving knife off of your table saw. This can be very dangerous. I only remove the riving knife when I am cutting phenolic and glass because it has less tendency to close up on you. I also only cut short material this way. Use this process at your own risk! That being said, I consider this to be very safe, and EXTREMELY cost effective process.
I'd probably just watch the video rather than read my wall of text.
I personally use a sled system by Incra since I already had the miter gauge and fence for my big saw in the shop. There are a million instructions on how to make a sled and sacrificial fence on Youtube if you decide to make your own though. There's not a lot to it. Most people like to install the sled on the right side of the blade when using a jobsite saw so that they can use the table saw's fence as added support. I install mine on the left instead for a few reasons. One, I like to use the sled on my big table saw (which requires me to have it mounted to the left of the blade)... But more importantly (to me) it saves time. By having the sled mounted on the left of the blade it allows me to use the rack and pinion fence to very quickly adjust my stop block. Most stop blocks mount on the fence of the miter gauge of the sled. By having it mounted on the left side of the blade on the table saw fence, I don't have to bother with flipping the stop block up every time I make a cut since it stays in place, rather than moving with the miter gauge.
For a stop block, I just use a piece of 2x4 with a hole drilled into it so that a clamp will fit. This is the clamp I use. It's made by Milescraft but there are dozens of similar clamps on the market.

Now for the important part, and what I do different than most people. The blades. This is also the reason a riving knife can't be used with my process. I use circular saw blades instead of a 10" table saw blade for this process for several reasons. For phenolic/Micarta 1" thick or under, use 7-1/4" circular saw blades. For phenolic/Micarta over 1" and up to 2" I use 8-1/4" circular saw blades. For glass I use diamond tile saw blades.
A 7-1/4" has a tooth speed that is nearly 30% slower than the tooth speed of a 10" blade, which helps prevent burning the material. The circular saw blades I use are also significantly thinner than the thinnest 10" blade and have an ultra thin kerf which results in less friction and less wasted material. A smaller blade also increases the torque of the blade which can be really beneficial with the underpowered 120v saws, especially when cutting dense composites.
Best of all? I can get a 7-1/4" carbide circular saw blade for $7 a pop, compared to about $50 for the Freud 10" table saw blades I use. I can get hundreds of clean cuts out of a single circular saw blade.
For 7-1/4" blades I like these thin kerf, 24 tooth Diablo blades. They cost just under $7 each from the big box retailers.

When I need to make a particular clean cut on something really spendy like Westinghouse ivory paper, rag Micarta, etc I like to step up to either the Norske 48 tooth composite decking blade, or the Diablo 40 tooth ultra thin kerf blade. Both make cuts that are a bit cleaner than the 24 tooth blade, but they cost about $15 each.

For cutting thick stuff, splitting phenolic/Micarta blocks into scales, or ripping scales, I use the 8-1/4" Norske 60 tooth thin kerf Miter-Aluminum blade. Aaron from MMS actually suggested this one to me and it has performed better than any other blade I've used for this task so far. It makes a ridiculously clean cut. I can usually get these for around $25 each.

For glass I use these GoYonder diamond tile saw blades. There are a ton of different companies that make these, but I've had bad luck with some of the others not coming with the spacer so that they'll fit in a table saw. These have a VERY thin kerf. I use a 4.5" blade for thin glass, and a 7" blade for thicker glass.

Alright... That's all I've got for you! I hope this is helpful to at least someone out there.
Questions, comments, input very welcome!
