Shaping handles with metal spacers - need some advice

Jdubb1977

Gold Member
Joined
Oct 19, 2021
Messages
21
Looking for a little advice on improving my handle shaping. Inside curves are giving me some trouble, especially when I've got hard materials in my spacers (steel, coper, brass, etc). It's kinda visible in the 2nd pic below, but you'll see there's a bump where the steel is in the middle of the spacer. On a couple of knives I've tried smoothing that out with a dremel and usually end up just making a mess of that area. Hand sanding can get things smooth, but I get that bump. I don't have a grinder w/ a small wheel attachment, so I'm limited on the power tool side. I use a 2x42 grinder with big wheels and a small 1x30.

I'm guessing that the key is not sanding that area w/ anything soft (fingers, sanding pads, etc). But, who knows? ;)

Any suggestions from people much more experienced that me on how to improve that area? Many thanks!
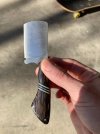
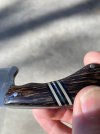
IMG_0632.jpegIMG_0631.jpeg
 
I like a Stanley rotating vise to let me orient the piece exactly how I want. For your issue, I would get my large half round file, as well as a variety of pipes of different diameters. Starting with coarse sandpaper wrapped around those implements I'd enforce the desired curvature.
 
That makes sense. Do you think wood dowels would work, or would metal/plastic pipes be better for those curves?
 
You are free to try whatever you have on hand. I have accumulated lots of sanding aids, most of them metal.
 
Wood sounds too soft in my opinion. I’d think you’d want something rigid that won’t deform so you can apply even pressure to the materials that wear at different rates.

If it were me, I’d shape a piece of g10 to fit the curve as closely as possible and use that.
 
As David said, metal sanding backers work better. I use a piece of hardened flat-ground o1 and various HSS rods.
Also needle files to get it close to flat initially
 
Any suggestions from people much more experienced that me on how to improve that area?

IMO, this is difficult to master, so the only thing I have to add to the above is more practice...
The wood portions will always sand away faster/more than the metal spacer, so you have to be very precise in your sanding. If you are off at all on keeping the paper exactly level with all parts the metal and the stuff on the sides) the metal bump will be there.
 
It helps to try matching the hardness of your handle materials as closely as possible, trying to stay away from softer woods when using hard spacers. Hardwoods such as desert ironwood, ebony, snakewood, etc matched with softer metals like brass, copper, or nickel silver might give you better results.

Eric
 
As David said, metal sanding backers work better. I use a piece of hardened flat-ground o1 and various HSS rods.
Also needle files to get it close to flat initially
I do have a set of needle files and some larger half-round. I'll put those to work and look at getting some metal pipe in a bunch of diameters to start. I think getting it closer on the rougher grits will go a long way
 
IMO, this is difficult to master, so the only thing I have to add to the above is more practice...
The wood portions will always sand away faster/more than the metal spacer, so you have to be very precise in your sanding. If you are off at all on keeping the paper exactly level with all parts the metal and the stuff on the sides) the metal bump will be there.
I've learned that the hard way! i've created more grooves from unequal sanding than I can count. Especially when I'm going fast or using anything powered. More practice is definitely what's needed most, especially when i'm mixing materials. I do a lot better when everything's G10!
 
I have used cut-off sticks of micarta as a sanding aide for different materials, like wood and metal.
 
An extra step that works for me is oil (better still, a film finish like urethane) the wood parts as you get close to the final shape. The finish does 2 things.
1) Keeps the wood clean as you continue to grind away the metal. This is especially important when using softer (more porous) and /or lighter colored woods or antler parts. 2) The finish gives you a clearer indication if you are sanding unevenly to the metal. You can see the wear and so proceed accordingly. A down side to the finish is that it can clog up your abrasive. I find though, that it can help more than not. After the final sanding, finish as you prefer. The temporary work finish will be all worn off.

There is good advice above as to pairing your materials to be more compatible in the shaping process and other how to. Good luck.
Thanks Ray. That's a good reminder. I've oiled material before to see how it's looking and thought "this makes it really easy to see where I'm sanding", and then quickly forgot what I'd just learned. 😅
 
Watch the nick wheelers part of the bowie series on YT on the handle shaping. One of the things he says is people switch way too early to soft backed sanding paper or shoe shine method. Keep it backed with a file or a piece of hardened steel 97 percent of the way. For curves you can use half round or round files. This helps also with not washing out the lines on your handle if you have ridges, flats and similar. When sanding hard and soft materials, concentrate on keeping the sanding part of the file always on the harder material to not create that bump. This happens with pins as well.
 
Last edited:
Also getting better on the hard platen on grinder helps, 90 percent of material removal happens on the grinder.
 
Watch the nick wheelers part of the bowie series on YT on the handle shaping. One of the things he says is people switch way too early to soft backed sanding paper or shoe shine method. Keep it backed with a file or a piece of hardened steel 97 percent of the way. For curves you can use half round or round files. This helps also with not washing out the lines on your handle if you have ridges, flats and similar. When sanding hard and soft materials, concentrate on keeping the sanding part of the file always on the harder material to not create that bump. This happens with pins as well.
Thanks for the recommendation on those videos. I gave them a watch the other night. So much good information to start practicing! I'm definitely guilty of going to soft backed paper way too early. I've been sanding on the grinder and hard backers to 220grit and moving to soft pads or my fingers after that. I'm going to work on making some hard backers and practicing more w/ my files before starting my next couple knives.

I might go back and revisit the knife I started this thread with and see if I can go slow and get this one feeling better.
Yeah, unfortunately not many makers go in such great detail on technique but prefer flashier videos that get the clicks from the masses.

There are some very good makers with low views on YT that show in great detail on how they go about certain processes - Salem Straub and Don Nguyen cross my mind, but there are many others as well.

Filing gives you time to think on what you are doing when removing material. Then some of those ideas and moves are transferable to the grinder. Simple handles can be done fully on grinder.
 
Back
Top