Recommendation? Sharpening a blade with a Urasuki

Cushing H.

Gold Member
Joined
Jun 3, 2019
Messages
2,714
I thought I would break this specific discussion out into its own thread....

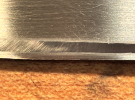
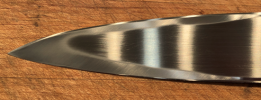
Re. that Yanagiba I am finishing up .... I am finding working on the initial sharpening of it, specifically the Urasuki side, to be very enlightening in terms of how well the Ura has so far been developed. The stone marks make it VERY clear just how far the Ura has been developed towards the spine and the edge. Refer to the below photos....
1637085966269.png
1637085997553.png
The first photo is at the tip ... and pretty clearly shows the Ura could have been carried forward further towards the tip (I seem to recall having some difficulty controlling the blade while grinding out there...). I can live with this, BUT the second photo is a close up of the edge further along towards the heel (the edge is on the bottom of the photo). It pretty clearly shows that the URA was not carried all the way to the edge.

The question is .... what do I do from here??? The work I have done so far has been with a 1000 grit waterstone .... and while I could probably continue to plug away at this and get that "sharpened" flat (I guess technically called the "Uraoshi" moved all the way down to the edge itself (which is where it must get to), but with a 64 rockwell blade and 1000 grit stone, that will take quite a while, and will also likely take several re-flattenings of the stone.

Other options I can think of would be to back off to a coarser diamond stone until I have the flat extended out to the edge .... but dont have the experience to understand whether this will produce too long a "flat" on the sharpened URA side (I have no idea just how wide the Uraoshi should be, especially along the edge..... The other option I can think of is to go back to the grinder and work to extend the width of the URA closer to the edge .... but that comes with some risk of over cutting and damaging the profile......

I have never had hands-on on any knife with a Ura .... so I just cant judge the best path forward. Those of you who have worked with this type of blade .... what do you think??

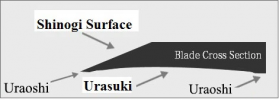
For reference, here is an image of what these blades look like in cross section. It makes it really clear what role the Ura plays in establishing the very shallow edge angle when you sharpen with the Ura side held totally flat against the sharpening stone, and why these blades can be made so darned sharp......
1637086793204.png
 
I quoted making one. I gave a price of $1800. Part of my price included sending out for sharpening. I’d send it to Murray Carter myself. Sorry can’t be of more use than that.
 
First thing to do is flatten your stones on a master stone.
Then go back and flatten the ura it to the edge on a coarser grit. stone. If using your coarser arato stone (600 grit), make it flat first. If using a diamond stone, make sure you keep the blade flat on the plate. Once the flat area is to the edge, then go back to the 1000 arato which is now flat.
Thank you stacy. My stone is flat (first thing i checked), just cutting slowly at 1000 grit. I did go out yesterday and get a coarser diamond stone ... so with your input i will have at it and extend the flat out to the edge, then shift up to 1000 and beyond.

I just came to realize i have no idea exactly what the geometry of the ura relative to the edge should be (or how critical it is) as ive never really seen one. What i "should" do is buy 3-4 knives and look at them, but then i would not need to make my own. :-). There is one store fairly close to me that *might* have a yanagiba or two for me to look at. I can always go back at a later time with the curved platen and extend the ura towards the edge...

Good news i think is that this is a one-time thing: once you get the thing ground right, touch ups on the waterstone should be really fast...

Thanks again.
 
Not an expert, but I would hit that on a disc grinder first with a 120 grit or on a surface plate with a 120 grit making sure to work all the surface with equal pressure. It looks almost like you have 2 bevels on your Ura side.
 
Not an expert, but I would hit that on a disc grinder first with a 120 grit or on a surface plate with a 120 grit making sure to work all the surface with equal pressure. It looks almost like you have 2 bevels on your Ura side.
I know it looks that way .... but that was the side precision ground by JT ... .so should be flatter than I could ever get on a disk (if I were to have one). Whatever difference there is is VERY small - easier to grind down flat on a stone than to try to grind..... I suspect if I were to try that I might cause more problems....
 
You can check japanesechefknives.com, there is loads of pictures of the ura side on the traditional jap knives. All things considered, I wouldnt worry too much, it looks the outer part of your uraoshi is polished. If you can feel the burr when sharpening the bevel side, i wouldnt worry. Ura is there just to make the deburring easier.
 
You can check japanesechefknives.com, there is loads of pictures of the ura side on the traditional jap knives. All things considered, I wouldnt worry too much, it looks the outer part of your uraoshi is polished. If you can feel the burr when sharpening the bevel side, i wouldnt worry. Ura is there just to make the deburring easier.
Freddy - thanks. I think you are right. I did go to japanesechefknives, but could not find any close ups of the ura side ... but i will try again.

Be that as it may, i did get a coarse diamond stone, and worked on the knife last night. It seemed that as much as i worked, that scuffed portion of the ura approached the edge, but just never got there. I DID eventually notice though that a portion of the edge towards the heel was receeding a little. Huh? This could not happen unless the stone was actually hitting the edge, even though i NEVER got a burr.

I eventually came to the conclusion you stated ... that i was massively misinterpreting what i was looking at ... that the edge was in fact ground, and the other stuff was just miscellaneous scuffing down in the ura. The thing is screaming sharp now. Lesson learned (at the cost of a slight concavity it the edge, which should be fixable by a little judicious stone work at the heel...

I dont know why i never got a burr. I am wondering if my bevel side is actually too shallow an angle?

Now i gotta make some sushi... 😊
 
Next time before finishing the ura, do a quick pass on the disc grinder and it will show you where you can extend your hollow. This is how i did my s grinds to do them even, for example getting the hollow inline with the spine.

Here are some links, you can browse through the pics and zoom in. It seems like the uraoshi show like in your knife (albeit not so pronounced), after sharpening only the outer part of the flat shows sign on the stone.

https://jp-knives.com/skk_f-761/

 
Next time before finishing the ura, do a quick pass on the disc grinder and it will show you where you can extend your hollow. This is how i did my s grinds to do them even, for example getting the hollow inline with the spine.
Even though I dont have a disk sander, I suppose I could use my nice flat diamond stone to mark the extent of the hollow. Good idea.
 
Here are some links, you can browse through the pics and zoom in. It seems like the uraoshi show like in your knife (albeit not so pronounced), after sharpening only the outer part of the flat shows sign on the stone.
Just had a chance to look through the website and found the photos of the Ura side that you showed .... but I find it interesting that there are basically no other photos on the website (that I can find) of the Ura side. Makes me wonder if the kind of patterning I am seeing is common, and they dont want to show it?

It ALSO makes me wonder whether the radius on the platen I made is **too shallow** - creating an opportunity for the kind of scuffing I am seeing just inside of the Uraoshi because the curvature is not enough to get the metal far enough away, acutely enough, from the stone surface to avoid contact without real grinding??? I forget the radius I made .... but recall it was "standard" in terms of radius platens that can be bought out there (just being too lazy to look up my old thread.... :-( ).
(EDIT - just looked up my old wood platen thread. I made it to 26" radius. Is that really what it takes ..... or should it be a smaller radius??????) Whey the heck did I get that scuffing off of a newly flat stone?????)
(FURTHER EDIT - just came across an older thread on this started by Brock - where he mentions this scuffing, and stacy mentions rinsing the stone and blade frequently ( https://www.bladeforums.com/threads/usuaba-grind-w-radius-platen.1514532/#post-17391213) . I *though* I was rinsing often ..... but I guess maybe not often enough??? :-( )

I think I have more research to do (including, going to that local store, and maybe dropping in on some of the local places that make sushi, and asking if I can take a look at their knives........ hopefully they will not take offense ......
 
Last edited:
Just had a chance to look through the website and found the photos of the Ura side that you showed .... but I find it interesting that there are basically no other photos on the website (that I can find) of the Ura side. Makes me wonder if the kind of patterning I am seeing is common, and they dont want to show it?
Try chefknivestogo, I just looked at eight or so yanagiba (270mm and 300mm) and they all had pictures of the ura side.
 
Hah!! .... I was just looking at an old thread between Brock, John Cahoon and Stacy (it is a WIP by John .... and Brock mentions a video on sharpening that he recommended (https://www.bladeforums.com/threads/a-yanagi-ba-for-a-friend.1601016/page-3#post-18542145) . I had come across this video before, but skipped over it for some reason. In that video at roughly the 2:56 time mark there is a close up where he flips the knife and you catch a glimpse of the Ura side. Guess what ...... scuff marks!!!!!!!!!
 
With smaller diameter of the wheel/platen it is for sure easier to feel the hollow. I think when you grind the hollow you almost (!) need to want to blow through the edge and then grind/sand back to flat, like this you will have a very thin uraoshi. For a 3-4mm thick yanagiba with a standard width a 10 or 12" wheel would work nicely I think. Also my hollows on s grind are much more consistent when centering the work rest to the middle of the wheel and not grinding it in free hand.
 
With smaller diameter of the wheel/platen it is for sure easier to feel the hollow. I think when you grind the hollow you almost (!) need to want to blow through the edge and then grind/sand back to flat, like this you will have a very thin uraoshi. For a 3-4mm thick yanagiba with a standard width a 10 or 12" wheel would work nicely I think. Also my hollows on s grind are much more consistent when centering the work rest to the middle of the wheel and not grinding it in free hand.
If you first grind on small contact wheel that Urasuki , it will serve as guide to grind next that big 36 inch radius .........
And paint whole side of that side of blade , that way you *see* where you grind
 
I just dropped by a local sushi place, and asked if I could take a look at their knives. Took me a little while to have myself understood (one guy apparently thought I was asking to sell them knives!), but eventually I got them to understand. Got to take a look at a several fairly well used knives. On all of them, the Urasuki was very shallow, as expected. On the Yanagiba, the Urasuki at the tip was washed out, just as mine had become .... and around the edges they also had some "hazing" - though not quite as much as apears on my knife. Honestly, I am still a little confused as to why there appears to be this unground line along the edge of the blade, even though the thing is definitely sharp. The only thing I can think of is a comment made in that video that as you are working the blade, the very thin edge can "lift up" and not be ground. Things are certainly thin there, and wonder if that is part of what is going on??

I think what I am left with is to re-grind the Urasuki doing as Freddy says and take the Ura up to and a little beyond the edge, then see how it behaves while sharpening. As I said, this was originally intended to mostly be a learning vehicle before taking on a 300 mm blade. I'd hate to work up that one while still being unsure of how these things behave during sharpening (which is certainly really different from the traditional double bevel blades I have worked on....
 
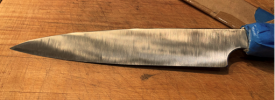
On a mission .... re-ground the Urasuki, paying special attention to extending to the spine and edge (Yes Natlek - I did paint it !!). It is as "easy" as I remember it to be to "register" the belt into t the existing curve, and I had the belt (120 grit) running quite slow - 20%. I DID notice, however, that it is fairly easy to "rock" the blade upwards or downwards away from the "registered" curve (the thing is so shallow!) - thereby creating a "double bevel" mentioned above .... so I was careful about that. However, I will say that avoiding that becomes increasingly difficult towards the tip. I suspect that some of my issues here are from my home-made wood platen, which clearly has some non-uniform curvature top to bottom (Sigh .... I think I see a precision mfgd metal radius platen in my future.....). Again - there is *so little* metal removed because the thing is so shallow that this only took 30 minutes or less (oh - I only took this to trizact A65 since this is my own and not a showpiece.... and the apparent unevenness of the spine and edge are reflections from the LED bulbs above the blade....) ....
1637283762020.png

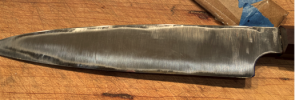
I went at this with the waterstone (starting at 1000), following the insights and advice from the video above (anyone wanting to try this has GOT to watch that video ... when you get hands-on it really helps you get the feel of what to do).

Anyway .... the Uraoshi was MUCH better behaved (again, I did not polish the inside of the Urasuki... so you might have to use your imagination to visualize the Uraoshi, imagining the remaining inside of the blade polished to a more refined level....)....
1637284033441.png

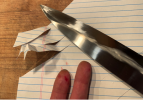
and working the bevel side as the guy in the video recommends it became really easy to keep things clean and flat (If I had spent more time working this, I am sure the haziness up towards the shinogi would have been cleaned up ... I was concentrating more towards the business end of the edge...... and things on the bevel are more even than appear in this photo)

1637284202493.png

this photo (which was intended to be humorous) gives a slightly better view of how the bevel comes out really flat and polished. There WAS a little bit of cost in terms of blood, but this was NOT cuts .... this was just "abrasion" from holding the fingers at the boundary between the blade and stone .... and abrasion of the skin from the stone.... But .... this thing is SHARP...

1637284685065.png

honestly, I did not find this "hard" ..... we talk about the "Zen" moment in grinding when you learn to "feel" when the bevel is sitting flat on the belt. In many ways sharpening on the waterstone with this single bevel/Uru geometry is very much like that. Kinda cool and relaxing.

First, I need to make some sushi :) . Then I need to get online and order some steel for a 300 mm blade with more appropriate overall profile!
 
I do what Freddy described. I grind the urasuki until it reaches the edge (spine isn't as important). The grind is very shallow. Usually I use a 48" or 60" radiused platen. Then I polish it . Once polished, I flatten the back until the correct amount of flat shows along the ha. I leave the flat as a matte finish created by the fine stone. 2000 is plenty fine, 1000 will do.

TIP: If you get a 2X72" felt belt for the grinder and charge it with polish, it will put a nice polish on the urasuki. Then proceed with grinding the matte finish flat. Run it slow and don't put much tension on it. I put mine on the grinder over a J-weight belt for support and strength. A wet slurry polish works very good.

When re-sharpening a dull knife, I give the ura a few strokes on a flat fine stone until the matte finish is restored all the way to the edge. Then I turn the blade over and sharpen the omote bevel. Once fully sharp, I give the ura one or two strokes on the fine stone again to help break the wire, then polish the ha on the omote with a quick buff on charged leather strop board or on the buffer. Never polish the ha on the ura. If you have to put a micro-bevel on the knife to get it sharp after considerable use, do it only on the omote, never on the ura.
 
Back
Top