Show and tell on some mosaic integrals. Ask me how I did things, or give me advice!

Joined
Oct 20, 2008
Messages
5,547
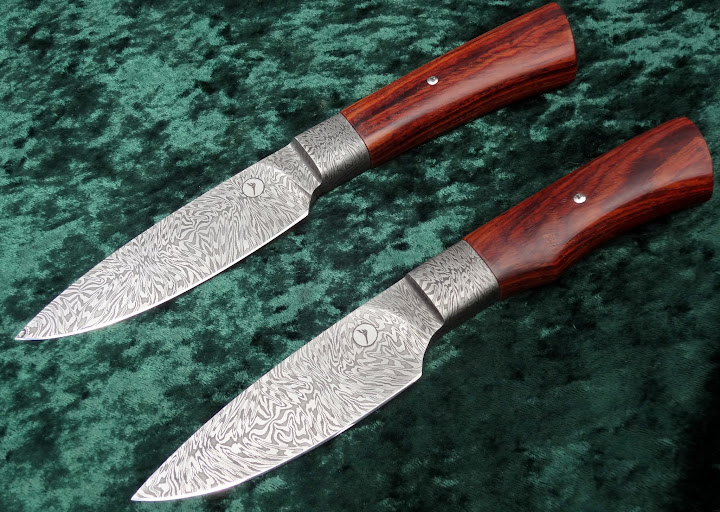
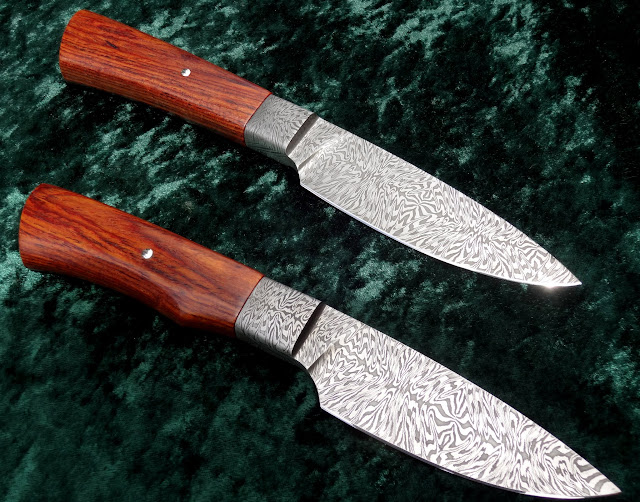
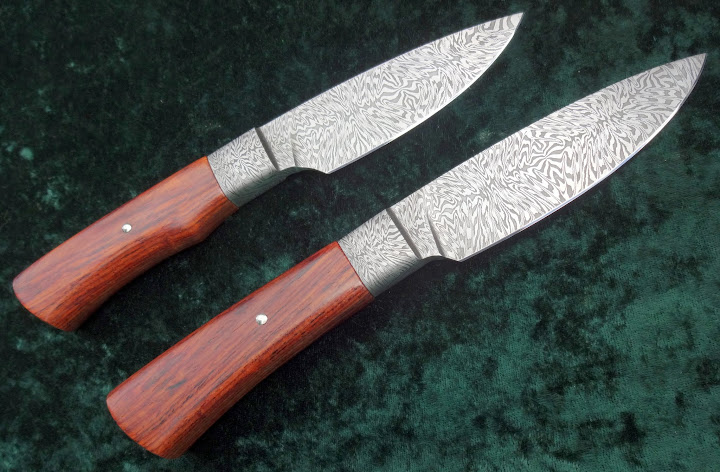
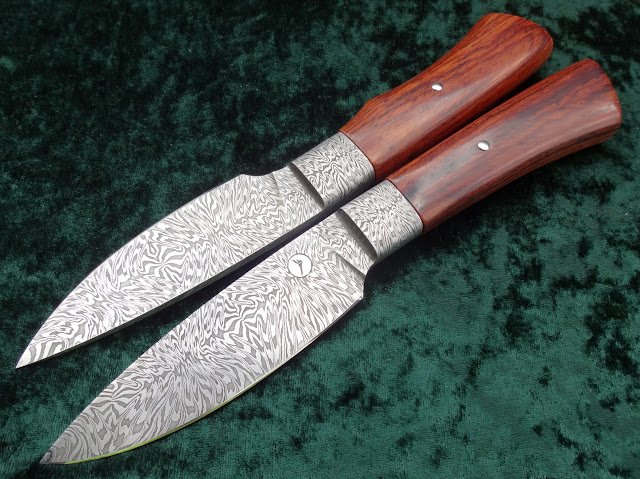
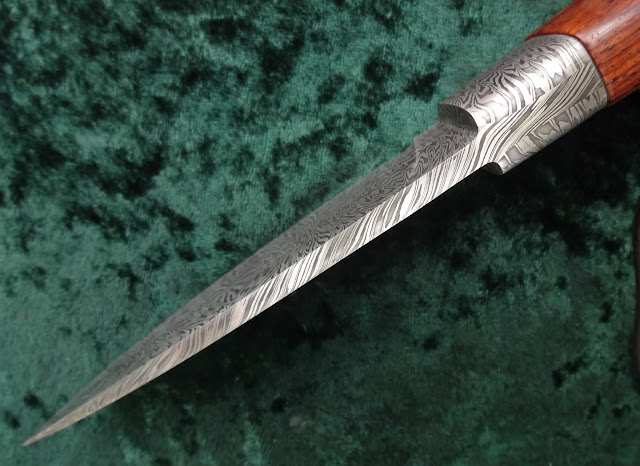
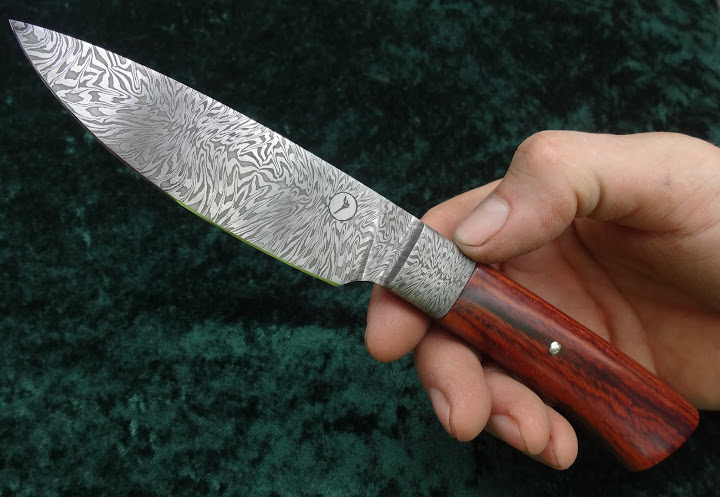
Here's a pair of mosaic hunters. I spent 15 hours of July 4th finishing them, and somehow the fire and explosions seem to have migrated into the work!

These knives are slightly dissimilar from each other in style.
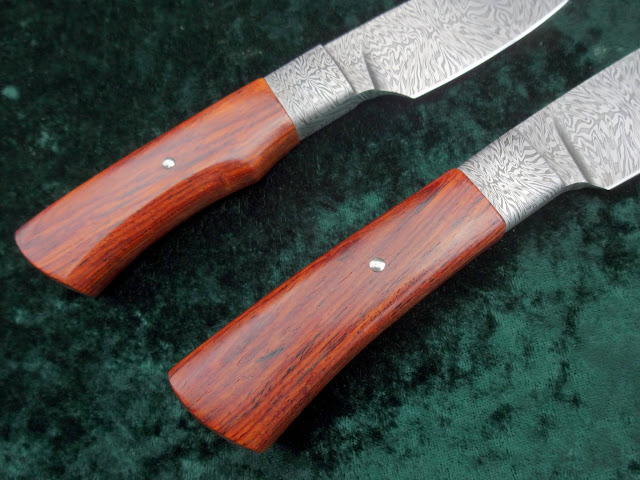
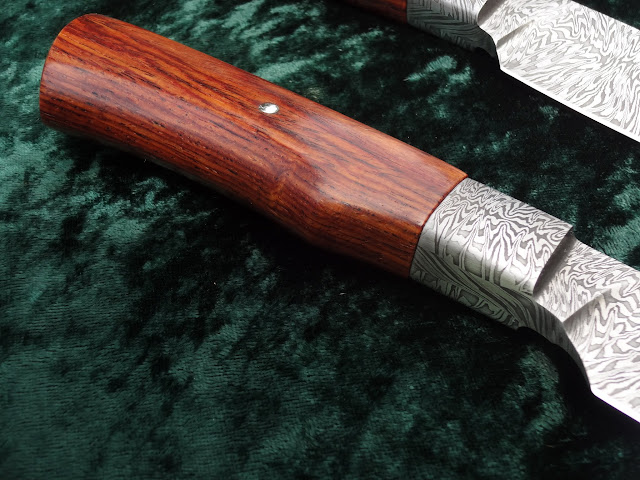
Knife #1 is 9” in overall length, with a blade length of 4-1/4”. It is the sleeker of the two, and has a curved/tapered handle.
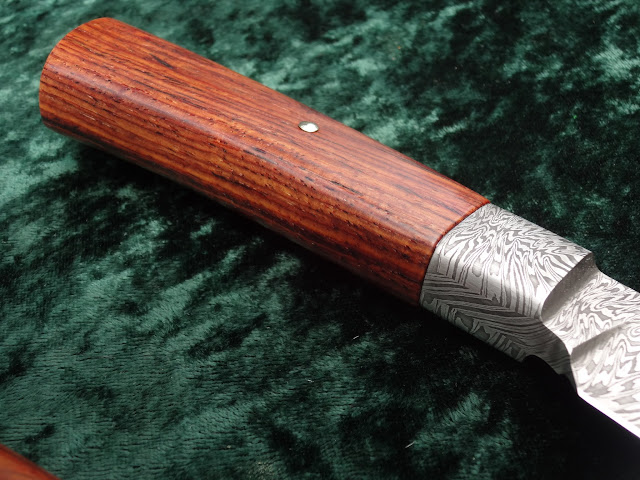
Knife #2 is 8-3/4” in overall length, with a blade length of 3-3/4”. The handle has a slight finger notch.

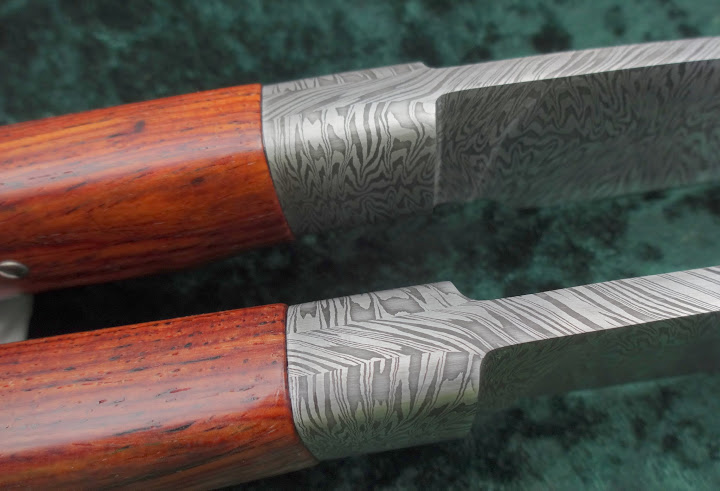
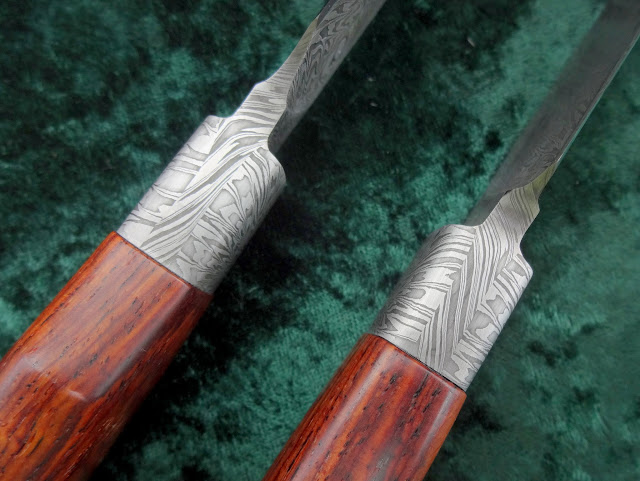
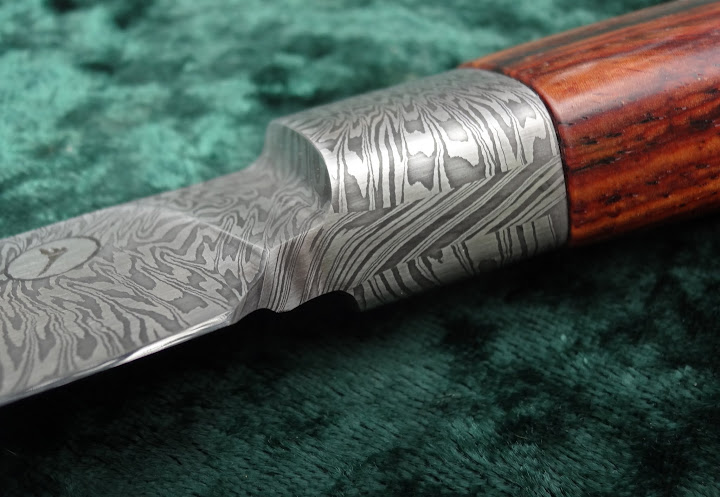
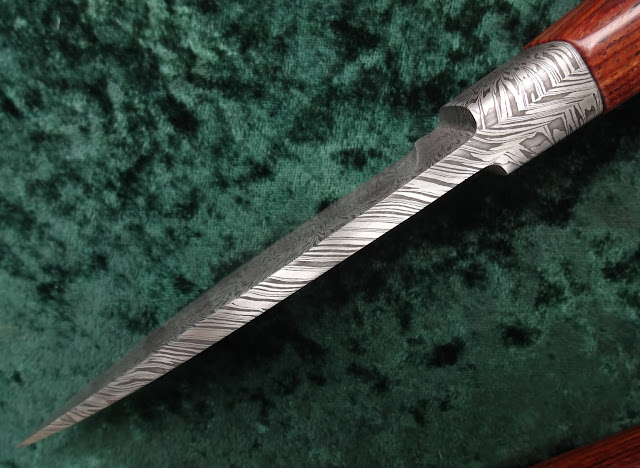
Both are forged from the same tiled-out billet of coarse w's steel, with bolsters from the ends of the same billet forged on.

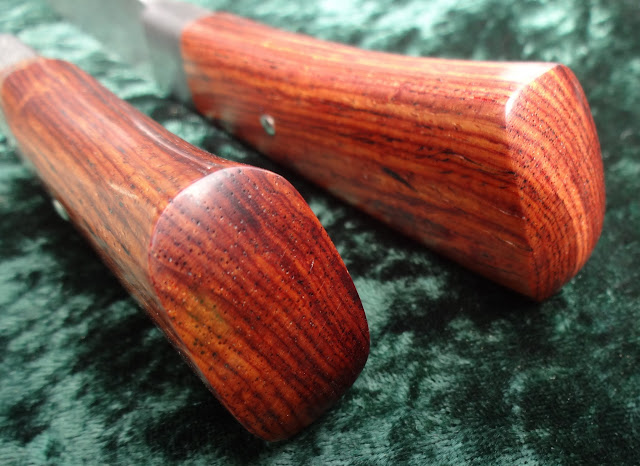
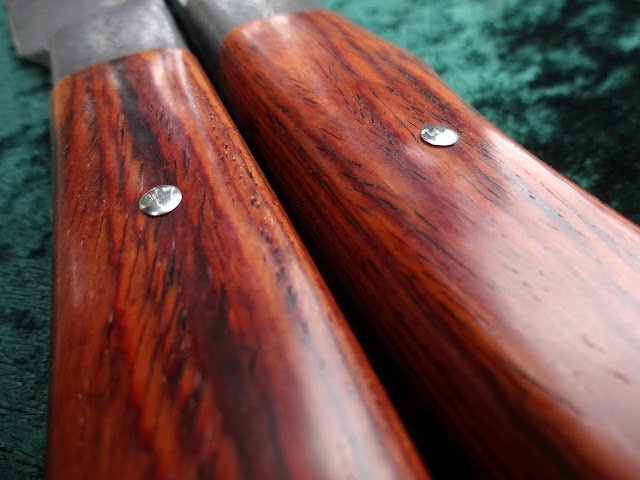
Both have handles of some incredible cocobolo I recently picked up, finished with Teak Oil.

The nickel silver handle pins are domed, and the grips are heirloom fit.

Lemme know what you think! Also, let's talk about knives of this style and how they are built. I have some pics I took while working, that I can post as necessary!

DSC03925.JPG


DSC03926.JPG


DSC03913.JPG


DSC03944.JPG


DSC03929.JPG


DSC03911.JPG


DSC03910.JPG


DSC03914.JPG


DSC03920.JPG


DSC03922.JPG


DSC03927.JPG


DSC03928.JPG


DSC03930.JPG


DSC03938.JPG


DSC03939.JPG


DSC03945.JPG


DSC03942.JPG


DSC03943.JPG
 
Salem, shoot me an email. I will you send you my writeup on finishing Coco. God only knows I've finished enough of it in my life.

But God damn thats nice. Amazing steel, amazing design and flawless execution.

And as is your instagram style

#forgedinfirechampion
 
Last edited:
Count, there are ways. My way often is the least technical. I just eyeball the hell out of things. When forging, experience tells how and where to hit it.
That said, integral straightening dies are easy enough to make. Just a stack of bar stock on either side, above and below, with a space between big enough for your bolsters. I've seen Mike Q. make a pair.
I sight down the knife a lot, when forging, and when grinding. I use strong light at all times.
For thickness matching and sizing, I use digital calipers a lot.

Thanks for the compliments fellas. Ben, I'll be in touch!
 
Very nice Salem. The damascus is crazy. Good call on the simplicity of design, the damascus and bolsters give the knives all the excitement needed.
 
Those are beautiful. Wow. I like the way the cocobola sets off the damascus. Both colour and the less busy grain. My goodness those make me drool.
 
It looks like you forged welded the bolsters to the blade billet. is that correct? I know that is how Rodrigo does some of his very complex integrals.
 
Such an inspiration!
Couple questions if I may- what's your sequence when working the handle wood down to a consistent "oversize" for that Heirloom fit? Do you wrap the bolster, or just carefully sand, or what?
Also, I can't tell by looking if the blade was forged out from full thickness (bolster thickness) or if you sacrificed a whole lot of lovely damascus by grinding whatever wasn't blade- assuming you forged it out...
Thanks for the best knife photos of the week!!
 
:eek: 
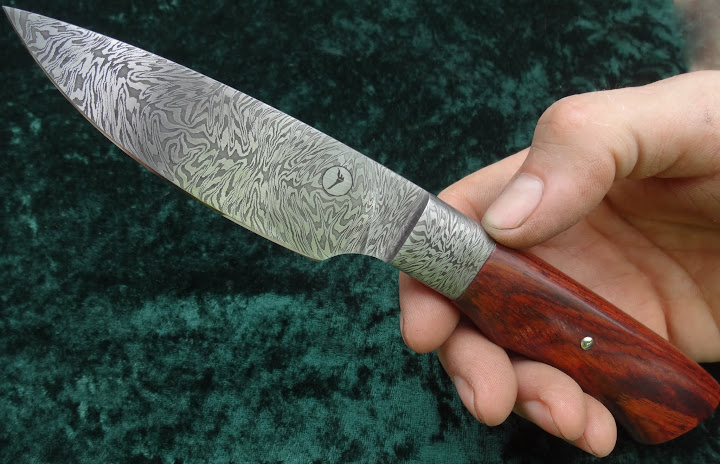
I saw these on my phone earlier and didn't even realize the pattern change between the bolsters and the blade. My mind is blown!
 
Yes, the bolsters are forge welded on. I like doing it that way better, since it opens up more possibilities for design and material combinations. Plus, it looks cool above and below! The bolster pieces are tack welded on the back, just a spot of weld where it either won't show or can get ground out. It can be TIG (the best) MIG (how these were done) or stick. Just enough to hold them on while forge welding. The forge welding has to be onto a thick blade, and hand hammer works better than press but I use a combination of the two.

So elementfe, this way is not so very wasteful at all! And pattern distortion is not a problem.

The blade and tang are made from a billet of crushed w's, with a coarse layer count and tiled out by the Ferry Flip method. Then the bolsters were added.

As for the heirloom fit, I only rough the handle profile out and then drill and broach it. I then bed the tang into it with epoxy, using paste wax as a resist.
After I can remove the handle and reinstall nice and tight, with it fit up I lightly scribe the contour of the bolster onto the face of the handle block.
I go over to the grinder and grind pretty close to the line. Then I finish shape the handle, staying just off of the lines I ground to where the bolster fits up.
I put the blade back in, clamp it vertical in a vise, and with strong light I use a fine mill file and file the wood to a uniform proudness (pride?) around the bolster. I check the handle visually, and adjust with the grinder as necessary, but hopefully just with 220 grit paper and then hand sand on up to 1000. The very front of the handle wood then gets lightly rounded over with 1000 grit paper and buffed for that tiny round corner all the way around.
 
Also, the initial W's billet was layered up and crushed, then layered again all by atmospheric welding- no flux, not even hydrocarbon. It makes for super clean welds. The tile weld was done with flux, as were the bolsters.

As far as my #forgedinfirechampion tag, well it's not that I'm trying to brag- rather, it is business and if I went on that show for exposure, I might as well play it through that way!;)
 
Wow Salem. Im just sad that these sold so fast!

I've often wondered how you grind the transition from bolster to blade? Do you use a file guide and grinder? Or mark them with dykem, then grind to shape?
 
Salem, did you "stretch" the pattern of the blade billets lengthwise between the bolsters intentionally or was that an issue of not having a long enough piece? You kept the pattern tight in the ricasso area, so I am just wondering if you were going for that contrast between the center and the bolsters?
Also, the initial W's billet was layered up and crushed, then layered again all by atmospheric welding- no flux, not even hydrocarbon. It makes for super clean welds. The tile weld was done with flux, as were the bolsters.

As far as my #forgedinfirechampion tag, well it's not that I'm trying to brag- rather, it is business and if I went on that show for exposure, I might as well play it through that way!;)
 
Ray Kirk's jigs for round bar bolster integrals are pretty spiffy. The video he did really explains the concepts and process well.
Count, there are ways. My way often is the least technical. I just eyeball the hell out of things. When forging, experience tells how and where to hit it.
That said, integral straightening dies are easy enough to make. Just a stack of bar stock on either side, above and below, with a space between big enough for your bolsters. I've seen Mike Q. make a pair.
I sight down the knife a lot, when forging, and when grinding. I use strong light at all times.
For thickness matching and sizing, I use digital calipers a lot.

Thanks for the compliments fellas. Ben, I'll be in touch!
 
Shane, for plunges I just mark out what I want, often with Dykem and scribe, sometimes just with a fine tip sharpie. Then I grind to that.
For the bolsters, I am grinding them in with the edge of the platen, freehand, just going by eye. I go up to about an A45 Gator belt.
For larger radius bolster fronts, I have a 7/16" small wheel that I've used often, but that makes a long transition and I'm starting to like a tighter look.

Almost everything I do on knives like this comes from Nick Wheeler, the DesRosiers, Mike Q, Kyle Royer, things I've learned from talking to them and looking at their work. Particularly Nick- I was reading through some threads of his from the past the other day and thinking about what a huge help and influence he has been to many of us here and elsewhere. That's part of why I did this thread, it's the kind of content that I'd like to see here again more frequently.

I want to mention that for the w's, I find it good when re-orienting the billet to start "crushing," to start crushing with square dies- i.e., aggressively pushing the corners in and re-squaring the billet on the bias. This really gets the buckling going well, so that the w bar does not need to be re-stacked a whole lot before developing good pattern. That's one I got from Jason Knight. In this case it is a 15 layer billet, welded, crushed at 90, cut and restacked to 4 layers, welded, cut and restacked by four again, and welded for a total of 16 layers after flipping.

Often I go to 39 flat layers before crushing, and then 16 layers of that, but coarse appealed to me this time.

Joe, what I did this time was after the bolsters were welded on, I just forged the blades to shape, including the points, and a fair amount of drawing down at the heel. An attitude of Nick's that I share- I'm not crazy about pattern weld being made in bars and then ground to shape. Even with something tiled, I don't mind some distortion- in fact I like the effect mostly. No sense pretending a hammer was not involved at some point! I guess my aesthetic is one of controlled chaos.
 
Last edited:
Salem, have you looked at the 1/4 inch small "wheel" wheel with no rubber coating from USA Knifemaker? Also, Burt Foster told me that used used a platen with a heavily radius edge for some of his integral plunge grinding. I have the radius end platens from Nate, but I haven't tried them for an integral yet. I did use one to get the radius on the harpoon clip on this knife. IIRC, is was the large 3/8 one. One of the Dutch makers, either Erik Markman or Toni Oostendorp, has a WIP where he shows the vertical filing jig/vice that he uses to get the 90 cuts on an integral. Is that how you did the handle/bolster junction?
Joe Mandt.jpg
 
Last edited:
Back
Top