i want to whack together a sink bridge and the only design stumbling block I have is how to prevent water from traveling down the length of the bridge and pooling up on the sink. Was thinking of putting a groove or something to route the water off the block at certain points but how do you prevent the water from clinging onto the bottom of the board and traveling off onto the edges of the sink?Perhaps blocks at each end would take care of that and also serve to keep the bridge from moving? If anyone has any pics or good examples for combating this I would be real interested in looking at it. I'd like to be able to turn the faucet on without working that water will make its way onto the sink.
You are using an out of date browser. It may not display this or other websites correctly.
You should upgrade or use an alternative browser.
You should upgrade or use an alternative browser.
Sink bridge - keeping water in the sink
- Thread starter nuggetz
- Start date
- Joined
- Jun 13, 2007
- Messages
- 11,143
Yes, cut grooves in the wood but make sure they are at least 1/4in wide. They don't have to be that deep but the width is important.
I would recommend using 1x6 board and cutting two strips the inner depth of the sink then one longer than the sink by a few inches. Screw all the boards together, cut your drain grooves and coat in a heavy coat of Flexseal.
I would recommend using 1x6 board and cutting two strips the inner depth of the sink then one longer than the sink by a few inches. Screw all the boards together, cut your drain grooves and coat in a heavy coat of Flexseal.
- Joined
- Dec 27, 2004
- Messages
- 2,270
i want to whack together a sink bridge and the only design stumbling block I have is how to prevent water from traveling down the length of the bridge and pooling up on the sink. Was thinking of putting a groove or something to route the water off the block at certain points but how do you prevent the water from clinging onto the bottom of the board and traveling off onto the edges of the sink?Perhaps blocks at each end would take care of that and also serve to keep the bridge from moving? If anyone has any pics or good examples for combating this I would be real interested in looking at it. I'd like to be able to turn the faucet on without working that water will make its way onto the sink.
I stumbled upon some stuff at the local hardware store, that for the last few months has worked well (in fact, am using it today)...

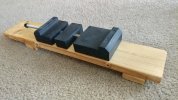
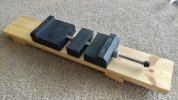
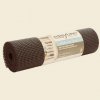
The "wood" is waterproof PVC board, (so no coating needed)... and the top is a thin hard piece of rubber sold as "Tool Drawer Liner". It has just enough surface texture that the water runs right off the side. You can see even with a decent amount of water...

... the water never makes it to the ends. I guess the board is so smooth or waterproof that it doesn't "travel down the board" on the bottom either, it just runs right off.
I also, as you suggested, put little blocks ("feet") on either end (just cut a small block from the same board and screwed it to the bottom)... both to hold it in the sink... and I can also use it on a counter top.
So far, so good!

Last edited:
- Joined
- Sep 20, 2015
- Messages
- 6,975
the water never makes it to the ends. I guess the board is so smooth or waterproof that it doesn't "travel down the board
No it's level. The sink is level. More than likely put the same board on a sink that is low at the back and . . .
My deck is made out of this stuff. No maintenance in 20 years ! Durable. 100° or more on the deck in summer and no issues.
- Joined
- Dec 27, 2004
- Messages
- 2,270
No it's level. The sink is level. More than likely put the same board on a sink that is low at the back and . . .
My deck is made out of this stuff. No maintenance in 20 years ! Durable. 100° or more on the deck in summer and no issues.
Maybe... but water seems to run off it like a waxed car.
(I try not to sharpen when it's that hot)...
- Joined
- May 11, 2016
- Messages
- 11
I just use a treated 2x4 with paper towel under the stone never had any issue with water.
- Joined
- Jun 4, 2010
- Messages
- 6,642
For the drain grooves I clamped another board to my bridge and drilled between the two with a 1/2" drill bit. Made a couple of drain troughs that work very well.
I have since switched to a cinder block resting in a shallow pan with a thin sheet of recycled rubber on top. When I rinse the stones, the water collects in the pan, the cinder block is the most stable sharpening surface I've ever used. Most of the water soaks into the block and evaporates over time.
Mostly I dunk the stones in another bucket. One for soaking, one for rinse water and dunking.
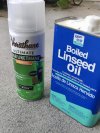
Wanted to give an update on my sink bridge. I went ahead and put one together and I think it came out pretty good. Not sure where I saw the suggestion to spray it with Flex-seal but that was a kick ass idea. It seals all the nooks and crannies and also aids with grip (both for the sink as well as the stone/holder). I probably could have made it a little bit wider. I only put 4 drainage slots into it and it seems to work great but I may modify it and add 2 additional slots towards the front as water tends to pool there as the width of the rubber feet on my stone holder creates sort of a well up front and water gets trapped there. It does manage to find a way out tho. In hindsight (funny how you never think of these little details while you're designing it), it would be better to orient the drainage slots so that they are NOT aligned with the feet of the stone holder. I also hollowed out a bit of the front underside so that I can rotate the bridge and still allow it to remain flat as it is sometimes more comfortable for me to hone on an angle instead of head on.
With regard to my initial query about ensuring that water doesn't traverse the bottom of the board and spilling onto the sink, I suppose my sink is pretty level as it just goes thru the slots and falls straight down. Here are some pics.......
http://imgur.com/a/2YUTU
With regard to my initial query about ensuring that water doesn't traverse the bottom of the board and spilling onto the sink, I suppose my sink is pretty level as it just goes thru the slots and falls straight down. Here are some pics.......
http://imgur.com/a/2YUTU
- Joined
- Oct 13, 2002
- Messages
- 2,008
I have been looking for a sink bridge for years. The Naniwa and Tojiro offerings are nice, but don't call out to me as being able to handle runoff, much less a steady flow stream adequately. I have used cutting boards, 2x4 and deck plank. Been eyeing the Czar Precision bridge for some time now. Looks to be the best of the commercially available bunch...
Last edited:
A note of caution for anyone considering this option, don't do it if your sink has a garbage
disposal! the grit from the stones will tear up the bearings & seals.
I use a home-made bridge & plastic tub, when finished the water goes Outside on the plants.

disposal! the grit from the stones will tear up the bearings & seals.
I use a home-made bridge & plastic tub, when finished the water goes Outside on the plants.

