How To Slipjoint tutorials and advice

TUTORIAL POST #6
This one will cover getting your handle material ready.

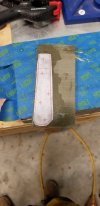
step one is to glue your template to the handle material. my design will allow you to get both handles out of one standard size piece of scale material. Having just completed a knife made of G10 I can say that if you are looking for the easiest material to achieve the best results G10 is it. It grinds and finishes the easiest and it comes pretty much perfectly flat right from the suppliers.
20181126_164953.jpg
For this build I used a large piece of G10, but if you are using standard sized scales you can print out the templates from my pdf files and glue them to the scale (use the same spray adhesive as before). No need to individually cut out each template. It should be noted that these photos are being made with an updated template. the only difference is that I added 2 more pins and a bolster. For this build those will be ignored. Only the pivot and 2 retaining holes in the backspring are needed. The extra holes are only needed when making a knife with liners.

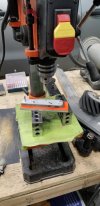
Using the optical center punch mark the 3 holes in only one of the scales. It is extremely important that these holes are drilled accurately. There is very little wiggle room if they don't line up to the template. If you drill the first scale and the holes are off just throw it away. Trust me, its not worth the headache. use inexpensive handle material to help ease the pain. Prior to drilling use a 123 block to verify that table is square to your bit. All 3 holes will be drilled with a 3/32" bit. Once one scale is completely drilled and you are happy with the placement clamp it on top of your second piece of scale material. you will use the 3 holes you just drilled as a template for the other scale. This removes one source of potential error and ensures at least your scales match perfectly. I like to use 123 blocks to elevate my scales to allow for easy clamping as pictured below. If you do this re verify your table is square after adjusting the height. Notice in the picture I have marked off the 2 holes that do not need to be drilled. This seems simple but it can save you from making a mistake. if you are using my current template this wont be necessary. As you drill each hole place a piece of 3/32" rod through it so the scales don't shift. It may seem that the rod fits really tight or is hard to get in. If this is the case chuck up some rod in cordless drill and turn on your grinder with a 240 grit belt. Spin the rod using the drill against the moving belt for one or two seconds to slightly bring down the diameter, this makes for an easier fit. You can use these rods as assembly pieces for the rest of the build, just don't take too much off or it could affect the final fit up.
20181126_170348.jpg
Once both scales are drilled use 2 or 3 pins to secure them together and grind them to their rough shape. I use my platen and work rest to ensure 90 degree edges. use a 123 block to ensure your platen is square. This can be done freehand but you will likely be slightly out of square.
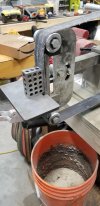
20181126_170830.jpg
I like to start with an old low grit belt to speed things up. Finish up to a low grit for this stage. This will be refined later.
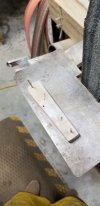
20181126_171211.jpg
Once complete you will be left with something like this.
 
nice contribution here, slip joints are not easy, many things have to work together well and there are many operations.
I've made my own macro view outline to guide me, and I'm developing it with details. Most steps have to be done in the right order and you need to know what comes next.

I was surprised by your 47 HRC on the spring, I felt that was a little soft IMO, but it seems to be working for you, I like to be several points higher based on what other experienced makers have advised me. I don't have any empirical evidence to support that yours isn't suitable, so just laying out my thought here.

here's one way to bend the spring, I found it to be the simplest most efficient way, either clamped to a bench or in the vise ( as noted earlier)

regards

mv44bzE.jpg


SteaUC5.jpg
Thanks for your input. This looks like an easy method to set tension.
 
We are talking about bending the backspring BEFORE HT are we not? After HT seems like it would be a tad on the brittle side for bending?

I've read that 45 to 48 Rc was a good range for spring temper, especially for backsprings would like to hear other folks comment on that. Bill - your comments?

Ken H>
 
A 3 pin set up in a drill press vise works well for bending springs. I check every blade and spring and if I
had a favorite number it would be 48 on springs. I've broke my share at 50RC. As far as bending before or
after heat treat any small adjustments on spring tension are done AFTER heat treat.
Ken.
 
As far as bending before or after heat treat any small adjustments on spring tension are done AFTER heat treat.

Ken, you say you're bending small adjustments AFTER heat treat - I've broke backsprings trying to bend them after HT. Would you share your method?

Ken H>
 
My method is to use 3 3/8 pins and do it very slowly. Put the knife back together and see where its
at. Sometimes it will be a half doz. or more assemblies. I have broke springs doing this but I have a
lot of knives out there still walking and talking great after tweaking a tempered spring.
Ken.
 
Thank you for the prompt response Ken - Using the 3 pin method just might work for all you're wishing to move the spring is a few thou. I might try that. You've sure got the experience to know, and I learn so much on this form from folks like you who have been so good at sharing knowledge with the rest of us.

I'll confess I did bend a backspring one time by heating to red between the center pin and back end so it would bend a tad. Since this area never moves in working because it's so much thicker than the spring part I figured that would be ok. This slipjoint has held up good, but it's only got a yr or so of use on it. Didn't sell it, gave it to my brother and he sure gives them a work out with day to day use on the farm.

I'm still learning about slipjoints and how best to make them.

Ken H>
 
It is very interesting to see how different people accomplish the same thing. I typically just move my spring on the middle pin towards the blade pivot about 1/16" or so before drilling the back hole in the scale/liner material. If it ends up too stiff, I just grind some off the inside of the spring on my 2" wheel until it feels right. I've never had them come out too light from the beginning. Anyone see any issues with this method? You do have to leave a little extra material on the liner but I don't find that part to be a big deal.
 
TUTORIAL POST #7

Setting the open position

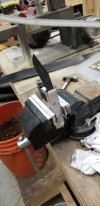
The first position that needs to be set is the open position. The half stop and closed positions are based on the open position. I assume that this can be done out of order but in my opinion this is the easiest way. The first step is to assemble the knife prior to making any adjustment. Don't expect it to fit great at this time because you left extra material in key areas. An easy way to assemble the knife is to place assembly pins in the pivot and rear holes. Then place the knife in a vise and use it to compress the spring until you can fit the center pin in. See picture below.
20181126_171841.jpg
Use a pair of soft jaws to help prevent scuffs on the knife handle. Once assembled you blade should be canted slightly downward. Your goal will be to bring the blade upward until it is in line with the handle.
20181126_171901.jpg
notice the downward cant of the blade. This is good.
20181126_175533.jpg
In this photo I have placed the assembly on my rise and fall indicator. This helps to show the joint. In order to raise the blade up you will remove material from the face of the spring. be very careful not to over do this. Even if you have an indicator make sure you test assemble the knife to see your progress. At this point you are not concerned with readings on the indicator just blade position. I place the handle on my RFI and place a piece of tape in line with the handle to give myself a visual line to align the blade to. At this time I grind away a little material away from the bottom half of the face of the spring to create a gap for pocket lint. You should be left with small gaps in the two critical areas (these 2 areas are easier to see in the cad files). once you have got your blade straight with the handle you will need to grind the excess spring material off. This is done with the knife test assembled and in the open position. If your blade isn't perfectly aligned this will correct minor errors and make the blade and handle perfectly aligned. Once completed your knife should have a perfectly flush joint in the open position.
20181126_180020.jpg
I made this attachment to ensure I am left with a 90 degree corner when I am done grinding. I place the open knife against my rest and grind until flush. I then progress my belts up to 400 grit. Make sure to dip your knife in water frequently to avoid overheating and ruining the temper. At this stage you may as well finish the back of the handle as well. Then remove the blade and temp pin the handles together to finish the remaining 2 outside edges of the hadle. Now you wont need to touch the perimeter of the handles again. Once complete you will be left with something like this.
20181126_190653.jpg
At this point if you have no vertical blade play in the open position you have succeeded thus far. If you have a little play it can be corrected. You will need to identify why you have play by examining the assembled joint in a RFI. you can likely correct it by removing material from the location in the picture below. this will further raise the blade. You can correct it grinding flush. this will alter the shape of your blade a bit, but its better than throwing it out.
upload_2018-12-8_13-57-26.png
By removing material from the blade in the location shown you will change the angle of the blade relative to the handle. By raising the angle using this method you will close up any gaps between the blade and spring on the spine of the knife. This will slightly reduce spring tension, you will not be able to correct massive amounts of play this way. If this doesn't make sense send me a message and ill try to elaborate. This is hard to visualize unless you are looking directly at the problem. If you have blade play at this point post a picture of your knife in the open position and Someone will be able to tell you where to remove material to correct or reduce it.
 
Last edited:
A VERY good tutorial you've got going Derek - a really good job. While I've made a few slipjoints and have been happy with the results, I've picked up a couple of pointers from your WIP. If you don't mind, I'd like to copy and make myself a file..... wait, you said you were preparing a PDF file for the final?

Again, good job and Thanks for taking the time to share.

Ken H>
Thanks for the feedback. Feel free to copy anything you want. I do intend to make a complete guide but it could be a while yet. I want to include bolsters, liners, multiple blades etc. The nice part about the forum is that i can edit as i learn more. When i put out the final document I want it as close to perfect as possible. Its been great learning new methods from others and i want to soak up as much as i can to show either the best way or preferably multiple ways to do any step. I have ALOT more mistakes to make before it will be what I want. Hopefully we can all share our methods and mistakes to expidite the process. In the mean time im happy to provide all the info I have. Thanks again.
 
Quick update

I intend to post the halfstop tutorial in the next few days. I recently sold a knife to a member here and they had some feedback i would like to incorporate. In order to do this i will need to slightly change my close position procedure. I will make a new knife and take more pics of processes for that step. I know alot of the pics are of different builds. I will have a finalized version with pics from all one knife eventually. Thanks for hanging in. I hope this is helping someone.

All of the steps up to this point are current and require no changes. If anything new comes up i will update the neccessary steps on this thread.
 
Back
Top