Tarp set up knots

Joined
Dec 11, 2000
Messages
1,039
For the last few years I have been one of several people running a tarp and knot workshop at the BushcraftUK summer Bush Moot. More than once I have wished that I had pictures that I could post of the knots that we demonstrate, to make it easier for people to go away and practice at home. The internet is absolutely loaded with knot web pages, bushcraft and tarp demos and many excellent Youtube videos, but despite searching, I couldn't find examples of all the exact knots I use.

I think it is very important to say that while I like how I set up my tarp, there are a LOT of different methods and different knots, cords, fasteners and methods that people use to excellent effect. In addition to putting up the following photos, I will try to explain my reasoning for using these methods.

For a start, I like knots for rigging tarps, rather than clips and cam cleat gizmos, since they are light and I don't have to worry about losing or breaking them. They also allow a lot of versatility.

Ideally all knots are tied to be quick release, meaning that they come apart when you want with just a tug on the free end, even after they have been worked on by wind and water.

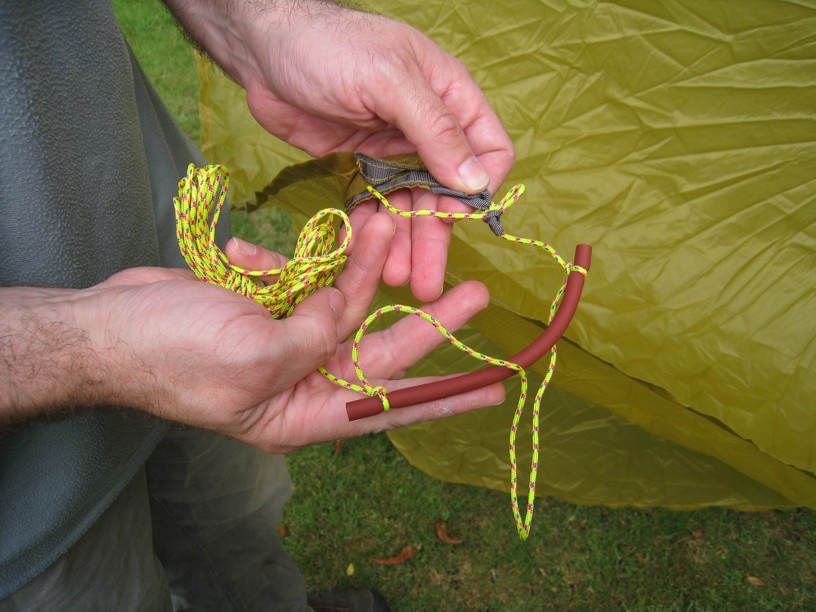
This is my example set up:
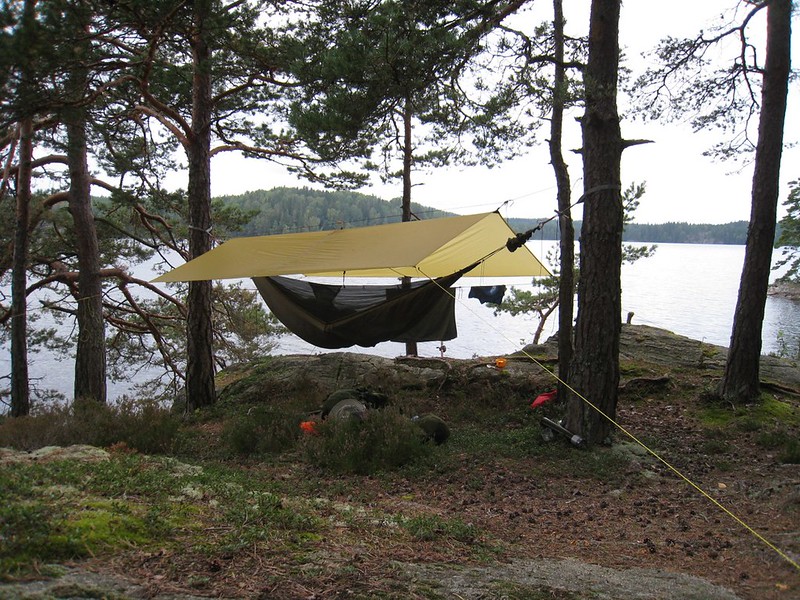
img_5334 by Last Scratch, on Flickr

I use a ridgeline strung between trees (or poles), which goes up first. I believe that a separate ridge prevents me applying excessive tension to the tarp, allows for easier repositioning or re-tensioning of the tarp, and makes packing up easier and cleaner. I put the ridge above the tarp, rather than throw the tarp over it, because it removes the risk of water wicking down the ridgeline under the tarp, and that of the tarp fabric becoming worn where it rubs on the line. It does however mean that if I want a gear hanging line, I need to rig another cord.

For the ridge I like 3mm polyester sailing line, something like Excel Pro. 8 strand plait is a little grippier, but the 16 plait is nicer to handle, I think. Polyester does not stretch, which has its pros and cons. It doesn't tend to sag when it gets wet, as nylon does and tension on the guy lines don’t cause the tarp to sink towards the ground. On the other hand, it is unforgiving of poor knots when you are trying to maintain tension. It is either tight, or not. Stretchy line, nylon say, can be stretched a lot, and have more tension, or a little less, and still be almost as tight.


Anchoring
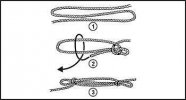
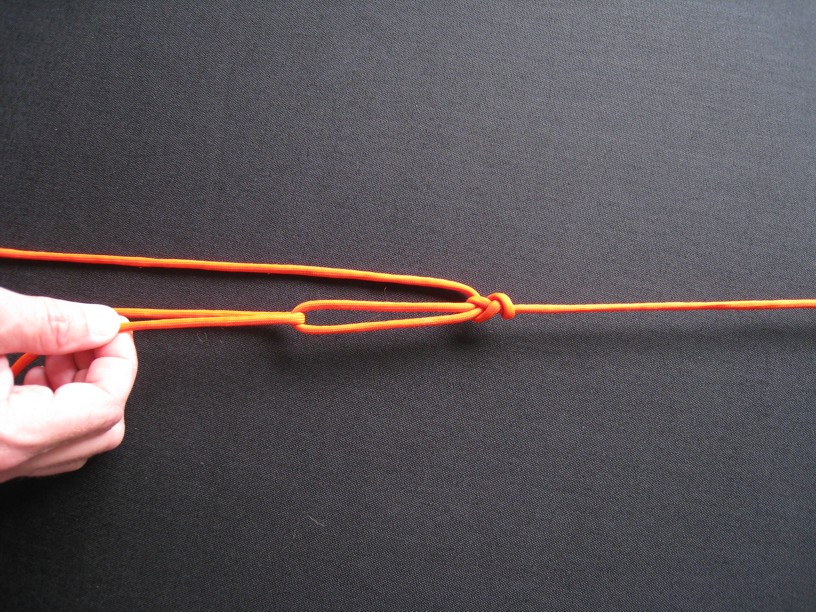
One end of the ridge is tied with either an Evenk Slippery Figure of Eight, or a Falconer's Knot. The Evenk is a little more secure and can be tied in mittens or heavy gloves. The Falconer's is certainly good enough, strength-wise, and can be tied with one hand, a distinct advantage if you are setting up in very muddy conditions, say in the jungle.

Evenk Hitch on Youtube

Falconer's knot on Youtube

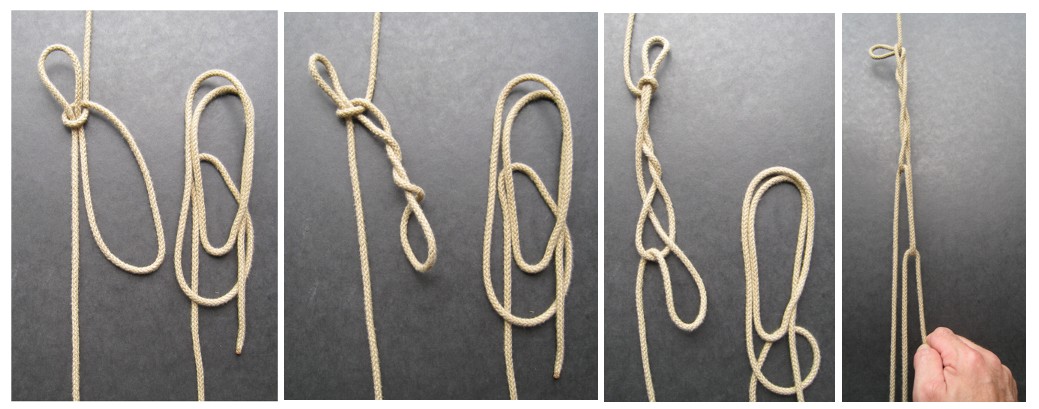
I have photos of tying the falconer's knot, but since both falconers and bushcrafters use the knot, there are more and better videos out there showing how it is tied...even some of our own Stuart, teaching in the forests of Borneo ;)

Falconer's knot slide show
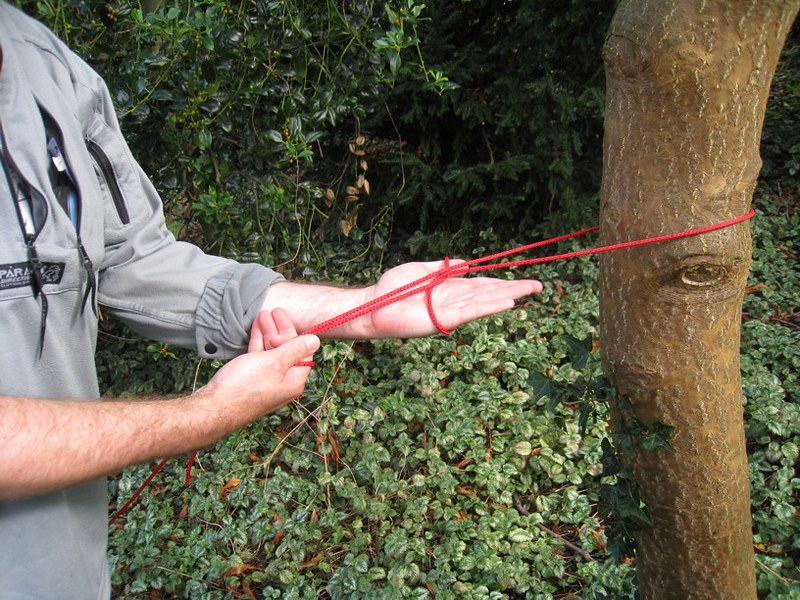
The Evenk:
img_6710 by Last Scratch, on Flickr
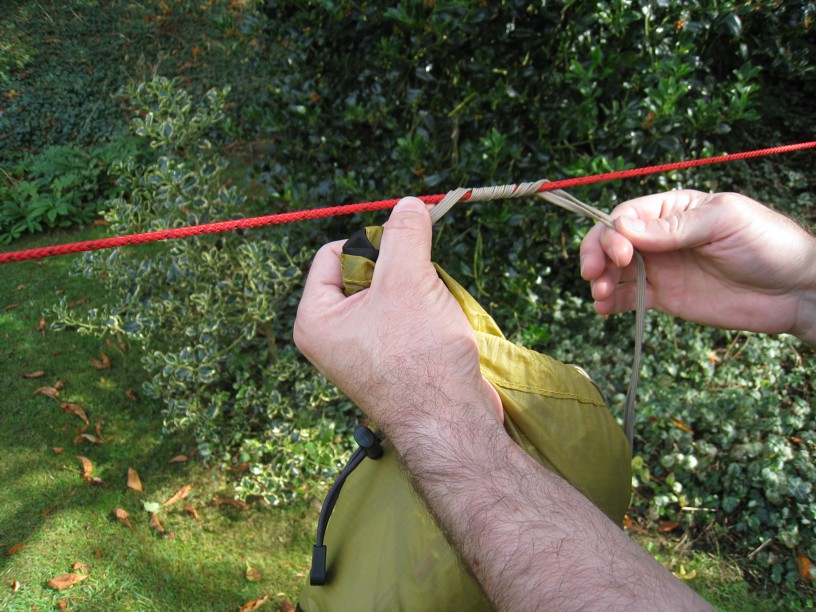
For a right hander the working end is wrapped around the left hand. Where you wrap is up to you, if you only encompass your fingers then you will probably find you have to do the later pull-through with just your fingers. This method allows for the wearing of gloves in cold weather too.

img_6711 by Last Scratch, on Flickr
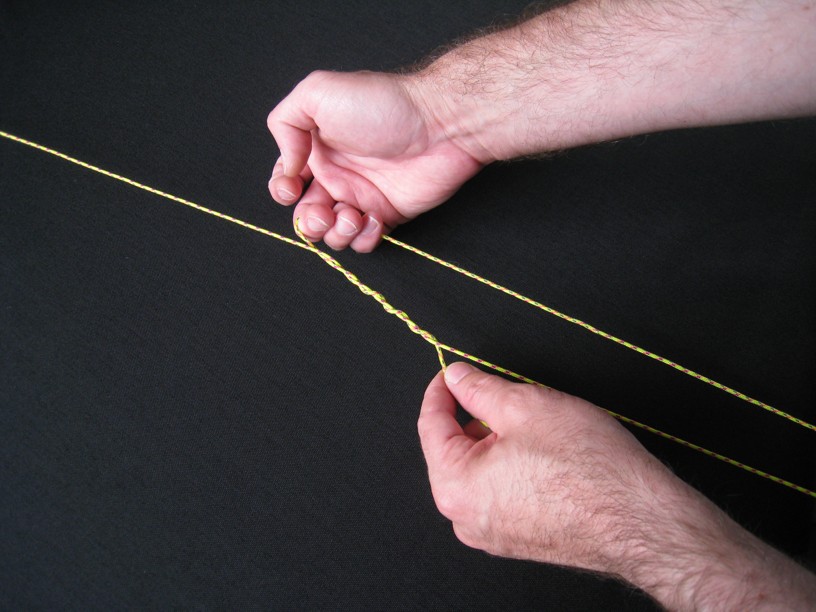
The left hand is rotated to point at the supporting tree,

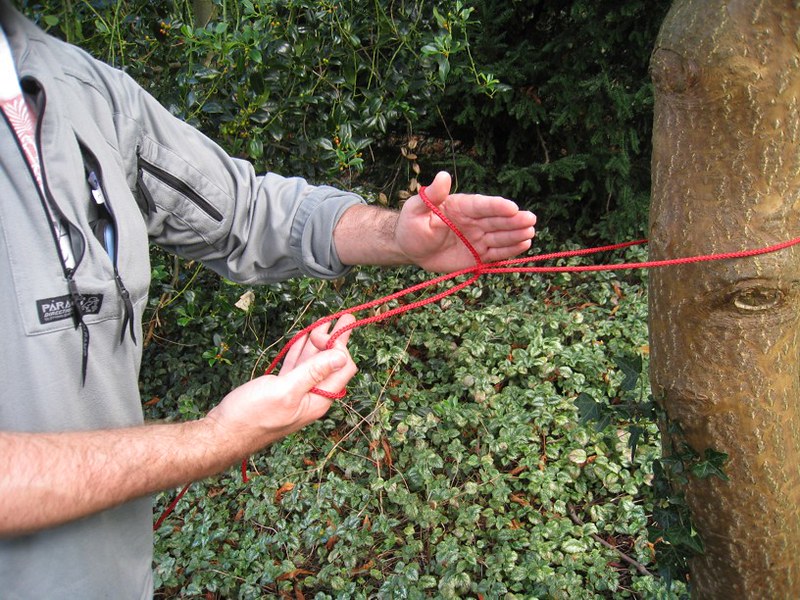
img_6714 by Last Scratch, on Flickr
reaches over the top, note that this is easier when the right hand is keeping a little tension on both cords.

img_6713 by Last Scratch, on Flickr
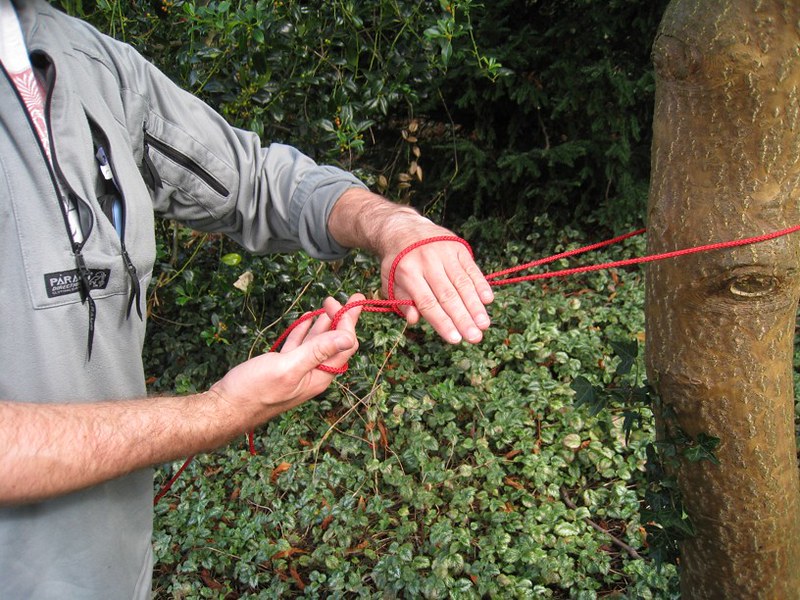
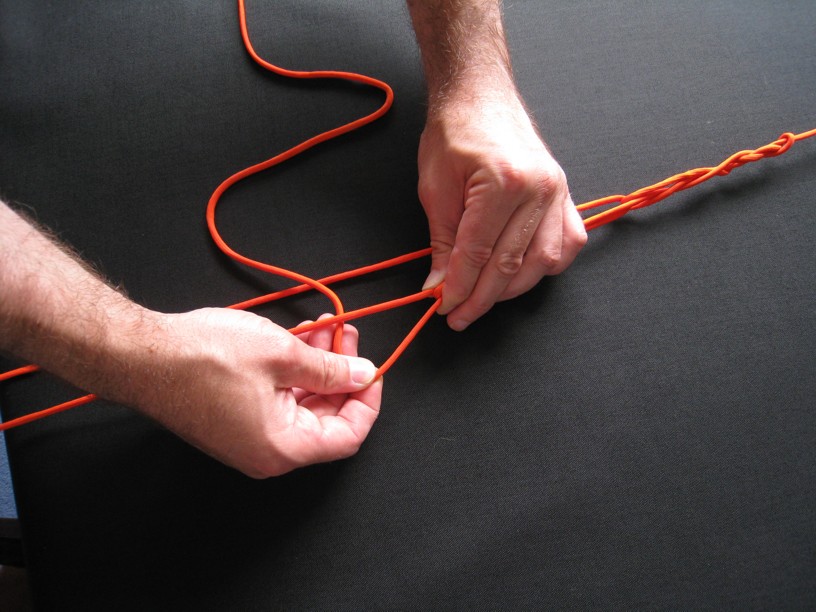
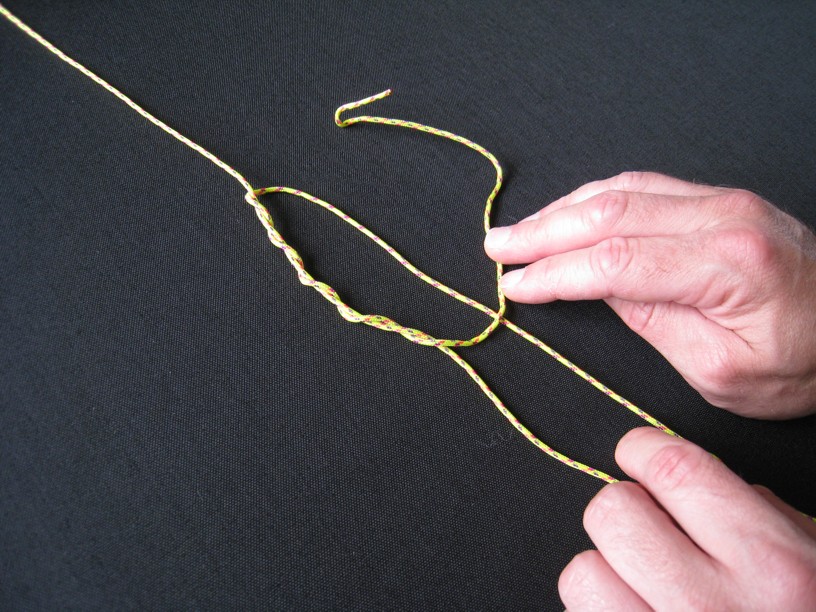
The working end of the ridgeline is grabbed by the left hand, in this case, because the thumb was included in the wrap, it is caught using the thumb and fingers.

img_6715 by Last Scratch, on Flickr
A loop of the working end of the line is pulled through.

img_6716 by Last Scratch, on Flickr
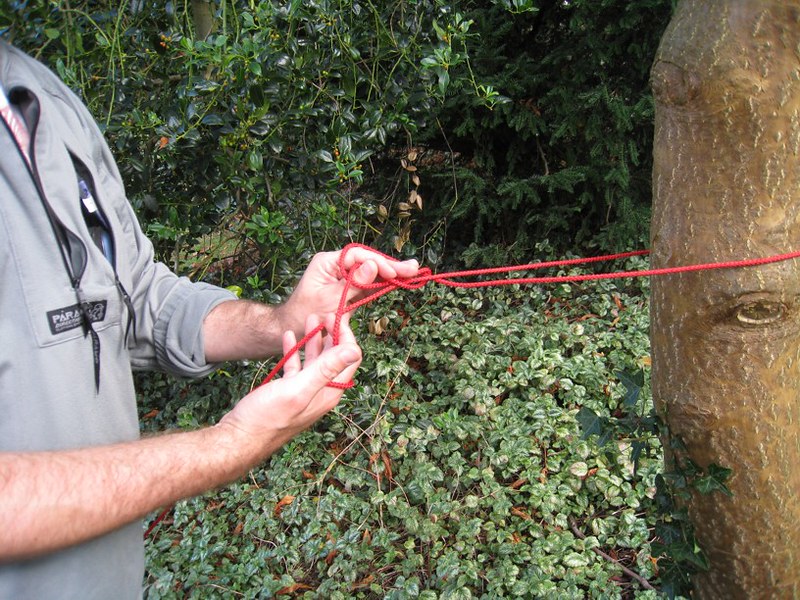
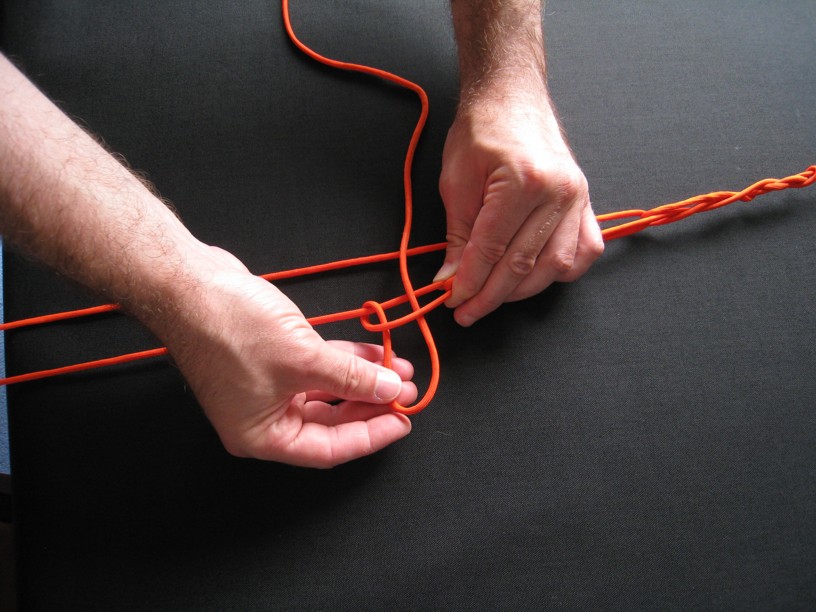
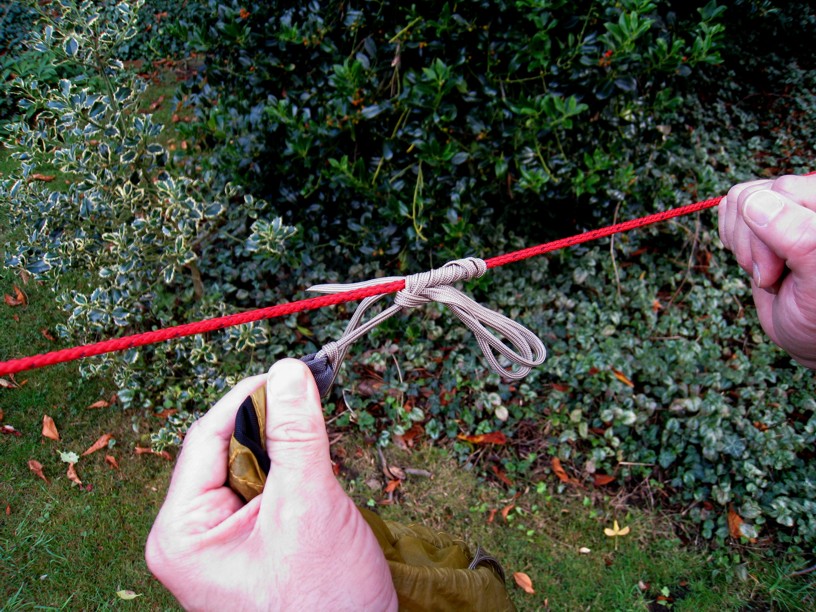
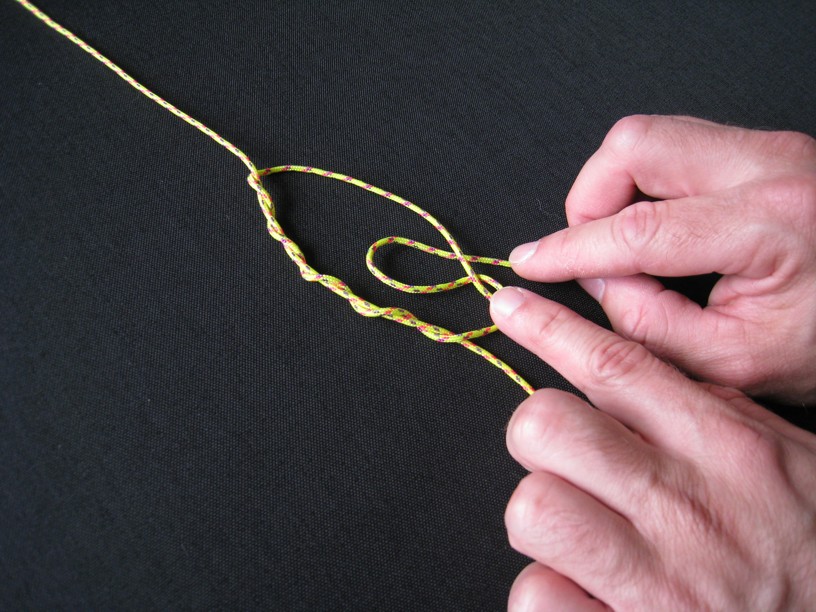
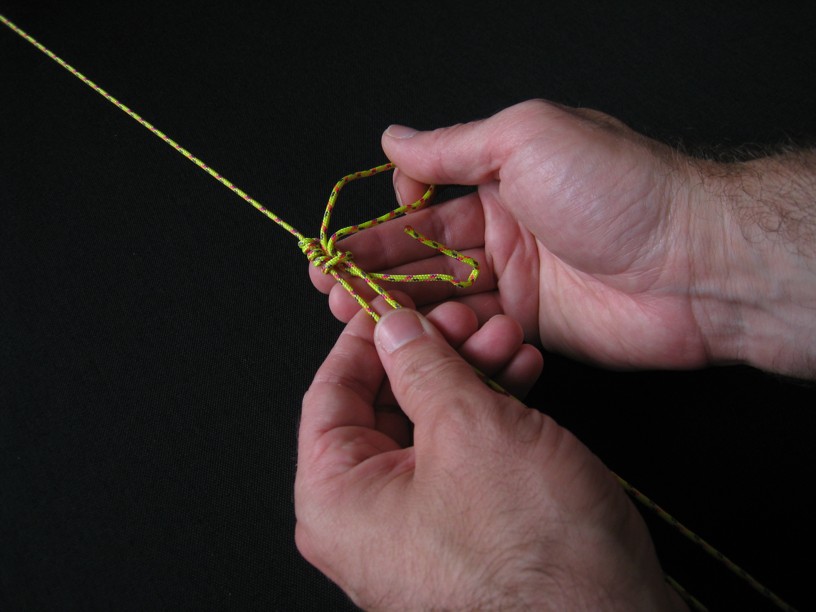
The loop is pulled in such a way as to tighten the knot, keep tension on the standing part of the line and pull firmly to fully tighten the figure of eight.

img_6717 by Last Scratch, on Flickr
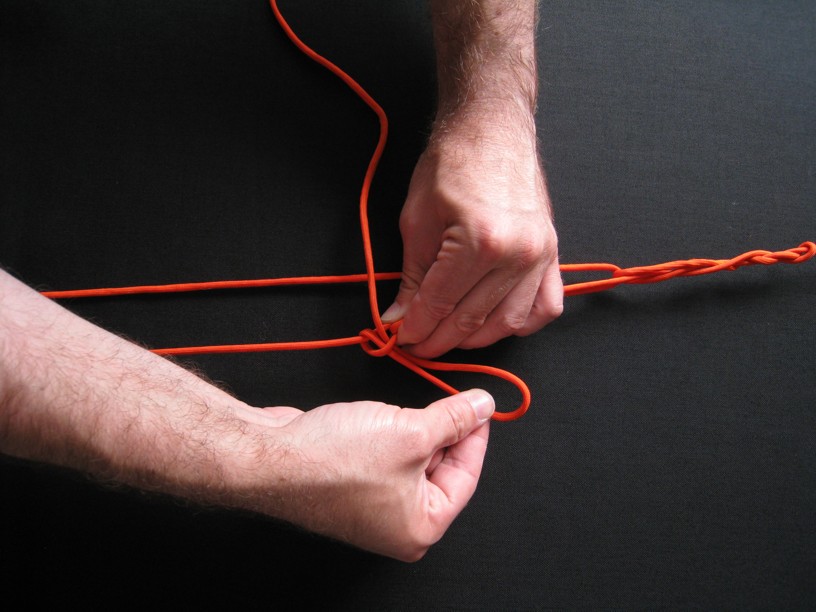
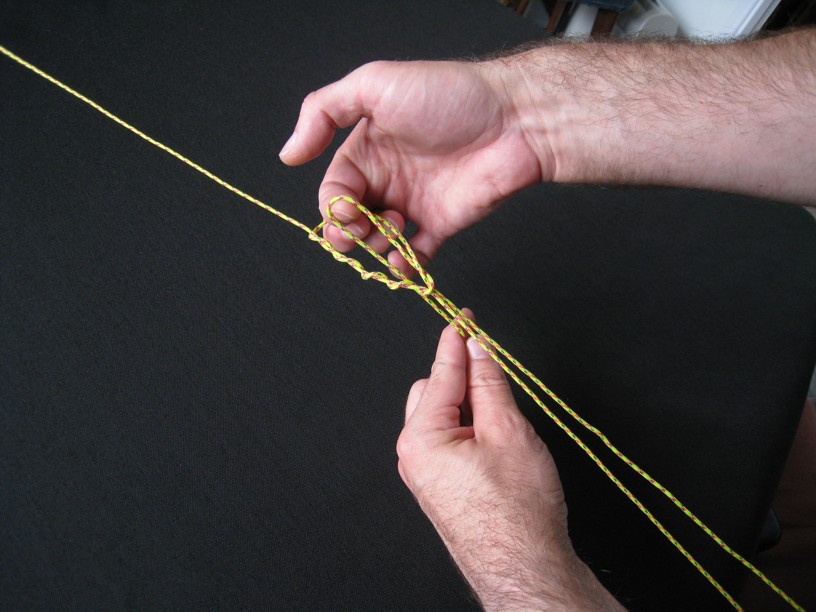
If the knot does not look like this, it may need to be capsized and tightened, just lightly grip the two lines from the tree with your right hand and wipe/pull your hand towards you, over the knot. This will flip the knot, if needed, and give the shape shown.

img_6718 by Last Scratch, on Flickr

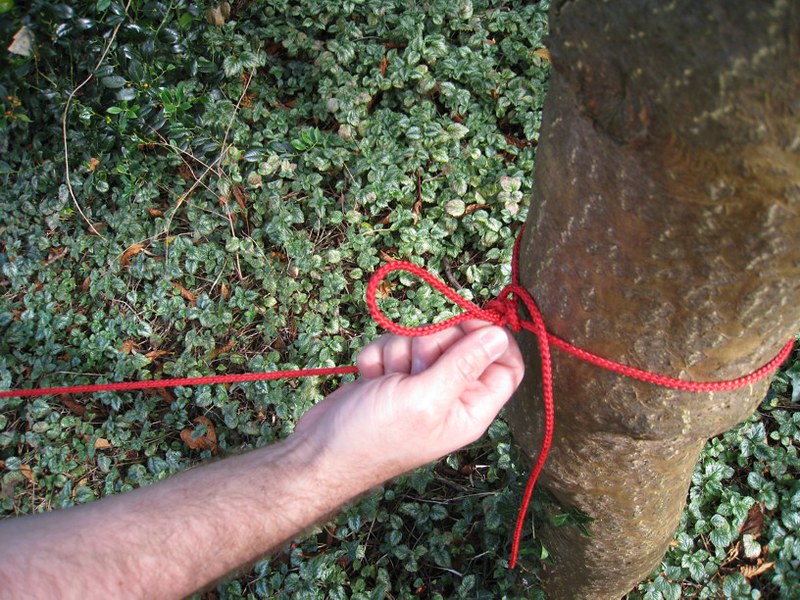
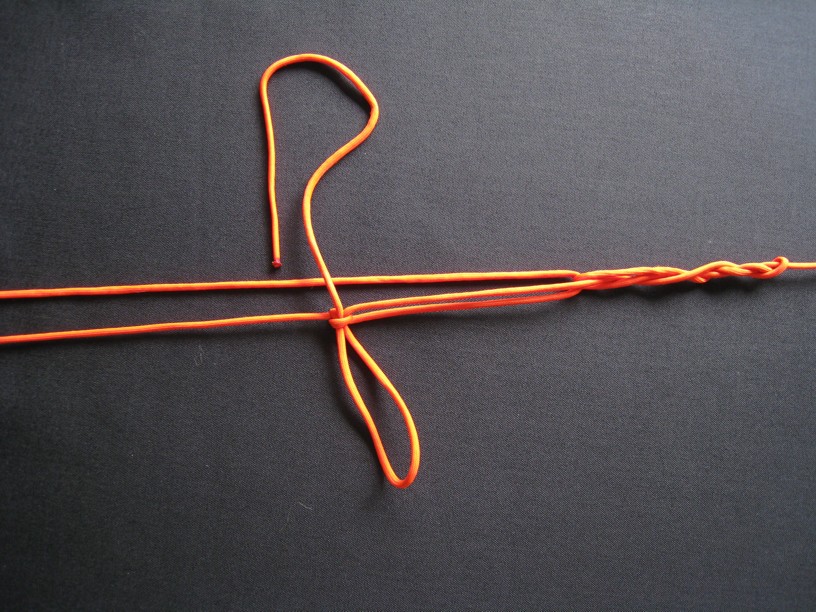
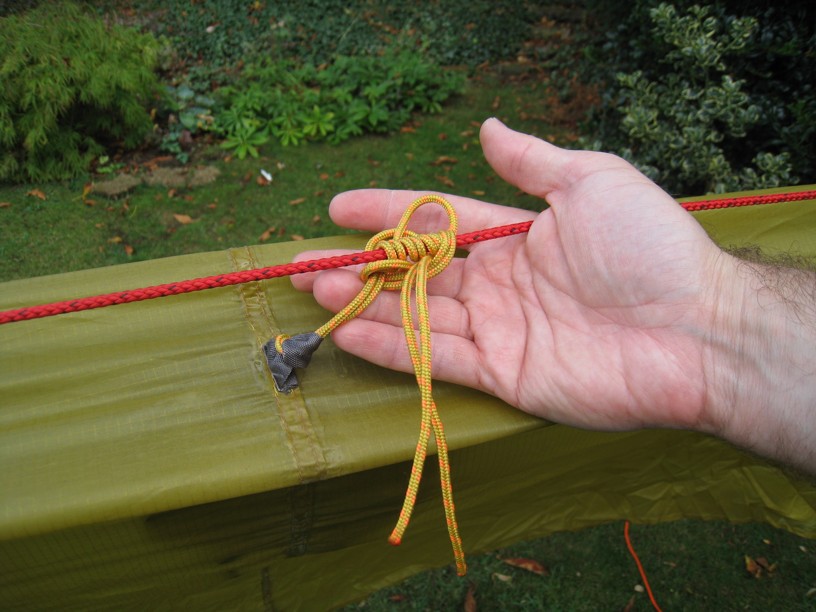
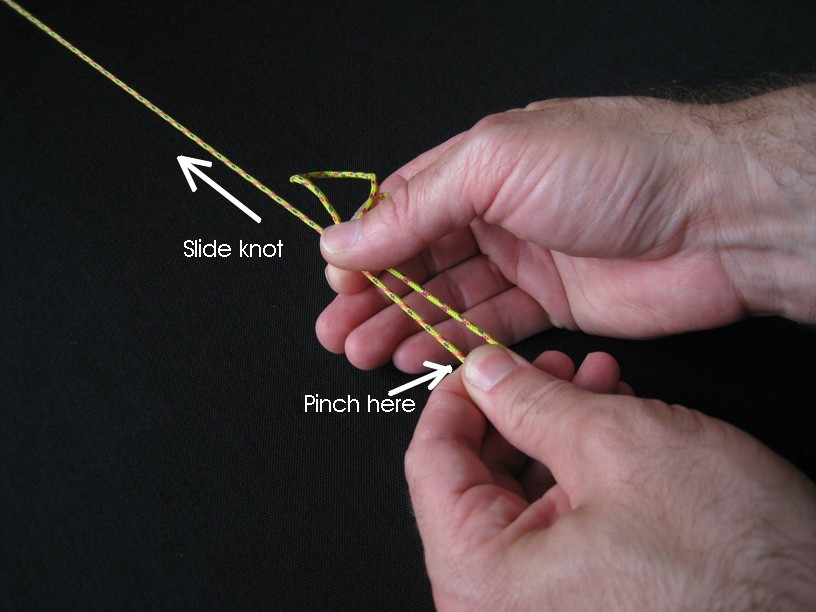
Slide the knot up snugly against the tree. If the knot was not tightened before being slid up the line it may open up and become less secure, though only rarely come un-done.
 
Last edited:
Tension
There are many ways of putting tension into the ridge. Sometimes I use the method demonstrated by Woodlore and illustrated in the Ray Mears book Bushcraft, also as shown in the first part of this Youtube video:
This method is very compact, good if your trees are a little close together relative to your tarp size, but with low stretch line it can be difficult to ensure it is secure. It is of paramount importance that the knot is snugged right up against the tree. Without the tree to close one side of the knot, it will capsize and come un-done.

More often these days I use a modified version of the Trucker's Hitch, originally shown to me on one of Mors Kochanski's courses. It needs more spare distance between trees, but only requires you to wrap around the tree one time, which I find easier and faster.

IMG_6760 by Last Scratch, on Flickr
The main ridgeline is on the left and the working end is held in the right hand. A loop is twisted by the left hand in the ridge. At least three twists, in smoother line, four or more are needed.
IMG_6761 by Last Scratch, on Flickr
Fold the twisted loop back towards the tree around which you just passed the free end of the line and take a "bite" or tight loop of the line through the twisted loop.

IMG_6762 by Last Scratch, on Flickr
Pull this bite as if you were making a chain of loops.

IMG_6772 by Last Scratch, on Flickr
Pass the working end of the line through this new loop.
IMG_6773 by Last Scratch, on Flickr
Pull on the working end to add tension to the line. This arrangement is like pulley, providing mechanical advantage.
img_6684 by Last Scratch, on Flickr
To lock off the tension, pinch the bite...

img_6685 by Last Scratch, on Flickr
...and slide your finger and thumb to push/pinch the point where the line bends. This is like putting the brakes on, by pushing in the same direction that tension has been applied, tension is maintained while you tie off.
img_6686 by Last Scratch, on Flickr
Create a loop, like a figure 4...

img_6687 by Last Scratch, on Flickr
...and pass a loop of the working end of the line through.
img_6688 by Last Scratch, on Flickr
Pull on the loop, in the direction shown, back towards the rest of the knot, to lock off. Try to pull asymmetrically on the loop so that you tighten the half hitch you just made, without pulling too much of the tail through.

img_6689 by Last Scratch, on Flickr
The finished hitch. See how those multiple turns in the original loop wrap around the line, the friction they provide prevents the knot from closing up.

img_6690 by Last Scratch, on Flickr
With only one twist at the start you end up with a figure eight loop, which gives slightly less mechanical advantage, and because it lacks the friction to stay open, can tighten up to become much harder to untie when it is time to pack up.

Addendum:
The Trucker's Hitchs is often illustrated like this:
Truckers_Hitch by Last Scratch, on Flickr
As can be seen, this is basically the same as above, but with a sheepshank type loop locking one end. This additional security does not seem to be needed if you have enough wraps.
 
Last edited:
Attaching Tarp to Ridge

This method was shown to me by Jed Yarnold of TrueNorth Outdoors and allows for flexibility in how you set up your tarp, speed and efficiency for both erecting and packing up.

Short lengths of line, about 60cm, or double the distance from elbow to finger tips, are attached to the tarp ridge loops using a simple Lark's Head (http://en.wikipedia.org/wiki/Cow_hitch). 3mm accessory cord works well, but in this case I have used 550 paracord with the cores removed, which allows it to flatten out and grip even better.
img_6729 by Last Scratch, on Flickr

img_6730 by Last Scratch, on Flickr

The doubled paracord is wrapped around the ridgeline, away from the tarp and towards the support post or tree.
img_6731 by Last Scratch, on Flickr

The two ends are then passed back around the lengths nearest the tarp, creating a triangular space
img_6732 by Last Scratch, on Flickr


Tuck the looped, double lines through this space and pull on loop to tighten the knot. Don't pull the free ends through.
img_6735 by Last Scratch, on Flickr

Do this at both ends of the tarp and slide the knots to transfer tension from the ridgeline to the tarp. Prussics will do this too, but the knot shown allows the short lines to be left on the tarp, and can be untied with a quick tug on the free ends.

If you have a middle tie out point on the tarp's ridge you can use the same method, although this one isn't going to take load and is purely there to help with packing up later.
img_6741 by Last Scratch, on Flickr
Having the middle supported can be a bit like lending yourself a third hand when trying to get the tarp into its sack.


ADDENDUM, 8 July 2017: IMPORTANT

In this example I have used 4mm 8-plait line for the ridge, and paracord for the attachment. This works, however, using paracord on 3mm 16-plait and it WILL slip on you if you have any wind. For 3mm x16 I recommend thinner line for the attachment, Zing-it works, as does the 2mm line I use for guying out.
 
Last edited:
Guy Lines

I started using Excel Pro Racing Line, pre-stretched polyester sailing line (http://www.sailboats.co.uk/Product~Marlow_2mm_Excel_Pro__30M_Mini_Spool_KF0149.html)
for guy lines a few years ago and have been very happy with it. It is not significantly more expensive, per metre, than 2mm accessory cord sold in camping shops, comes in good visible colours, is fairly wiry, so does not become crushed or fray easily and it is not so slick that knots don't hold. A single spool of 30m works out well to give eight guy lines at 3.75m each, which is a pretty good length. I wouldn’t want anything less than three metres and more than four and a half would almost always been too much.

For attaching the line to the tarp I am tending towards a slippery sheet bend, although I used to use bowline or figure-8 loops in the line and make loop-to-loop connections with the tarp. I found that loop to loop could be hard to untie after a wet night of wind. Although I leave the lines on this light weight tarp attached, on bigger tarps, which may be rigged in more ways, taking the guy lines off when packing up can be useful, it makes packing easier, and makes it easier to reconfigure at the next rest break / camp site.

For tensioning the lines I use a knot shown me on the Woodlore Fundamental course back in 2003. I have since seen videos of Ray putting up a hammock in the jungle and he uses a slightly different version, but I have never had this one slip or fail to un-tie when I want, so have carried on using it. It shares similarities with the knot used to attach my tarp to my ridgeline.

If anyone knows the name of this knot, I would be most interested to know. Please bear in mind that it was being taught to students back in 2003, so the name needs to be at least that old. ;)

Put some tension into the guy line having run it around the peg. A bit of tension makes it much easier to tie.
img_6661 by Last Scratch, on Flickr

Wrap the free end around the standing part (tarp-to-peg line). Four or five times will do.
img_6662 by Last Scratch, on Flickr

I have taken tension off to make this bit easier to see, but in practice this is done with the same tension as shown in the first pictures. Take the working part of the line back across itself, forming an open space…
img_6666 by Last Scratch, on Flickr

…and pass a loop through the space just created.
img_6667 by Last Scratch, on Flickr

Now this is the slightly tricky part to describe, pull on the part of the loop that goes to the knot. This tightens the knot. Try not to pull on the part of the loop that will pull the free end through. That loop is what makes this easy to untie later.
img_6668 by Last Scratch, on Flickr

img_6665 by Last Scratch, on Flickr

You can help snug the knot tight by with a little nudging from the peg end of the line.
img_6669 by Last Scratch, on Flickr

The shape almost looks a bit like some of the manufactured guyline tensioners, and it works in the same way, by forcing a very slight kink into the main line, which allows the wraps to grip and hold
img_6670 by Last Scratch, on Flickr

img_6671 by Last Scratch, on Flickr
 
Last edited:
Pegging
It should almost go without saying that you want the guy line as close to the ground around the peg as possible and that the peg needs to be angled such that it stays that way. It isn’t really necessary to have notches or hooks in the top of the peg if enough angle has been used to keep the cord at ground level, where it can exert the least leverage against the peg.

img_6746 by Last Scratch, on Flickr

Self Tensioners

Nylon fabric, be it sil-nylong, or polyurethane coated, will stretch when it gets wet. I have mixed feelings about adding tensioners to my guy lines, they add weight and bulk, but for now I am happier using them than changing to a line that stretches enough to take up any slacking off of the tarp fabric. My tensioners are made from small diameter surgical tubing. The tubing isn't permanently fixed to the lines, but is attached with a pair of simple slip knots, arranged so that tension on the line grips the tubing tighter. The slack between the knots prevents over tensioning or over stretching. The rubber is only 4-6 inches long before stretching.

This was the only thing on here that I came up with almost by myself, having only see the very neat, but permanently installed, tubing tensioners used on Jacksrbetter tarps.
http://www.jacksrbetter.com/DSC00368 - web Small.JPG
which can be made like this:
http://www.tothewoods.net/HomemadeGearTarpTensioner2.html

I wanted something that wasn’t permanent in the line, and that was dirt simple to make.

img_6751 by Last Scratch, on Flickr

img_6742 by Last Scratch, on Flickr

img_6744 by Last Scratch, on Flickr

img_6743 by Last Scratch, on Flickr


Conclusion
So, there are the knots that we demo at the Bushmoot each year :) I hope that this hasn’t all been showing Grandma how to suck eggs. If anyone has photo series showing what they think would be a better, faster, easier or more secure way of doing any of these jobs, please post away :D

All the best.
 
Last edited:
C_C, congratulations on posting a useful skill - something that's becoming rare in this sub-forum.

Like dogstar, I too, love knots, and so, have a couple of questions/comments - please do not construe this as critcism - it's not intended as such but rather to promote discussion.

While your knots obviously work very well, what advantage, if any, does the Evenk knot have over a slippery Buntline Hitch, which is fast, easy and very secure and can also be tied one-handed? (in the following, it is not shown as slippery)

Buntlinehitch.jpg


You mention that the modified Trucker's Hitch was demonstrated by Mors Kochanski. In his book, 'Top Seven Bush Knots and the Use of the Windlass' he shows the 'tie-through' loop as a 'Figure of 8 noose-loop' and the finish knot as a 'Slippery Sheet Bend'. Has he rethought this or are the changes, yours?

Kochanskisparbuckleknot.jpg


You explain further down that the Figure 8 can tighten up, making it harder to untie but how does it give less mechanical advantage?

Personally, when tieing the Trucker's Hitch, I use a Single Lineman's Knot. I have never found it difficult to untie after a load has been applied.

SingleLinemansLoop.jpg


I like your homemade tensioners - simple and effective.

Thank you for a well thought out and superbly illustrated post.

Doc
 
Last edited:
Good stuff, thanks for sharing! It's good to know and use various working knots and their applications. I still have to look some of them up if I haven't tied them in a while. :o
 
Very informative post. Thanks for sharing the variation on the truckers hitch.
 
I tarp and tie a lot of stuff in the course of a day and my favorite tie off is a sheep shank (sp), you can see how it's useful for takin' up slack and cinchin' down a load, it's quick to do and ya can do it when both ends of the rope are tied off already.

image018.jpg
 

Attachments

  • image261.jpg
    image261.jpg
    8.2 KB · Views: 9
Excellent piece of writing
Very clear
Very informative
(I am a Technical Writer, so this is a professional evaluation !)

Thanks
 
Thanks guys! I really wasn't sure whether this would go down well here...no knives, no guns, no tales of derring do. ;)

Doc,

Those little booklets are great. :) Has anyone watched Mors' DVD on knots? It's been a couple of years at least and I can't remember for sure whether he shows the multi-wrap method of the trucker's hitch, or whether I only saw it on a course. Since the way I have shown is how it was shown to me, about four years ago, I can only assume that he has changed his thinking since publishing the booklet. Sadly I can't say it was my invention. :rolleyes::D I have used both methods and like the multi wrap method as easier to untie. I have also used a single lineman loop but have had trouble untying it on thin line after it has seen heavy load. Compared to other loops it was easier to untie, but it still required some picking at, rather than just falling apart as that trucker's hitch does.

Regarding the mechanical advantage, maybe I shouldn't have said it that way, but if the knot does not close up, the loop that is acting as the primary "pulley" gets longer as tension is applied. This means that line is moving through the wrap-loop, which acts like another pulley. There probably isn't really that much difference in practical mechanical advantage;:eek:

I haven't experimented much with the slippery buntline. I have had my set up blown on pretty hard and the Evenk didn't slip, so I never went looking for anything more secure. I understand that the buntline is particularly good for securing a flapping load as the motion just draws it tighter rather than working it loose. A friend of mine, with plenty of jungle hammock/tarp hanging experience, played with how to tie a slippery buntline with the same speed and fluidity associated with a falconer's hitch. He said that he succeeded, but I never got my head or hands around it, either way, at the last check he was still using the falconer's hitch most of the time. I must own though that that red ridgeline is a little too stiff to take a falconer's hitch and if I was going to use such a knot for hanging a hammock I would probably use the buntline as the most secure. For tarps, if you can tie the slippery buntline as quickly and easily as you need to then there probably isn't much in it compared to the other knots. The Evenk and Falconer's do seem to untie a little quicker and easier but not by much. The fact that the Evenk can be tied in mittens doesn't matter much in the UK.

I don't suppose you have any pictures on how you do the one-handed slippery buntline hitch? I can do it one handed, but it is a fiddle.

Hi T. Erdelyi
Sheep shanks are great for shortening lines, or bypassing damage, but I hadn't ever thought to use one as a tensioner. I have been playing around with some cord trying to figure how you do it without much success. Which bit do you pull on to put the main line under tension?:confused:

Thanks again guys!
 
Last edited:
Hi T. Erdelyi
Sheep shanks are great for shortening lines, or bypassing damage, but I hadn't ever thought to use one as a tensioner. I have been playing around with some cord trying to figure how you do it without much success. Which bit do you pull on to put the main line under tension?:confused:

Thanks again guys!

If your tyin' off a tarp, take the free end of the rope pass it through the grommet, (or if there is no grommet, take a piece of cord and make a loop on the corner of the tarp) feed it back through the loop closest to the end you're tyin' off on the sheepshank and pull back towards the tarp, the loop acts as a pulley of sorts and ya can put tension on the line and just tie off at the sheepshank end with a couple of half hitches. Dependinin' on how ya tied off the other end ya still have a loop on the other end to take up more slack or tie off another cord or rope, I hope that explains it, I'll try to take a pic tomorrow and post it so ya can see what I mean.
 
Very informative thread! I love working knots & their applications.

If anyone knows the name of this knot, I would be most interested to know. Please bear in mind that it was being taught to students back in 2003, so the name needs to be at least that old. ;)

I think this is a variation of what Budworth calls the adjustable grip hitch:
264px-Adjustable_grip_hitch_knot.png


Here I attempted to tie your knot versus the slipped adjustable grip hitch that I use. My attempt at your knot is in the darker cord.

I think the only difference is that the bight is passed through the larger loop structure of the knot in your variation, rather than under the last turn in my variation.
edit_preview.php


Here is the dressed structure of the two for comparison.
edit_preview.php
 
Very smart thread. Too many working knots have gone the way of the Dodo simply due to the new materials these lines are made from. A couple knots I use pretty frequently is the butterfly knot for putting a solid, non-slipped loop in the middle of a line without ends. #2. I use a variation of the truckers hitch that does not require either end of the line. A simple solution for your guy line tensioner for sure. What I do on my boat when I need lines to have slack taken up when tension is eased is this; I use a 12 strand braid line (hollow type, but gutted double braid can work I guess) and put a short length of shock cord inside the line. Bunch the line up over the shock cord and stitch/whip the ends in place. Now you have internal elastic tensioners that can't be lost.


-Xander
 
Very cool system! I'm really impressed by the clarity & time put into your post. I want to echo Doc in that I get excited about these kind of knot threads, and my comments are in no way intended as criticism. Just trying to share some thoughts...

Pass the working end of the line through this new loop.

IMG_6773.jpg

Pull on the working end to add tension to the line. This arrangement is like pulley, providing mechanical advantage.

There's a video of a "transport knot" from a trucker in Brazil that Pict/Colhane posted on his youtube channel. http://www.youtube.com/watch?v=DHH9JLwB-34

If you watch the first minute or so, I think this is another way to tie the tensioning knot you use on your rig without having to thread the working end through a loop. If the trucker were to twist his first "ear" several times, I think he would end up with your knot.
edit: as I look at it more, it's almost your knot, but the working end goes through a different loop for leverage. Yours is more secure in slippery line, I'd bet. Does it ever jam on you?
img3756n.jpg

img3757oh.jpg

img3758u.jpg

img3763p.jpg


I think his is a "wagoner's hitch," which I think is related to a sheepshank that a previous poster noted. After I saw this video, I started using this knot when hauling stuf in my pickup. It works great for me.

A sort of half sheepshank provides the loop to pull on for the leverage, and it works great for heavy loading, b/c it doesn't jam. Even after heavy loads, the loops fall apart when you release the tension. I presume a full sheep shank would let you do the same, except you would have leverage in both directions, b/c you could use the loop on each end as the loop of a trucker's hitch type setup on both sides of the sheepshank.

"half sheepshank" formed in the wagoner's hitch
img3759v.jpg


full sheepshank with leverage loops in both directions
img3761oi.jpg

edit_preview.php
 
Last edited:
Back
Top