The Whittling Corner

Status
Not open for further replies.
Ace, nice job on that cartridge. I use leather covers for my thumb and forefinger, and I also wear a cut-proof glove on my non-dominant hand. I cut myself really bad one time when a piece broke unexpectedly. Thankfully, there was no permanent damage, but I learned my lesson.
 
Ace, nice job on that cartridge. I use leather covers for my thumb and forefinger, and I also wear a cut-proof glove on my non-dominant hand. I cut myself really bad one time when a piece broke unexpectedly. Thankfully, there was no permanent damage, but I learned my lesson.

Mind sharing the safety gear details?
 
OK, I tried to get a more realistic look by shortening the bullet and reshaping it to look like a JHP. After an image search for similar cartridges I've concluded that this most closely matches the proportions of a 40 S&W. :confused:
Now both my thumbs are sore with tiny little cuts that need to heal up. o_O:rolleyes::eek:

35616311180_f2efd4f78e_c.jpg

Or possibly the brainchild of Cooper...the newly resurgent 10MM. Nice shaving maker!
 
Ace, nice job on that cartridge. I use leather covers for my thumb and forefinger, and I also wear a cut-proof glove on my non-dominant hand. I cut myself really bad one time when a piece broke unexpectedly. Thankfully, there was no permanent damage, but I learned my lesson.

This is good advice. I usually wear a carving glove on my holding hand and use latex coated tape on the thumb of my knife hand. I do my best to avoid needing it. If I do end up touching the glove or the tape with the knife edge, I stop and think about how I could have avoided it.

A few tips: always think about where the knife would go if the wood was suddenly out of the way. Keep your fingers and body clear of that path. If the wood splits out (like it did for me once, too) the knife will go in that direction quickly. Also, if you find yourself pushing hard, stop and think about what you can do to change that. Maybe you can use a different technique. Maybe you need to sharpen your knife. Finally, if your instincts are telling you that what you're doing is unwise, listen to them.

J_Curd J_Curd I sent you a PM with links to what I use.
 
Ace, nice job on that cartridge. I use leather covers for my thumb and forefinger, and I also wear a cut-proof glove on my non-dominant hand. I cut myself really bad one time when a piece broke unexpectedly. Thankfully, there was no permanent damage, but I learned my lesson.

Thanks for the safety advice. I have tried very hard to cut away from myself as much as possible, but for rounding the top of this piece that didn't give enough control. Fortunately I was only shaving off very shallow cuts at that point but I still managed to nick my thumb at about the degree of a bad paper cut. That made me think that some kind of protector would be worth considering. I'll see if I can work up something from a piece of scrap leather.
Yes, keeping your brain engaged while doing this sort of work is a very good idea! :thumbsup:
 
As WhittlinAway mentioned, you can also use 1" comfort bandage, sold in drug stores (also called "CoBan") to wrap fingers. Sometimes it's nearly impossible to keep fingers completely out of the way, no matter how hard you try, so it helps to have some protection.
 
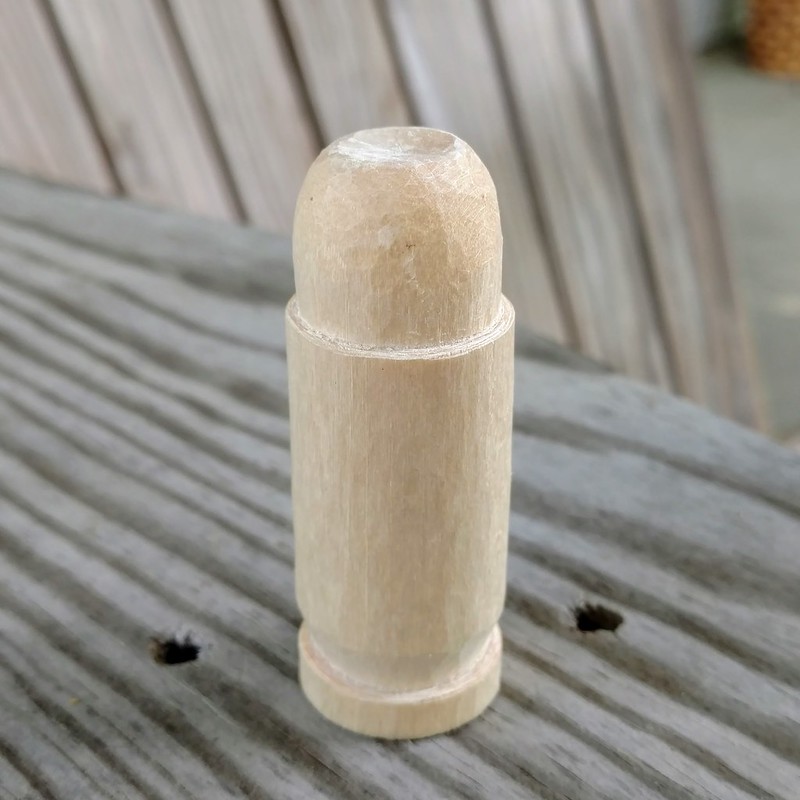
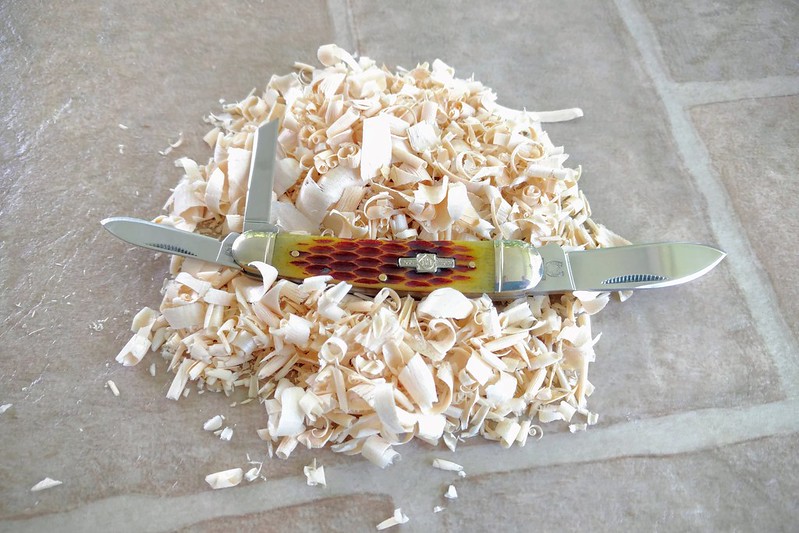
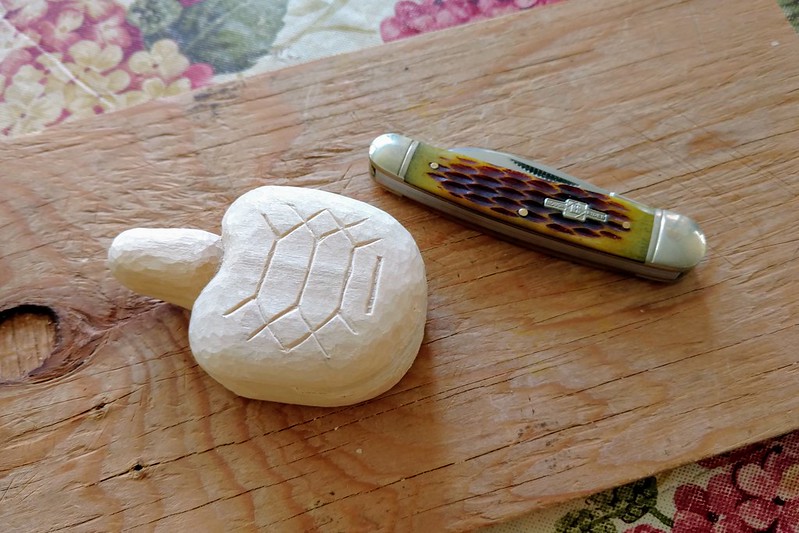
I thought I'd come in and "set a spell" here on The Whittling Corner. I just picked up my first whittler, A Rough Rider 375, and bought some basswood. Then I learned how to reprofile the blades, made a strop, and learned how to use it. So far all I've made with the knife are shavings as I try my hand a various compound curve shapes to get a feel for the knife and the wood. Still trying to decide on a first project.
I'm pretty happy with the knife. I like the shape of the main blade but it is a bear to open thanks to the double backspring, and all the blades have good snap. The coping blade has a crisp half stop but the half stop for the pen blade is a bit mushy.
I think this is going to be fun. :)

35154253673_19b8ded64a_c.jpg
I recently got the exact same knife and really like it. I've carved a few wood spirits and a knife for my grandson with it with only some stropping from found branches. I plan to reprofile the edges though so it cuts more smoothly and doesn't try to dig in as it does now.
 
I recently got the exact same knife and really like it. I've carved a few wood spirits and a knife for my grandson with it with only some stropping from found branches. I plan to reprofile the edges though so it cuts more smoothly and doesn't try to dig in as it does now.
G gmwolford I did reprofile mine a bit and it's cutting very well. I'm sure I could go even more acute with the edge and I probably will once I get more experience with it. When I ordered it I had it pictured as larger than it actually is and I was afraid the main blade was going to be unwieldy, but it seems to be about ideal for me and I can control it very well.
I think I have a new project in mind that I plan to start on soon. I'd like to see a picture of that knife you carved!
 
I bought mine at the local flea market so I knew how it fit/felt when I got it. The primary blade and the coping blade were the things that drew me to it.

I spent my afternoon cleaning and sharpening this older Uncle Henry 34 OT I just picked up. The carbon steel blades were easy to put about a 20 degree inclusive bevel; it basically had none to start with LOL

The knife I whittled is nothing special but here she is along with my Rough Rider Whittler
sR81xAb_d.jpg
 
As WhittlinAway mentioned, you can also use 1" comfort bandage, sold in drug stores (also called "CoBan") to wrap fingers. Sometimes it's nearly impossible to keep fingers completely out of the way, no matter how hard you try, so it helps to have some protection.

I picked up some 3M CoBan at the drugstore. I have some fairly thick leather scrap on hand so I am putting a piece against my thumb and them wrapping it with a few inches of CoBan. It seems to hold in place very well and provides quite a bit of protection. Also, trying to be always mindful of where the blade is "aimed" and making sure no body parts are in the line of fire except for my well-protected thumb -- and even then making sure that is only for a shallow, well controlled cut.
 
I've made a few chains now, and find them to be a good way to get to know a new knife. My first was made with a Case Seahorse whittler, with a bit of initial work being done with an Opinel No. 6. The second was whittled with a Schrade USA 34OT. The third was thanks to a GEC #33 Conductor Whittler / Camillus 72 tag team.

I have one in progress now with a GEC #66 Calf Roper. I thought I'd share a few pics before settling in for the final stretch.

Layout:

E6BA1ohh.jpg


Aside: using dividers is a treat. Here I've evenly divided sections into thirds and fourths without the use of a ruler. It doesn't require math and can be quicker and less error prone than marking things out with a ruler.

I used the sheepsfoot blade to knock off the first two corners and the spey blade for the last two:

Xh5eXbIh.jpg


The spey blade took the octagon to a cross:

xTl2EDgh.jpg


The sheepsfoot then took over to remove most of the remaining waste area...

yObHh7Kh.jpg


... and begin to shape and free the links.

zBOcnv3h.jpg


And that's where it stands. As soon as I hit "Reply to Thread", work will continue. :)

By the way, if anyone is interested in more detailed play-by-play photos and description, let me know. I'd be happy to write something up to post in The Workshop forum.
 
Last edited:
...
By the way, if anyone is interested in more detailed play-by-play photos and description, let me know. I'd be happy to write something up to post in The Workshop forum.

I certainly could benefit from that if you have the time to put it together. Thanks!

Also, there's a workshop forum? I'm not sure where that is...
 
I certainly could benefit from that if you have the time to put it together. Thanks!

I'll put something together once I've finished the chain. It may be a few weeks.

Also, there's a workshop forum? I'm not sure where that is...

Yup, there is. Unfortunately it's a bit hard to discover. Here's how to navigate to it:

Forums -> Community Discussion Forums -> Activities, Training & Skills Development -> The Workshop: Projects, Tools, Techniques & Ideas

In there you'll find the epic Whatcha whittlin' these days? thread. Also not to be missed is the carve a little character tutorial.
 
There's a thread titled "or maybe how NOT to whittle a chain" that may be of some help. (It was originally a HOW TO thread, but the title tag left with the forum software change)

Oh, cool! Thanks for pointing it out. I hadn't seen it before and it's a great resource.

I'll scrap my plans for writing something up. This thread already covers it in far greater detail than anything I would have done.

Here's the link for the others: or maybe how NOT to whittle a chain.
 
Turtle
Well, now I know how Michelangelo must have felt once he got started on the statue of David.
;)
For my earlier "cartridge" project I cut a block of basswood in half, then bisected one of the halves. Looking at the remaining half piece (about 2.5 inches square and about one inch in thickness) I got the idea that It might be useful for making a little stylized turtle -- quite stylized with no feet and tail, just a basic shape. Little did I realize how much work was involved in removing all the wood that did not fit into the shape of a turtle! The basic outline took about three days of on-and-off work, with just a bit more time to round off the top and add the pattern.
Shown with my RR375 Whittler.

36182465945_9ec4e7200b_c.jpg
 
A Ace Rimmer you've been whittling up a storm lately! I hope that means you're having fun with it. :) What's next?

Nice work M Msturm ! I love the idea of leaving them for others to find. I wonder what sort of adventures they end up having.
 
Status
Not open for further replies.
Back
Top