- Joined
- Apr 13, 2017
- Messages
- 1,801
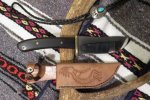
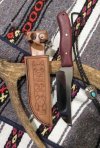
Greetings, I'm the guy who posted "southwestern style sheaths" on the bottom of page 2 about 3 weeks ago. Those "slab" styles were rightly referred to as "old school" and I decided to update a couple of new ones to a "foldover" style (my first ever). Please tell me the proper terms for these styles. Any comments and suggestions are quite welcome. I reviewed nic681's excellent sheath making tutorial from 2010 but still have a few questions about the sewing with waxed thread though.
When planning the stitching line I used a modeling tool, straight edge and french curve, then punched with a 4 tine punch from Tandy. I first punched the front side + thin welt, then used finish nails to hold the front and back together, re-punched thru the front enough to mark the inside of the back, then final punched the back. I wasn't sure the punch would go cleanly thru 2 layers+welt in a single operation without really beating it. I still got a slight wiggle, any tips to get those punch lines dead straight? I could use a wearable pair of magnifying glasses with lights that I've been meaning to get.
My holes seem too close together when using this punch, when compared to other pieces I see here and all over the forums. What's a good average distance between holes? I can scrap the punch and drill or tap on a drill press if needed, or get a punch with wider spacing? Should I just buck up and get a groover and a wheel as well? (Trying to keep a budget)
I watched a video where the guy was using two threads and needles working from the top and bottom, while I went down from the top and then back. Would that alter the appearance?
At the ends I back stitched a couple of holes, then used a regular sewing needle with a microdrop of superglue on the thread, then trimmed tight with an exacto knife. Is that a proper method or is there a preferred way?
And finally a big thank you to all the posters and advisers willing to share their hard earned knowledge and expertise, and Merry Christmas to all.