- Joined
- Feb 16, 2010
- Messages
- 3,666
I've about worn out my old cheap grinder, so I've been holding off on working on blades until I get my new grinder finished. However, I wanted to participate in the virtual BBQ and offered to start a couple forge WIPs.

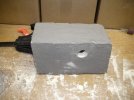
First, let's start with the simple 2 brick forge of a non-traditional design. Normally, you hollow out the sides of two bricks and wire the two together. I did this but felt that it was a bit flimsy. I like a hole down the middle. It's a bit more work, but it is tougher and gives a better swirl for more efficient combustion. I also coat the inner chamber with cement. These bricks are so soft that your forging stock will quickly damage the brick. The cement on the other hand is very sturdy and easy to apply. You can stand the forge on other bricks, strapped to a cinder block works well, also.
Here are the parts you might need to build it:
$15 Two soft insulating firebricks
$2 16 oz. Rutland 2700° refractory cement
$3 12" x 24" 1/4" metal cloth
$15 Propane torch (I prefer the MT245C by Magna, nice large flame)
$5 Propane fuel
Tools needed
Saw
Drill
Tin snips / wire cutters
12" long 3/16" drill bit or thick coat hanger
3/4" or 1" spade bit
2" or larger hole saw or forstner bit
Start with two bricks. Normally, you would use straight bricks, but I have a plethora of arch bricks and the build process is the same.

Cut them in half

Stack them like this

Get a 2" - 2½" hole saw

Mark the center of the bricks

Drill most of the way through three of the bricks from one side. The hole saw will bottom out so you will have to finish drilling from the other side

Drill through the center hole and out the back side. This way the big holes line up better.

On one of the bricks, drill a 3/4" - 1" hole(depending on your torch size, you want just a little bigger) in the middle of the brick about 1½" from the top into the top/side of the chamber. You want the flame to be able to enter through the hole and swirl around the chamber.

On the fourth brick, drill half way through and remove the core by scraping it out. Drill/carve a pass through on the bottom of the brick just big enough for a blade but not enough to lose too much heat.

Using a long drill bit, coat hanger, whatever, drill down one of the corners deeper than your landscape screws. Empty out the dust and put the screw in. This will hold the bricks together while you drill the other three corners and insert the screws. It is very important that you pre-drill the holes. If you don't, the bricks will split and crumble.


Next, cut your metal cloth to fit around the bricks and a little extra to fold over the corners. I like to leave a little extra at the ends to fold over also. Fold the cloth around the bricks and secure it. Cut a couple 1" pieces of metal cloth wire to use to tie the cloth together.


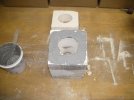
Time to mix some refractory cement. A 16 oz. can is under $2 at most hardware stores.

I use a small blender to mix it. You can mix it by hand, but it takes a long time. Cut the cement into smaller chunks and add 2-3 oz. of water to 16 oz. of cement. Mix until very smooth like pudding, adding water if/when necessary. Any excess water will dry out and isn't harmful.

Coat the inside of the forge with a thin coat of cement. Give it a couple days for the cement to dry. The first time you fire up the forge, you can expect the bricks to get a few hairline cracks. This is because the tiny air bubbles in the bricks expand and cause cracks. This is normal, which is why we wrap the bricks in metal cloth.

Give the forge a few minutes soak to warm up, then put your steel stock in and watch it turn orange.


First, let's start with the simple 2 brick forge of a non-traditional design. Normally, you hollow out the sides of two bricks and wire the two together. I did this but felt that it was a bit flimsy. I like a hole down the middle. It's a bit more work, but it is tougher and gives a better swirl for more efficient combustion. I also coat the inner chamber with cement. These bricks are so soft that your forging stock will quickly damage the brick. The cement on the other hand is very sturdy and easy to apply. You can stand the forge on other bricks, strapped to a cinder block works well, also.
Here are the parts you might need to build it:
$15 Two soft insulating firebricks
$2 16 oz. Rutland 2700° refractory cement
$3 12" x 24" 1/4" metal cloth
$15 Propane torch (I prefer the MT245C by Magna, nice large flame)
$5 Propane fuel
Tools needed
Saw
Drill
Tin snips / wire cutters
12" long 3/16" drill bit or thick coat hanger
3/4" or 1" spade bit
2" or larger hole saw or forstner bit
Start with two bricks. Normally, you would use straight bricks, but I have a plethora of arch bricks and the build process is the same.
Cut them in half
Stack them like this
Get a 2" - 2½" hole saw
Mark the center of the bricks
Drill most of the way through three of the bricks from one side. The hole saw will bottom out so you will have to finish drilling from the other side
Drill through the center hole and out the back side. This way the big holes line up better.
On one of the bricks, drill a 3/4" - 1" hole(depending on your torch size, you want just a little bigger) in the middle of the brick about 1½" from the top into the top/side of the chamber. You want the flame to be able to enter through the hole and swirl around the chamber.
On the fourth brick, drill half way through and remove the core by scraping it out. Drill/carve a pass through on the bottom of the brick just big enough for a blade but not enough to lose too much heat.
Using a long drill bit, coat hanger, whatever, drill down one of the corners deeper than your landscape screws. Empty out the dust and put the screw in. This will hold the bricks together while you drill the other three corners and insert the screws. It is very important that you pre-drill the holes. If you don't, the bricks will split and crumble.
Next, cut your metal cloth to fit around the bricks and a little extra to fold over the corners. I like to leave a little extra at the ends to fold over also. Fold the cloth around the bricks and secure it. Cut a couple 1" pieces of metal cloth wire to use to tie the cloth together.
Time to mix some refractory cement. A 16 oz. can is under $2 at most hardware stores.
I use a small blender to mix it. You can mix it by hand, but it takes a long time. Cut the cement into smaller chunks and add 2-3 oz. of water to 16 oz. of cement. Mix until very smooth like pudding, adding water if/when necessary. Any excess water will dry out and isn't harmful.
Coat the inside of the forge with a thin coat of cement. Give it a couple days for the cement to dry. The first time you fire up the forge, you can expect the bricks to get a few hairline cracks. This is because the tiny air bubbles in the bricks expand and cause cracks. This is normal, which is why we wrap the bricks in metal cloth.
Give the forge a few minutes soak to warm up, then put your steel stock in and watch it turn orange.
")