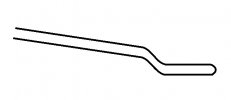
Hello ya'll,. Let's see if this is the way to post a new thread. When working a billet with the press I have no problem making it longer. Even with flatting dies it gets longer, but not much wider. I start with a 3/4" square billet, drawing with flatting die it might grow to 1" wide, but lots as longer. Is there a trick to working the billet wider?
You are using an out of date browser. It may not display this or other websites correctly.
You should upgrade or use an alternative browser.
You should upgrade or use an alternative browser.
widening a billet with press?
- Thread starter Ken H>
- Start date
That's sorta what I was thinking BillyO, but wondered why I never saw any dies made like that. Thought I might be missing something. I'm thinking something like 3 or 4 tiny "fullering" sets on top 'n bottom. Perhaps make the "fullering" ridge no more than 1/8" deep? Maybe take a 1/4" rod, cut in half. Space the rods apart about 1/8", with rod halfs on top alternating with rods on bottom so when billet is pressed the "grooves" wouldn't be trying to "pinch" the billet?
I'm bouncing ideas here. I might be able to try something in a day or 3.
I'm bouncing ideas here. I might be able to try something in a day or 3.
Joshua Fisher
Knifemaker / Craftsman / Service Provider
- Joined
- Mar 27, 2018
- Messages
- 1,432
Coal iron works has fullering dies that press from the top and bottom, those would probably work great and you could setup stop blocks along the sides of the press, for example if you want to widen a billet but don’t want it thinner than say 1/2” lower the dies until they are 1/2” apart and measure how much space is between the two plates along the frame of the press, then you can take some 1/2” thick flat bar and cut two sticks to that measurement that can then be clamped to the frame and act as stops.
Thanks for the inputs - I've been away and didn't see the responses. Something along those lines are what I'm thinking of trying. Today is the first day without raining almost all day so hope to get a bit more project work done, a set of squaring dies welded up, etc.
Why is it I've not seen anything about "widening" a billet? Plenty about drawing a billet longer.
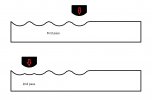
When doing San Mai, I might use 1/8" of SS for each side with a 3/16" high carbon core for the billet. Right now all I've got is 1" wide. After setting the welds to a nice solid feel, I can take small bites with flatting dies to make it thinner. This makes the billet grow longer without all that much widening. I'd like to draw the billet wider as well as longer. I'm thinking of something like a mini-fullering die, with perhaps 2 or 3 fullering grooves that are perhaps less than 1/8" high each (to give <1/8" grooves). I'd think perhaps the top grooves alternating between the lower grooves? Does any of this make sense? OR - is there better ways? Remember I'm on a low tonnage "H" press. This image below is an attempt to show what I'm talking about. This is a side view as looking from side of press with "humps" laid out same as a fullering die.

- Joined
- Sep 21, 2014
- Messages
- 2,814
Not sure why this is, but perhaps because we're making the bar from individual pieces, it'd be as easy to just start with wider stock and make a wider billet? Any forging will distort the pattern (unless you are the perfect blacksmith, I guess), especially when widening a billet...\Why is it I've not seen anything about "widening" a billet?
I'm curious to see if this will work. My 2 thoughts on this are that (1) multiple fullers might speed up the process, but I'd feel more comfortable that I'd have more control over the process with only one fuller, and (2) I think it'd be easier to control if the fullers were not offset.perhaps 2 or 3 fullering grooves
One of the things I've learned in my years of forging is that it's pretty important to keep things straight and flat for accurate forging, and I'm not sure that'll be easy with these dies.
I'm sure you're right about reason for not widening a desired pattern, but right now since I'm just learning to "weld" and not really worrying about what the final pattern is I hadn't thought of that. Good point though. Remember, I'm also talking about plain carbon bars and San Mai where there is no pattern.
Good comment on the drawing I made above - did some more thinking last night and am now thinking perhaps a gentle curve rather than "fullering" type might be better. Press a gentle curve full width of billet to force it wider, then next press with flatting dies to level it out? With that full width curve there should be less chance of cold shunts/inclusions.
and of course "Kisser" blocks would be used to control depth of groove. I do NOT have anywhere near enough control of the press without kisser blocks.
- Joined
- Sep 21, 2014
- Messages
- 2,814
That's the safer, but slower way. You'll probably quickly get to the point where you do multiple passes with the drawing fuller before switching to the flat dies. As you get more motor control you'd be able make those fullers narrower to work faster, but I bet the difference would be minimal with the power of the press.Press a gentle curve full width of billet to force it wider, then next press with flatting dies to level it out?
Stacy E. Apelt - Bladesmith
ilmarinen - MODERATOR
Moderator
Knifemaker / Craftsman / Service Provider
- Joined
- Aug 20, 2004
- Messages
- 36,435
Your sketch is a ladder patterning die. I think you would get better fullering with opposed high spots, instead of alternating them.
Now, if you were shooting for adding horizontal wave pattern to damascus, then your dies as-sketched should create some changes in the pattern.
Personally, I would make a single low arc on the dies.
My 30 ton press is still torn down, but it had square 6" by 6" die plates. They could be inserted in any orientation. This allowed either lengthening or widening of a billet.
Stacy, Thank you for your comments, they are ALWAYS appreciated. I've since sorta realized a single low arc as you mention would be the best method. I think I can stretch my dies 4" of usable space which would allow a combo die with about 2" of gentle arc, and a 2" wide flatting die. It seems those two dies are best used together. I'm finding the narrow 3" die base of the standard die for this 12 ton press is a bit of a drawback, just not hardly enough room for combo dies.
That would be nice - and it proves that "size does matter" {g}square 6" by 6" die plates. They could be inserted in any orientation
- Joined
- Sep 21, 2014
- Messages
- 2,814
Here's a quick sketch of what I think are the best shaped "combo" die profiles for drawing out billets. This is the side and end view of an ~ 3" x 6" die that's on the 165# Wolf power hammer that I learned on. I'm not smart enough to know if this size/shape would be the most efficient on a press, but my point in sharing this is to try to demonstrate the general shape of drawing dies. There's a large radius to squeeze the metal from the center out to the sides, thus stretching the bar. But there's also a large enough "flat" spot to straighten and flatten the bar during the drawing out process.


- Joined
- Sep 21, 2014
- Messages
- 2,814
Here's another couple of pics that hopefully helps demonstrate how the pattern can change depending on the shape of the dies. These are 2 almost identical 450 layer raindrop billets I recently did. The only difference is that after drilling the holes, I flattened/drew out one bar with the flat side of my combo dies made of 2" square and the other was drawn out with the drawing side (2" dia arc). Can you tell which one is which?
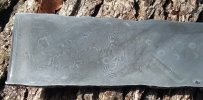
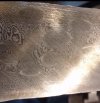


BillyO, you sure can tell the difference in the final pattern. I much prefer the top pattern done with flat dies. The bottom pattern really shows the distortion of the drawing dies.
Here is another idea for combo widening and flatting die. Comments? This 4" width will require a new die mounting setup rather than the original bolt in die. Making each section 1-1/2" would allow the existing bolt in setup to work. Comments?

Here is another idea for combo widening and flatting die. Comments? This 4" width will require a new die mounting setup rather than the original bolt in die. Making each section 1-1/2" would allow the existing bolt in setup to work. Comments?

Here's what I'm talking about for quickchange die holder. This is the bottom - forgive the crappy look, I've not cleaned it up up yet. When it's slid all the way back, there will be a pin that drops in front to hold in place. The back of the brackets have stops welded on so die can't go out the back.
Of course the brackets are welded to the press, but that shouldn't be a big deal. If ever desired it wouldn't be a big deal to grind welds off and clean up and use with bolts are normal.

Of course the brackets are welded to the press, but that shouldn't be a big deal. If ever desired it wouldn't be a big deal to grind welds off and clean up and use with bolts are normal.

What are the two holes in the quick change holder for? It looks like they line up with the original bolt holes, but you mention the new holder is welded on. It might be worth protecting the threads somehow if you think you might need them again someday. I guess new dies you make would not have the slots in them and cover the threaded holes, but the dies in the picture would let the threaded holes fill up with debris.Here's what I'm talking about for quickchange die holder. This is the bottom - forgive the crappy look, I've not cleaned it up up yet. When it's slid all the way back, there will be a pin that drops in front to hold in place. The back of the brackets have stops welded on so die can't go out the back.
Of course the brackets are welded to the press, but that shouldn't be a big deal. If ever desired it wouldn't be a big deal to grind welds off and clean up and use with bolts are normal.

I really enjoy reading your posts about the new press and hope you will keep posting about what you make with it and maybe a review after you have used it for a while.
- Joined
- Sep 21, 2014
- Messages
- 2,814
Hubert has a good point about protecting the threads. Is it possible to get some threaded studs for a hex key to sink into the bolt holes? If a big enough key, you could then use that socket for pins welded to the dies and just drop them in.

If your drawing is indicating 2 separate pieces, is that necessary or would it be just as easy grinding the fullering die out of the same piece you use for the flat die (if you have a big enough piece, that). Also, I'm not sure the 1/16" offset is really needed.
How much overhang do folks think is safe? This could allow for a bigger flat dies (as you know more is better for flattening/straightening) as well as possibly allow you to make some die plates on the diagonal.
I can't remember if this was mentioned, but is there enough throat to allow you to build up a base so you can do whatever you want? Referring back to the above question, if a 1" overhang would be safe, you could make a base plate like this:
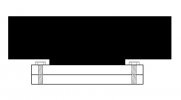
You know I'll most likely have at least one...Comments?
If your drawing is indicating 2 separate pieces, is that necessary or would it be just as easy grinding the fullering die out of the same piece you use for the flat die (if you have a big enough piece, that). Also, I'm not sure the 1/16" offset is really needed.
How much overhang do folks think is safe? This could allow for a bigger flat dies (as you know more is better for flattening/straightening) as well as possibly allow you to make some die plates on the diagonal.
I can't remember if this was mentioned, but is there enough throat to allow you to build up a base so you can do whatever you want? Referring back to the above question, if a 1" overhang would be safe, you could make a base plate like this:

I had thought about something like your overhang, but for simplicity decided to try what I've got.
The threaded holes you see are where the original dies are bolted in. Those threads are screw in, so it that does get buggered up they can be replaced. Once I use the slide in dies some and decide this is what works good, then I'll perhaps tack weld a filler in the die slots so the threaded holes would be covered.
I have also thought about getting a set screw with hex drive to put in the inserts. I'm not sure it's needed once the die base is solid to provide protection.
One thing on the overhang, while it would be ok, not sure it would be good to have the press putting so much pressure that far away from center of ram.
On the two piece combo die, I think it would be much easier grinding the widening arc full width, then welding the arc portion and flat portion to base plate. The 1/16" might not be needed, not sure but it would serve as a fixed 1/8" spacer to prevent pressing too far and getting the blade too thin at that point. Playing around other day with a round bar I found how easy it is to pinch a 1" truck axle into without a spacer bar in place. I can't see where the 1/8" would be too much space? By the time the scale is cleaned up on a 1/8" thick billet it's going to be <.100" thick I would think?
I've now got top and bottom "L" brackets welded into place. I think I'll use it a bit before rigging up a clip to hold die in place.
Later
- Joined
- Sep 21, 2014
- Messages
- 2,814
But most of the piece could still be directly under the ram where the main pressure is. I'm mainly thinking for flattening dies, but having another 1/2" width on the combo dies can make a difference, especially with the small-ish plates that are on this 12-ton model. According to the specs, the 12-ton combo dies are only 3" long, making each half only 1.5" wide which means that the widest billet you could draw out using these would be <1.5". On the 25-ton, the dies are 8" wide so each half of the combo dies can draw out < 4" wide billets.One thing on the overhang, while it would be ok, not sure it would be good to have the press putting so much pressure that far away from center of ram.
1/16" overhang would not be enough to change the force on the ram, but 12" might be. So my question, and I'm hoping for some engineers to chime in....what would be the most overhang to be safe to allow for wider die plates and wider billets?

