WIP: Restoring an old bone handled Scout knife (to clean or not to clean?)

Joined
Feb 12, 2013
Messages
1,122
As you may have seen, I recently purchased a VARY rusty old scout knife with bone handles. I plan to restore it as best I can, but I've never done this before on a knife with bone handles. What care do I need to take with Bone? I plan on hitting it with some WD40 and Wire wheels, but I've seen others post good results dissolving the rust with citric acid, vinegar, or a coke a cola bath. I'd like to try something like this to get out some of the rust on the springs and down in the liners without disassembling the knife, but I don't know if it'll damage the bone.

Anyone have advice for me? I'll update this thread with more pictures and progress when I receive the knife on Monday.

the knife in question:

$_57.JPG
 
Last edited:
My biggest concern looking at the knife is the amount of pitting on the blades Sean. I would sand the main blade first with 220 wet/dry sandpaper and 3 in 1 oil. If it looks like you can remove the majority of the pitting, then continue on with the rest of the blades.

If it looks like the blades are too far gone, your only option would be to find the same knife with better steel and swap out the blades and springs. The bone looks good and you might find one that has cracked/chipped bone with good steel for cheap.

That's the best I can tell you without physically holding the knife. :)
 
Yeah, I have concerns as well, but I recently cleaned off another knife that looked this bad and most of it was surface rust, not a lot of it actually ate away the steel. I'm not partucularly concerned with getting it perfect or even shiny; I'm fine with some pits. I'm a big fan of well worn tools and old stuff with character. I'm mainly concerned with getting the crusty stuff off and how best to clean out inside the knife where I can't get to scrub.

If I can't get it back in good shape, I may just send it off to you so you can physically hold it like you did my old tip-top Barlow (which I'm still loving by the way!)
 
I clean the insides with 3 in 1 oil and a bamboo skewer stick. I try wipe any oil off the bone immediately and let it flow thru the joints and back springs until it comes out clean.
 
WD-40 is a workable rust-remover, especially combined with steel wool. Douse the steel parts thoroughly (don't worry about the bone). Leave it overnight, come back and scrub with more steel wool. Repeat until you sense you've gotten all off you can.

Don't be afraid to scrape at the WD-40-soaked rusty parts. I have an old & pitted (but sharp) TL-29 from Klein Tools that I use for this task. Again, keep working at it until your reach the point of no continuing improvement.

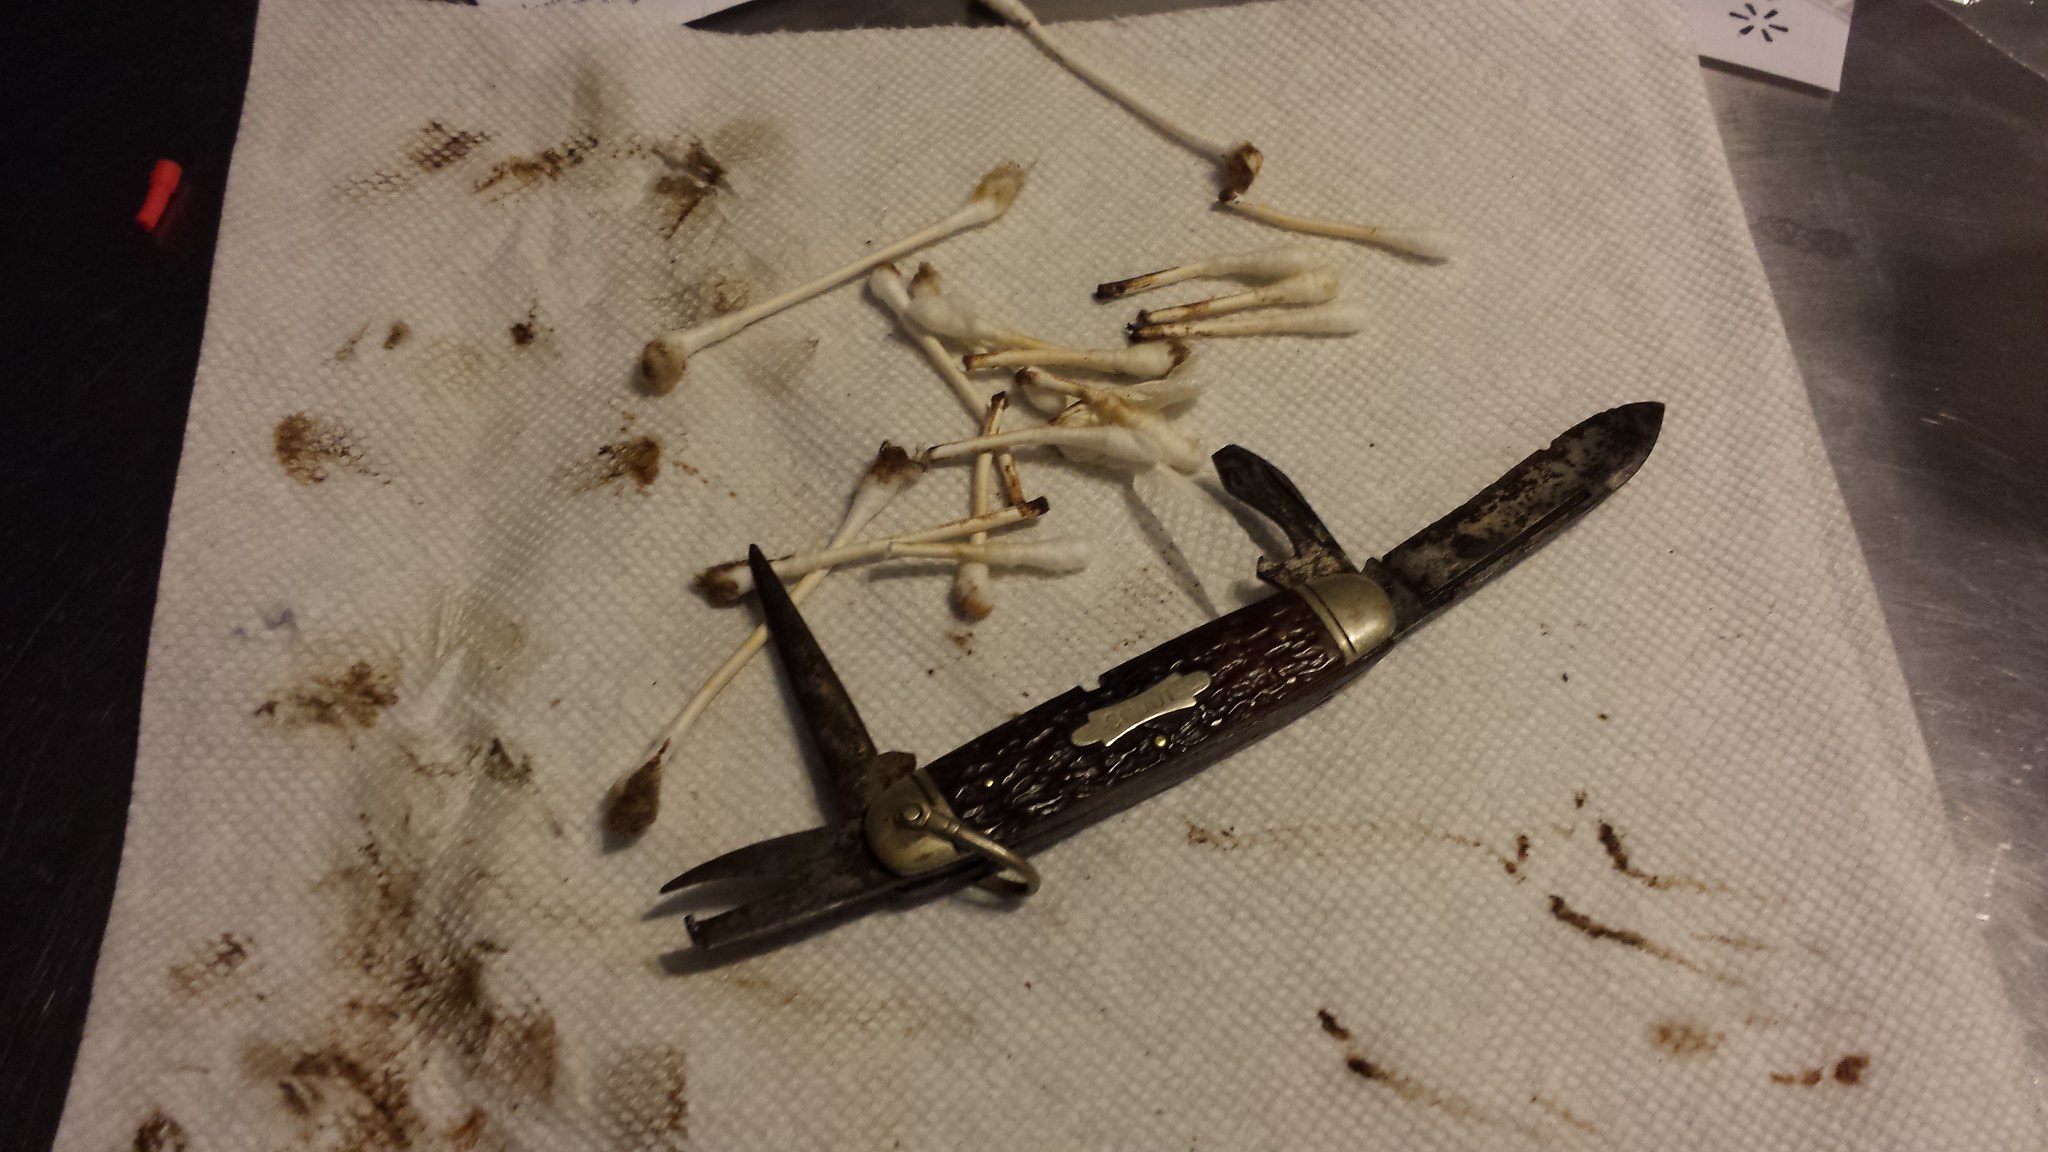
Wipe off the gunk and WD-40, then wash the whole thing in hot water & dish soap, rinse thoroughly, dry thoroughly: use Q-tips and paper towel worked into the crevices with wood coffee stirrers (Starbucks, McDs) or popsicle sticks. Canned air also works. Drive away all the water.

Then oil. I don't recommend 3-in-1 unless that's all you can get. A gun lubricant like Break Free or Quick Release works better.

Carry and USE the knife, oiling probably once a day for a week or so. Then once a week for a month. By then, if you've been carrying and using (or opening) all the blades, it should be pretty smooth.

IMPORTANT CAUTION: Never pose the blades as your image shows, with all the blades partway open. I know people like to do this for display — you'll see it all the time. But it's playing with fire, as the maneuver puts high stress on the backsprings, which can be decades old and weakened with rust.

Knives vary greatly in their vulnerability to this, but many a Camillus "demo" knife, for example, has a busted backspring thanks to somebody trying it.

If you want to display the blades open, it's safest to do it this way —

• Open one blade fully, then half-open the blade on the other end of the same spring.
• Now fully open one blade on the other spring, followed by half-opening the other blade on that same spring.
• To close them, close the half-open blades first, then those that were fully opened.

The principle is never having both blades on the same spring half-open at the same time. See Black Mamba's Scout knife:

boyscout.jpg


http://www.bladeforums.com/forums/s...ity-Knives-Scout-Knives?p=9207196#post9207196
 
Last edited:
With a knife that rusted you have to like the challenge of cleaning it up. Ebay always has lots of older bone 4 blade Utility knives (aka Scout knife). Many are in good shape and with a little effort you can score one for $25 or less, sometimes even for $10. Hence there is not much point to spending a lot of time working on a 4 blade knife with that amount of rust unless you enjoy doing that kind of work.
kj
 
AreBeeBee, thanks for the tips! I'll give them a go.

With a knife that rusted you have to like the challenge of cleaning it up. Ebay always has lots of older bone 4 blade Utility knives (aka Scout knife). Many are in good shape and with a little effort you can score one for $25 or less, sometimes even for $10. Hence there is not much point to spending a lot of time working on a 4 blade knife with that amount of rust unless you enjoy doing that kind of work.
kj

While that may be true, I was specifically looking for a bone handled long pull scout knife with an intact bail. Those are pretty slim pickin's and the ones that are out there were more than I was willing to spend, so I'm taking a chance on one I got in my budget.
 
O.K., long pull does decrease number available. In part my point is having 4 blades all of which need work and on both sides, will take quite a bit of time. I think most people say a wire brush on a drill is a bit too aggressive and hand methods are preferred. Hence: will take a fair bit of time.
kj
 
20150603_185825 by mrbleh, on Flickr

Are getting stuck at the po for a few days, I finally have the knife in hand. The tang stamp reads

WYETH
Hdwe &
Mfg co

From what I can tell they are a wholesaler from way back. But there's very little info. I'm thinking it's a pre WWII (probably '20s) Schrade, Ulster, or NYKC. Any other info would be appreciated.

I'll have better pics when the sun comes out tomorrow, then the cleaning begins.

The knife isn't a bad as the seller's pics suggest, minus the big chip out if the main ends it meet the bail.
 
Last edited:
Begun by Wm. Wyeth in St. Joseph, Missouri in 1860, in 1881 the company was incorporated as Wyeth Hardware and Manufacturing Company. William died in 1901 and his brother Huston took over. It was one of the 20 top hardware firms in the U.S. at that time with their own saddlery. They did produce and distribute catalogs so it is possible to find copies among the hardware collectors. Wyeth Hardware and Manufacturing Company became The Wyeth Company after World War II, and managed to survive the 1960s, last known in 1989 references. So your tang marking is bracketed by those two dates, 1881 and 1945. The spun pins date it as well.

http://www.knifeforums.com/forums/fbbuploads/1380074128-Screenshot_from_2013-09-24_20_07_13.png

I also found this on another knife site:

J.J. I got lucky and got in contact accidentley with a person that was raised right at ST. Joseph Mo. and was a friend of the Wyeth's family and was a knife person, he told me all about the Wyeth's knives, and about who made a lot of them, he said that the used 6 different stamps while they were in business. mine was made between 1860 and 1900. here is some of what he said about it, the steel warrented steel blades came from England after 1890 and that is when the law was in effect that steel blades had to be stamped where the came from.and this knife was made on contract at the Waterville cutlery co. in conn.the steel came from England.but the also contracted a lot of knives from many other companys like Uticaand a co. that also was in ST. Joe. called "CUTINO"CUT. CO. which later left there and re located in KC. They use to make all of WYETH's light duty knives for them. stamped them and put them together, before the relocated. he new everything about the hardware co. knives. well thats what he has told me. It was lucky finding him.
 
Last edited:
A bit more? Not only does the style opener date your knife to roughly prewar, but so does the shield. Tom Williams told me that Camillus was sued by BSA somewhere around the end of WWII for the use of the word "Scout" and scouting images on their knives and they then quit the practice until they acquired the license from BSA to produce official knives. He even sent me several art cuts from the Camillus archives where they had taken a razor blade and cut out the offending shields etc. from the ad copy.

105cnjd.jpg


ETA: When putting oil on this knife, try not to put in on so that it soaks into the bone. You know it has open pores and it will absorb and darken the bone unevenly. I suggest pipe cleaners and q-tips And backed fine sand paper such as on a pane of glass (holds it perfectly flat so you control the depth and angle of blade sanding).
 
Last edited:
I contacted Alan at Scoutknives.net to see what kind of info he could provide. He says it was probably made by Union Cutlery Co in either Tidioute, PA, or Olean, New York, they made a lot of these for contract manufacturers back in that time. A quick googling shows that Union Cut co eventually became Ka-Bar.


Here's a better picture of the knife closed. Full album here

20150604_082021 by mrbleh, on Flickr

I'm holding off on a real heavy cleaning. While there is some rust I definitely want to get rid of, I'm hesitant to remove the patina and get back to raw steel. I'm going to start with some WD-40 and steel wool and go slow.
 
Thanks guys. That bail detail was another thing that sold me on this knife in spite of the condition.

I'll probably hit the bolsters with a light metal polish tomorrow to brighten then up a little.
 
I've cleaned up worse. In fact not long ago I did a Barlow that I got cheap off the bay. Everyone else passed it up because it was so nasty looking. Slow and easy is the way to remove accumulated dirt and corrosion without reducing the metals themselves.
 
I've cleaned up worse. In fact not long ago I did a Barlow that I got cheap off the bay. Everyone else passed it up because it was so nasty looking. Slow and easy is the way to remove accumulated dirt and corrosion without reducing the metals themselves.

Do you have before and after photos of your barlow on the site? (trying to avoid hijacking the thread topic)
 
Back
Top