Leather First attempt at Fancy pants for my new axe.

Joined
Aug 26, 2010
Messages
7,735
Hey folks! Yep I finally took the dive into leatherwork. Watch out Pugs! Ha! Dont think you got anything to worry about brother! Anyway I hung a new handle on a Plumb no.4 single bit axe and got it finished up. Its a vintage NOS but had never been used. I lost my other axe in a house fire and never found it. I had been using a double bit axe but not my favorite design when your using knotty oak wood. I dont have much for leather working tools and have been making do with what I got or can make. I figured an axe sheath should be easy enough just to get started. Got me some leather to get started and im going to make it black. I figured a snap fit at first but will end up using a Sam Browne stud.
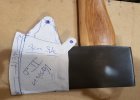
AXE PIG1.jpg


I think i got a basic plan layed out so here goes nuthin!
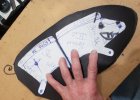
AXE PIG2.jpg

I put two tabs on the sides in case I want to put a grommet and tie to slip around the handle in case the snap came loose but decided to no do that. Main snap just has to work.

71ba60e0c2e8749b1676597ad543e80c


cc7ba950018c2ff29c00281821ed7b2b


Theres the welt glued on.

c8e007310c87ab15fe53142ebac2fb6c


And test fit.

f515d023a921116a02999d176deebf58


and a little touch up on the belt sander.

ad50f576aa8669fa0c19be6026fab58d


I did want to make a cutout to show the logo so lets see how that works out?
More later fellas! I got to process some more pics. Im actually done with the sheath but will show progress anyway. Im actually making a full size Aranyic Machette sheath now but im still waiting on my edge bevelers from Hong Kong. Pugs I got more questions than I can even start now so will update ya when I can! Sure has been helpful to have several of your sheaths for reference. Man i sure got lots of respect for what you do now that i try to do this myself. Your rigs are just beautiful works of art man!
 
Ha! "Jack of all trades but master of none they say" Whatever they say aint good enuff for me!! I dont think I can burn myself as bad doing leather work eh? lets hope!
 
Last edited:
Anywayz a new hobby and little time to do it! I got pics uploaded i think??? This new format aint workin for me? Proceed.

7fd0c3595015052de548bc95f0ed18ae


Here is a the screw on inside of a Sam Browne stud which got some thread locker (CA) just to make sure it didn't come loose after assembly. Also I cut a thin patch to cover the back of the stud so it doesnt scratch up the blade as you slide it in and out of the sheath. And it will!!! Trust me!. The glue you see there is contact cement tho. Its for bonding leather to leather. Its regular contact cement like you find in any hardware store but i recently found a water base contact cement that dont piss of the wife while working indoors so I tested it and it seems to work so far. I figure the stitching would hold it all together once done anyway.


275fff7895fe6292e970057a1de69db4


Here is a border line to make some distinction where the axe is and the sheath:)!


9bc73cc72dc399fa646c5498c0e3b0f5


Here is where you burnish the edges to make the sides shiny. So far I found my best results was to burnish the edges just after I apply the dye to the edges. If you get the edge too wet then you just mushroom the edges and is not desirable.

a7e0d15657879528829116f450884b87


Here i wet the sheath and wrapped the axe with plastic wrap so it dont rust while the sheath dries out. hope this works?

9fdba6df6abfcf0d1ac6f3a5d90b06af


Now this rivet stuff requires a bunch of practice. I made plenty of tools and such to apply these things to make them look good and still work. I eventually found out a way to do it about the same time my tools arrived but at least I know what works now. I cant say the same thing for snap rivets yet. Working on that now tho.

a91254d4464580cd377f037136c40262

Here is where you are supposed to have an edge beveler tool to cut the square edge off the leather so it has a nice rounded edge that you can burnish and smooth the edge to make it look good! Pugs you can see my pricking iron at bottom of this pic. Yep a dinner fork. Thats so you can make some marks to know where to stitch evenly. Aint got that tool in yet either:) I drilled the stitching holes for this one with a regular drill bit. My pricking iron is due in the next few days so maybe that will help on next project?

5611845c17de9cc72f24dcdf266e8045


Here is end results. I used Pugs secret texturing technique but I wont tell nobody but it sure worked good since I had plenty of undesireable tooling marks on the surfaces. I sure learned a lot about leather fabrication to say the least. Knowing what I learned now Im going for gold! Making me a new knife sheath.

bef250dc4bd57822980b5e647eb83e7e


Some burnished edges. Im happy with all the edges.

0cc411a0caf6c9c9d09f840be13109fc


I haven't conditioned or polished the final finish yet but aint gonna worry bout it yet. Still playing with chemicals...as usual:)
OK thats about it! Lets liven this place up some now! It sure has been slow lately. Im gonna try myself but we need to bring more traffic to this place. The Kamis need it! Sure seems slow around here? Maybe some food processing, wood processing, History, smithing? My internet is almost non-existant but im gonna try. Hope somebody learned something but if you really want to learn something watch for Pugs! He's the man that determines the migration of beaver and other critters across the Mason Dixon line! Enjoy!
 
Last edited:
Have you been up to the sheaths and such sub forum? Lots of leather working knowledge up there.

Your sheath looks pretty professional by the way. Good Job.:thumbsup:

O.B.
 
That is some damn fine work, especially for a first try. Only thing that looks a bit rough is the rivet picture, as you mentioned. Texturing is very nice, too.

Much nicer, and more intricate than my initial attempt. It was a sheath for a Condor golok. Turned out pretty well, but I was afraid to try the stitching, so I just did rivets.

With my second attempt, I discovered that there are 4 ways to install the 2 sides of a snap, 3 of which are wrong. Please don't ask.
 
Looks mighty good to me. Makes one appreciate how much work goes into this kind of stuff.
 
Funny, I just became aware of something I'd seen over the years and didn't take much notice of before now.

Himalyan Imports, via Bill, Rusty, Sarge, Andy Roy, Ferris, SteelyGuns, Aardvark, Yvsa, and many others, including Ndoghouse, has spawned many fledgling artisans in leather work and knife-making over the almost 20 years I've been watching and playing here. Other sites have lurkers, clients, discussions...but it seems that it is so commonplace at HI, that folks just naturally gravitate to attempting to craft some edged tool-related article and to show them to the Forum.

The artistry and effort of the Kamis, and the social intent of HI, emphasize the handwork and meticulous expertise of our fellow citizens of the world and may prompt attempts by folks to emulate the hand-work and (unlikely) skill-set in various blade-making, leather-work, checkering, and, of course, the creative utility of the various H.I. offerings.

It is almost a generational inheritance coming from the distant past intentions of Bill and Yangdu to provide for the kamis, and drawing interested parties to share in the crafted cutlery and the beneficent purpose that caused the founding of HI.

Pretty neat.
 
I agree it's highly unlikely that any of us could come close to the skill set the kami's have achieved over the generations, especially under the conditions and using the tools they have at hand. I'm knocked over every time I hold a HI knife. Amazing what they can do.
Not to say we don't have some folks with some real talent around here. Pugs makes leather sing and of course Bookie can do most anything very very well.
I'm proud they even let me hang out on the same forum with them.
 
Hey Danny that is a great looking cover, ya did good brother especially for the first one. Ive been pretty dormant as of late, just busy with life. Keep working and it gets easier as you go, but as you can tell its not as easy as it looks. There are tons of tricks so if ya need anything hit me up. I love the fork stitch spacer, that has been used by alot of folks, if ya want a good tool for stitch spacing try this, the Craftool Spacer Set from tandy, its one of my favorite tools, it gives you a little more versatility then the pricking tools. but its good to have both. Your edges look really nice as well, sometimes the smallest things are the most noticed like edges. Keep rocking brother your doing great.

 
Have you been up to the sheaths and such sub forum? Lots of leather working knowledge up there.

Your sheath looks pretty professional by the way. Good Job.:thumbsup:

O.B.
Man that didnt even cross my mind! Thank you much. Guess I shoulda figured there would be such a forum here! I will definitely check it out.
That is some damn fine work, especially for a first try. Only thing that looks a bit rough is the rivet picture, as you mentioned. Texturing is very nice, too.

Much nicer, and more intricate than my initial attempt. It was a sheath for a Condor golok. Turned out pretty well, but I was afraid to try the stitching, so I just did rivets.

With my second attempt, I discovered that there are 4 ways to install the 2 sides of a snap, 3 of which are wrong. Please don't ask.
Yep them rivets gave me a hard time for sure. I definitely got to practice on them to get it right. I got them too close to the edge but I didnt want to intrude in on the stitching so put them as far in as I could without cutting through my threads. I got the stitching a bit off too because now I realize you need to get the welt width so that when you do your grooves that they ride on the welt underneath or your groover will slide off and screw the symmetry up real good and is then about impossible to fix.
I suppose I still got lots of screwups to figure out so Ill keep yall updated.


Thanks Pugs! Man you are right about progress on this kinda work. No matter how much you read or YT videos you watch you still find so many things no one talks about. Having a handful of your sheaths around have taught me so much. I dont know If I could even attempt at another without such fine examples! Im trying something now I prolly shouldnt but WTH? YOLO!!! Ill start posting soon. It involves a cobra skin I will say that. The Cobra is from Thailand I think and so was the knife so I thought it appropriate. Thanks again for the encouragement fellas! I certainly need it! And yes you are right Kismet! This forum is definitely to blame but in such a good way! I love the family here and that means more to me than anything. Thats why I post here and not really in other subforums. I may have to change that some in the future tho. Plenty more family to be made I guess?
 
Hey man on the rivets, put the holes for them in first, then just stitch up to them, you will need to do a few different stitches but you wont cut them trying to do it after. Also after you put the flat washer on the rivets cut the post lower so not as much needs to be rolled over, craft tool make a great rivet setter with a base and a top tool that helps round the post head, and just go slow when you are hitting it and med taps so it rounds without bending your washer.
 
OK ...so do stitching before rivets? I could have done it otherwise but listening to the wiser Ill try that!. I think its time to start my next post. It really doesnt apply here on the axe cover. OK Brother. Im gonna upload some pics and start this over. I sure wish my dam tools would come in. They been in Shitcago IL for two weeks in customs from Japan but hopefully they will arrive in a few days??? Thanks so much Pugs! Your knowledge is so much appreciated!
 
We got mixed up brother do the stitching last, but make your rivet holes first, then when you make your stitching line and hole spacing you can stop just before each rivet, this way you wont damage or cut into your stitches when setting your rivets at the end. Sorry for confusing you on that man. Remember you can always hit me up if you have questions.
 
Thats kinda what i was figuring i would do on the next one. I have my next project cut out and got some cobra mounted on it. Yep. Im gonna leave it at that for now. Thanks for your help man! You have helped me more than you know just from your sheaths that I have now. I have bunches of questions but ill ask them on the next thread. Gonna upload pics and progress now. Yes it does make sense to do rivets after. I understand that now. OK on to the next project! Beavers are safe around here for now but Cobras aint!
 
Arrgh! You are straight Pugs. Thats what I meant. I was bass ackwords on my text but that was what i meant. Had too many IPA's that night i guess. Yes I understand and agree. Rivets first then stitching in between. Makes perfect sense. Not sure if im gonna use rivets at all yet but still working out the geometry. Might just rely on setting stitching in grooves and be done. thx Bro! Ill update on other thread soon.
 
Back
Top