You are using an out of date browser. It may not display this or other websites correctly.
You should upgrade or use an alternative browser.
You should upgrade or use an alternative browser.
How I photograph knives
- Thread starter PhilL
- Start date


- Joined
- Oct 1, 1999
- Messages
- 6,490
Juggler, I think you're getting closer, by why isn't there any reflected light on the back bolster?
OK let's try this again.
The closest I have to a Buck 110 is this Parker-Edwards, it has a Damascus blade not a mirror polished blade, but it should serve our purposes.

There's the knife, overall even lighting from point of the blade to the end of the bolster. I'm also much more over the knife than you are, more of a profile of the knife.

Here's what my setup looks like again. You can see even from this shot that the lighting covers the whole knife.
Juggler you're going to have to figure out what you're doing different from this basic setup.
OK let's try this again.
The closest I have to a Buck 110 is this Parker-Edwards, it has a Damascus blade not a mirror polished blade, but it should serve our purposes.
There's the knife, overall even lighting from point of the blade to the end of the bolster. I'm also much more over the knife than you are, more of a profile of the knife.
Here's what my setup looks like again. You can see even from this shot that the lighting covers the whole knife.
Juggler you're going to have to figure out what you're doing different from this basic setup.
- Joined
- Oct 3, 2004
- Messages
- 4,553
Is it because its either to close or to far from the reflector, depending on which side its on? I'm thinking that its too close.
Thanks for these threads, Phil. I've learned a lot and, I like to think, I already knew a good little bit to start.
Thanks for these threads, Phil. I've learned a lot and, I like to think, I already knew a good little bit to start.
- Joined
- Oct 1, 1999
- Messages
- 6,490
Is it because its either to close or to far from the reflector, depending on which side its on? I'm thinking that its too close.
The problem isn't the reflectors, the window is the main light, and that's what he's having a problem seeing. The blade and the bolsters are basically mirrors, and the rule is that The Angle of Incidence equals the angle of Reflection which means the angle the light is hitting the knife will match the angle that the camera must be on to see those reflections.
The reflectors are only there to open up the shadows caused by the main light.
Roughedge, would you be so kind as to post some of your photo work on this thread? I'm curious as to what you've learned here and what you do different?
Once again, my way isn't the only way to photograph knives. I can't think of any way easier, but I'd like to hear about it.
- Joined
- Oct 3, 2004
- Messages
- 4,553
Certainly. The first thing I learned is that I definetely need a tripod as is evident in this photo!

Obviously, the window is to the right of the photograph and the light far too intense on the scales area. I knew it when I first saw the photo on the screen but was unsure how to correct it. After reading this thread I've learned that the way to correct these kinds of problems is via trial and error. What I think I would do when I next photograph some knives is turn the knife 90 degrees so that the reflected light would not be more intense on any one portion of it. After reading here it sounds like common sense but.... something about common sense being not too common!")
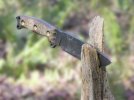
And the same applies here. Too dark on the blade, too much light on the handles. (Entirely OT, I apologize, but what should I use to clean the stag on that Trailguide? it looks worse in the photo then it actually is but it definetely needs some tlc.) Also, I suspect that this photograph would see definite improvement if I had used a reflector.

also, your postings have convinced me that I need to pay more attention to the angles regarding both light and reflection. Further, I've become convinced that I really need to give background more consideration. I think the neutral backgrounds as shown in this thread just naturally lend themselves to better representing the true subject.
This weekend I will buy a tripod, or borrow one from a friend, and reshoot these two knives using what you've talked about here. I don't think it would be truly worthwhile to try until then.
I'll include this one because I think its one of the better knife photographs I have and its in my photobucket account. Its a bit too dark though, I think.

Obviously, the window is to the right of the photograph and the light far too intense on the scales area. I knew it when I first saw the photo on the screen but was unsure how to correct it. After reading this thread I've learned that the way to correct these kinds of problems is via trial and error. What I think I would do when I next photograph some knives is turn the knife 90 degrees so that the reflected light would not be more intense on any one portion of it. After reading here it sounds like common sense but.... something about common sense being not too common!
And the same applies here. Too dark on the blade, too much light on the handles. (Entirely OT, I apologize, but what should I use to clean the stag on that Trailguide? it looks worse in the photo then it actually is but it definetely needs some tlc.) Also, I suspect that this photograph would see definite improvement if I had used a reflector.
also, your postings have convinced me that I need to pay more attention to the angles regarding both light and reflection. Further, I've become convinced that I really need to give background more consideration. I think the neutral backgrounds as shown in this thread just naturally lend themselves to better representing the true subject.
This weekend I will buy a tripod, or borrow one from a friend, and reshoot these two knives using what you've talked about here. I don't think it would be truly worthwhile to try until then.
I'll include this one because I think its one of the better knife photographs I have and its in my photobucket account. Its a bit too dark though, I think.
- Joined
- Oct 1, 1999
- Messages
- 6,490
Roughedge I do appreciate you showing your work here. I don't think they're bad at all. It's hard to get good lighting on a knife when it's in a box, you did good. Of course it could be improved in Photoshop by balancing out the light, by dodging and burning.
Your last photo is a little busy for me. Maybe if the background was thrown out of focus. Once again I'm not big on props or backgrounds.
Your last photo is a little busy for me. Maybe if the background was thrown out of focus. Once again I'm not big on props or backgrounds.
- Joined
- Oct 3, 2004
- Messages
- 4,553
Roughedge I do appreciate you showing your work here. I don't think they're bad at all. It's hard to get good lighting on a knife when it's in a box, you did good. Of course it could be improved in Photoshop by balancing out the light, by dodging and burning.
Your last photo is a little busy for me. Maybe if the background was thrown out of focus. Once again I'm not big on props or backgrounds.
Thank you for the compliment. I believe that they will be still better once I implement a few things from here.
Agreed on the last photo. I've considered trying to blur the background in photoshop but its beyond my current knowledge. It may be best left to the other thread but do you have any pointers?
One of these months I'm going to sit down and dedicate some time to the giant 7 dvd PS tutorial I have!
- Joined
- Oct 1, 1999
- Messages
- 6,490
Agreed on the last photo. I've considered trying to blur the background in photoshop but its beyond my current knowledge. It may be best left to the other thread but do you have any pointers?
I was planning on doing a tutorial on How I Do Illustrations, but right now that's on hold. To answer your question briefly, you need to make a Selection of the knife and the stump. There's lots of ways of doing selections in Photoshop. For that particular image because it's rather complex I would try the Extract tool under the Filters menu. Or the Magnetic Lasso tool.
The procedure would be to duplicate the Background layer, make your selection, put it on a separate layer and then apply a Gaussian Blue to the background. he hardest part of course is getting a clean selection.
- Joined
- Oct 3, 2004
- Messages
- 4,553
Thanks Phil, I do like it a lot more that way. You've convinced me that I really need to increase my photoshop skills as well as everything else. I'm going to see about getting a tripod today to retake some photos; I have others that I did not show here because they are lit by flash and, ummm, are not appealing to the eye. I'll try and redo them.
Thanks Phil.
Brian
Thanks Phil.
Brian
- Joined
- Oct 1, 1999
- Messages
- 6,490
Brian, once you're happy with your photos I hope you'll try my Image Editing tutorial before you tackle your 7 DVD PS set. It will take you an hour or so rather than months to learn. I think I am going to add an Illustrations tutorial starting with how I do Selections.
Next, I want to thank Juggler for allowing us to look at the progression of his work. I hope some of the folks that are interested in taking photos of their knives are learning something right a long with him. Its a valuable lesson. Im a firm believer that everything is difficult before it is easy. Once you learns what to look for when taking pictures of your knives, its something youll never forget.
Lets see how this evolves.

Top left, was the first pic Juggler showed. Its off color, probably shot with tungsten lights. I cant tell what the actual color of the fabric is, if its yellow its just adding to the off color look. The blade and bolsters have no light reflected into them.
Top right, hes moved to the window and the color looks a lot better. The window is off to the left and he still isnt geting any reflections on blade or bolsters.
Middle photos, in both of these hes getting direct sunlight on the knife, which you can see by the strong shadow. We want diffused lighting not direct. The photo on the right is getting some reflected light on the blade and the front bolster.
Bottom left, hes now got the diffused lighting were looking for. The blade and front bolster are looking good, but hes not getting much on the rear bolster. The background appears to be overlapped sheets of paper, start with a background that's big enough for the subject.
Finally , my shot. The lighting covers the whole knife, no hot spots, or strong shadows. Juggler isnt there yet, but I think we can agree hes getting close.
I said before that theres a difference between looking and seeing. Hes not seeing the reflections...yet.
I say yet because Juggler has been so close to having the right angle for days. I think once he finally SEEs what he needs to see hes going to have one of thoe DOH! moments.
Next, I want to thank Juggler for allowing us to look at the progression of his work. I hope some of the folks that are interested in taking photos of their knives are learning something right a long with him. Its a valuable lesson. Im a firm believer that everything is difficult before it is easy. Once you learns what to look for when taking pictures of your knives, its something youll never forget.
Lets see how this evolves.
Top left, was the first pic Juggler showed. Its off color, probably shot with tungsten lights. I cant tell what the actual color of the fabric is, if its yellow its just adding to the off color look. The blade and bolsters have no light reflected into them.
Top right, hes moved to the window and the color looks a lot better. The window is off to the left and he still isnt geting any reflections on blade or bolsters.
Middle photos, in both of these hes getting direct sunlight on the knife, which you can see by the strong shadow. We want diffused lighting not direct. The photo on the right is getting some reflected light on the blade and the front bolster.
Bottom left, hes now got the diffused lighting were looking for. The blade and front bolster are looking good, but hes not getting much on the rear bolster. The background appears to be overlapped sheets of paper, start with a background that's big enough for the subject.
Finally , my shot. The lighting covers the whole knife, no hot spots, or strong shadows. Juggler isnt there yet, but I think we can agree hes getting close.
I said before that theres a difference between looking and seeing. Hes not seeing the reflections...yet.
I say yet because Juggler has been so close to having the right angle for days. I think once he finally SEEs what he needs to see hes going to have one of thoe DOH!
moments.- Joined
- Oct 1, 1999
- Messages
- 6,490
Joe, it's no bother. If you have no window or no daylight then you're going to have to go with artificial lighting. For a lighting source I prefer strobe (flash) with a modeling light (so you can see what the lighting is doing). A soft box replaces a window, in fact it will give you a lot more control since you can tilt it to get it more over the knife (or sword). For sword sized objects your going to need a larger light source and a larger background. Everything else is the same.
Joe, take a look at post #21 on this thread for the types of strobe units I would look at.
Joe, take a look at post #21 on this thread for the types of strobe units I would look at.
- Joined
- Oct 1, 1999
- Messages
- 6,490
A softbox is more or less a moveable window.
When I made my living as a photographer about 90% of the work I did was with a 36" square soft box that I made out of foamcore.
You don't have to make one you can buy them to fit the strobe unit you buy.
If you looked at Post #21 as I suggested you would have seen links to lighting equipment i would consider buying. Here's two units that have softboxes available.
I'm reading a lot of good things about, AlienBee
http://www.alienbees.com/b400.html
Foldable Giant Softbox for AlienBee
http://www.alienbees.com/foldable_detail.html
Here's another alternative.
http://www.amazon.com/exec/obidos/ASIN/B000I68LOI/nextag-photo-20/ref=nosim
For swords and rifles I would go with the Giant.
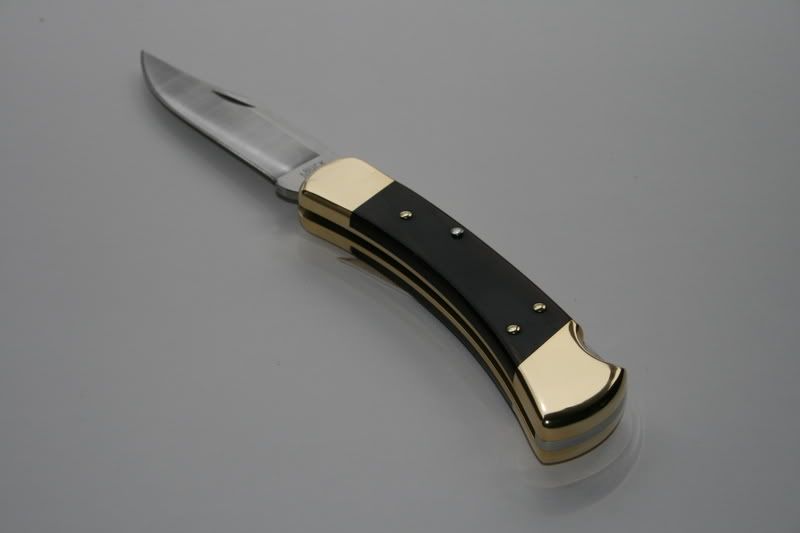
First let me apologize for the long delay. Everyday life can get in the way of "fun time" on occassion. First up, a pic of the setup used taking these pics. I used my old RCA Digital 1.5 megapixel camera to take the first pic. I cheated a little, forgive me. I used a piece of $.99 white poster board instead of typing paper, I used the "rough" side up, and the slick "shinier" side down. The only reason I made this change was due to convienience (sp?), if need be I will swap back. BTW, this pane of the bay window is as close as I can come to a north facing window. It faces nw.

I actually think this is the better of the two, because the light is better. However a small piece of "non-slip" material is peeking out from underneath the knife. So I tried to take another series of pics.

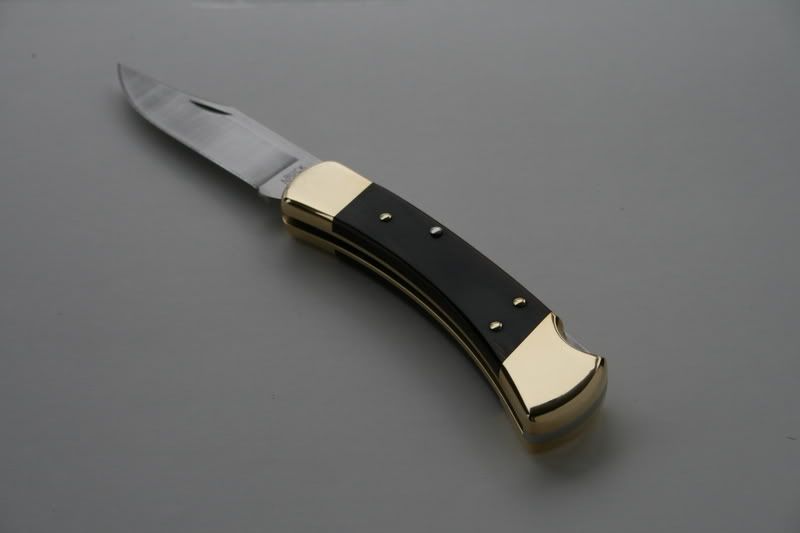
This pic was taken roughly 5 minutes after the first pic. But today is a very dark day, heavy overcast. This pic turned out a little darker.


I actually think this is the better of the two, because the light is better. However a small piece of "non-slip" material is peeking out from underneath the knife. So I tried to take another series of pics.
This pic was taken roughly 5 minutes after the first pic. But today is a very dark day, heavy overcast. This pic turned out a little darker.
- Joined
- Oct 1, 1999
- Messages
- 6,490
Juggler, we're looking pretty good with this last attempt. Seeing your setup really helps. It appears the problem you were having was that you just wasn't close enough to the window to get the reflections you needed. Maybe if you use the middle section of the bay window you can get even closer to it. The angle that you're shooting the knife at is a little low, I'd like to see you up and over it a little more. It also might look better if you point the the knife to the lower left corner. But, all in all I think you're very close to where you need to be and the improvement is huge.
Using poster board instead of typing paper is fine. My basic instructions are just that, Basic a place to start. Build on and improve upon it however you want. Don't worry about the stuff that's sticking out from under the knife that can be retouched away when you get to the Image Editing tutorial.
I think you should reshoot again. Without losing the reflections on the blade and bolsters, see if you can get a better shooting angle on the knife, ( more up and over it). Take at least four shots, with the point of the blade pointing toward the four corners of the view finders screen. Take another with the knife in the closed position. You may also want to try and take a closeup of the tang stamp. I think it's good to get into the routine of shooting different angles of your knives, open and closed and any details that are important on the knife. No better time to get into that habit than now.
Good work Juggler.