Installing Molten Metal Inlays in Wood Part 2

Joined
Mar 25, 2014
Messages
2,010
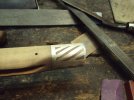
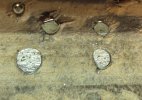
The molten Babbitt flowed through the holes we drilled a while ago. The metal cooled down and solidified when it met the surfaces of the barrel. This is how the "rivet" heads were formed and what holds this chevron nose cap in position.
42.JPG

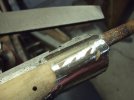
But, my faith was well founded and perseverance was the ticket. Actually, I'd call it more like "the Labors of Hercules". But soon, I could start making out the pattern in the wood. Rasping was done carefully so as to not bugger up the wood and need to do some re-shaping. Still, I kept rasping away and made sure the contours of the wood were followed carefully so as to stay in perspective. It is extremely important that you do not remove too much material or the design will be filed away. Easy does it. Use different files and various grit sand papers to dress the inlay up and soon, stripes galore! The Sun shines on Corn Patch again.
41.JPG
43.JPG

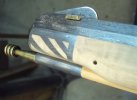
The rifle was assembled and the fit of the components checked. Tweaking as necessary until I was satisfied. and here is the finished nose cap.
44.JPG

When pouring nose caps or inlays, they can be as simple or complex as you desire PROVIDING metal can get into the cavities you create. 3-D is also possible. Let your imagination run wild. Experiment on pieces of scrap hard wood. If you have the space or room, why settle for a simple Yin/Yang when you can pour an entire winged dragon whose tail wraps around the handle? Need a bolster for that Khuk? Here you go.

Remember that pouring metal inlays is not always a "given". Mother nature can and does create situations you do not want to deal with. Impurities can appear during filing that are too large to completely be removed. There is such an irregularity in the last photo. There is a little dent/hole/ imperfection on the top bar of the nose cap. In this case, I've cleaned it up and will leave it. After all, it's hand made and not store bought. Air pockets or voids will also appear every once in a while. This is usually caused from the molten metal from cooling down too rapidly and the air which is forced out of the cavity gets trapped. Some times you can do a tiny re-pour. This can be scary and quite dangerous. Safety first!
 
Wow, that is so cool! Thanks for this bookie, I always wondered how inlays were done. Beautiful work too!
 
Thanks Bookie. I've seen your finished product before and we even discussed it in person but without the pictures I just didn't really get it. Now I really get it. That looks awesome. Turned out really nice.
I'm still plumb skeered of red hot or molten metal stuff but I can see some cool knife and gun handle inlays at least in my head.
Thanks for taking the time to show us nimrods how the pros do it.
And keep taking pictures of the rifle, the whole rifle and nothing but the rifle, I love looking at your projects.
 
Very nice description of the process with great pictures - well done Bookie!

I hadn't heard of "Nickelite" before, so I did a little research, and found that it contains no nickel at all. It is a babbitting alloy identical to ASTM grade 2 babbitt alloy, containing 89% Tin, 7.5% Antimony, and 3.5% Copper and aluminum. Melting point is listed as 466 degrees Farenheit. I guess the molten metal cools rapidly enough that the wood is not significantly burned or charred? I never would have thought that this process was possible, thinking that the molten metal would char the surrounding wood, but I guess it works fine with an alloy with as low a melting point as this alloy. But what is the melting point temperature limit for using this process and not charring the wood (or starting a fire)? Coin silver melts at 1,615 degress F, so I suspect that would be way too hot for using this process?
 
That burning / charring is one of the issues we talked about, I just couldn't wrap my mind around pouring molten metal into wood.
I seen it with my own eyes so I guess it works.
Would a propane torch heat it hot enough to melt. Or have to use Mapp or something like that?

I a real dumb head when it comes to metal.
That bar set on my bench for over a year, I was aching to do something but alas I guess I was just skeered. I'm glad it was put to good use with a good outcome.
 
MoparBob, I can't answer your questions since I have never dealt with hardly anything except lead, pewter, and Babbitt. I would suspect the heat limit would be based upon the alloy and the particular type of wood. Some wood burns insanely quickly and some resist heat. Which, I don't know.

Bawanna, I just used common, household, cat burglar propane. Mapp gas is more expensive and not needed for this.
 
Sweet. You melt some off with a torch into your ladle.
You keep the ladle on a hot plate or something to keep the stuff hot, then just pour it? Heck I might even be able to do that?
Lets see, gloves, safety glasses, long pants, all check. Courage - pending.
 
Bawanna, the only thing you need is confidence in yourself. You know, that thing which tells your head that you CAN do this. Just get thee a chunk of hard wood and some wheel weights and give it a go. (S'called "practice".) That's just what the Dai Uy would tell you, too. Then show us the photos of the finished inlay.
 
Wheel weights is the same stuff? Who knew. I gotta check my junk boxes I think I got some bullet casting ladles that would work for melting the stuff. I know I used to, can't imagine I tossed it but putting my fingers on it might take a bit. I can handle that part easy and I'll use the time searching to build up my nerves with this hot molten metal stuff.
 
Most all of the new wheel weights are zinc (to keep the lead out of the environment), but the older ones were lead. But the "Nickelite" babbitt that Bookie used has no lead - it's 89% Tin. That "Nickelite" bar that Bookie used is an "antique" from the Carbonite company (Carbonite was the brand name of their lead-based babbitt metal. For those that don't know, babbitt metal was used to pour plain bearings for a wide variey of shaft bearings, including steam train engines. You can still buy the equivalent of Nickelite from Acro sales for about $20/pound:
http://stores.acrosales.com/nickbabb/
And the old bars of Nickelite like the one Bookie used come up for sale on that internet auction site.
 
I think that's where that bar came from. Didn't know it was no longer made.
 
VERY cool, Fun to see how Bookie does that, I always admired the end result on the pics he shared of his previous boomstick creation. And the countersink so it holds it to the piece with no pins etc. Bac Si, I keep learning new things every time you allow us a glimpse into the Cornpatch forge. Bawanna, the skills needed for this sure seem to be based on how you work wood. Once you create the pattern in the wood, it is just filling in the parts you removed. I can imagine the fun designs a woodworker like yourself could create. Then using Bookie's technique to fill it should be straight forward. Though you are correct to be cautious. Just make sure you follow all his safety points and you should be able to keep from getting a lap full of molten metal. Just make sure there isn't anything blocking your chair from being able to backup QUICKLY incase a spill starts heading for your lap :D
 
Where you been Shavru? I was just fixing to send out a search party. All good with you?
 
Hi Dai Uy! Glad to see you check in and cam on ban for the kind words.

If you wish to pour a bolster on a khuk, make a paper dam around the handle and a teensy bit higher than the end result you want. The dam can be pinched to make the taper or can be filed in place. Worried about drawing the blades temper? Run the blade through a big tater or two (you can also use Brownell's heat sink compound) and leave it up off the dam enough so the ladle can pour into the dam. Clean up and polish out. Viola!

Tried out that Wakizashi I did on an old cast off wooden bedroom door. Went completely through with seemingly no effort and still shaved my arm afterwards. Just hangin' out waitin' on one of them cat burglars to show up.....
 
I had some trouble getting logged back in when the forums changed to the new format. it seems my memory is getting really bad these days LOL. between that and my email account having upgraded their spam filters it took a LONG process to get my password reset. That and the amount of time I am on my computer these days has cut back significantly too. I am trying to study for my next dan in Kendo. That takes me many hours each day of study, because I forget about half of what I learn each day and have to relearn it twice LOL.

Good to hear the OWak holds that good of an edge. I wouldn't have doubted a blade forged by you Bookie, but as you are aware, even with a Master Smith, until you actually use it there is always a small chance of the steel being flawed.
 
Awesome job Doc! Lots of good info there.

The old wheel weights were lead but had significant amounts of Tin to harden them. They are harder than lead that way. To answer the burning wood question... Wood is a great insulator as is paper as long as it is dry. I worked in the solder industry (thats whats wrong with me now) and people used to freak when I would drain several hundred pounds of lead solder into a cardboard box and leave it there overnight till it solidified. Then Id move it with a pallet jack and send it to the refiners. The box would never burn. Hot lead and water do not mix. One time I had a cement trowel I used to scrap the dross (slag) off the top and realized I had left it by the back door while it was raining and some droplets got on it. When I stuck it down into the molten lead it literally exploded. There was lead all over the ceiling, in my hair, eyelashes etc. I looked like a cheatah with burn spots all over me. Luckily it missed my eyes. Lead is so dense by the time the expanding gas bubble gets to the surface it expands so fast it basically explodes! Not fun! Make dang sure EVERYTHING is dry when working with the stuff.
 
Back
Top