-
The BladeForums.com 2024 Traditional Knife is available! Price is $250 ea (shipped within CONUS).
Order here: https://www.bladeforums.com/help/2024-traditional/
You are using an out of date browser. It may not display this or other websites correctly.
You should upgrade or use an alternative browser.
You should upgrade or use an alternative browser.
Pancake Sheaths and how I go about them. (PIC HEAVY)
- Thread starter Horsewright
- Start date


Gary W. Graley
“Imagination is more important than knowledge"
Knifemaker / Craftsman / Service Provider
- Joined
- Mar 2, 1999
- Messages
- 28,000
That Round knife I see sure could be handy! Thanks for the guided tour!
G2
G2
Rookie82
Gold Member
- Joined
- Nov 25, 2014
- Messages
- 2,507
This has to be the coolest thread I've seen since joining BF. I'm not a leatherworker at all and have never attempted such a thing, but it is truly fascinating to see a step by step process of how something is made. Very very much appreciated thread.
Horsewright
Knifemaker / Craftsman / Service Provider
- Joined
- Oct 4, 2011
- Messages
- 13,987
You're welcome guys! Camaroless, I wouldn't feel particualrly qualified to make a pouch sheath tutorial, I don't make very many of those. I might do some others on other types of sheaths though.

After edging we're gonna take a trip back over to the lathe. Again at this stage we're not going to use any gum or agent of any kind, just the dammpness already in the leather. At this stage we are really rounding the edges and getting the pieces of the sheath formed into one edge. Until recently I would have gone and sanded again at 400 grit to get some of the prep work done before rubbing. When I switched from Gum Traganath to Wyo Quick Slik the 400 sanding step ceased to be necessary. At this stage I really like to thiink of an edge as a 3 D kind of thing. So there is a top to the edge, a middle and a bottom. I take pains to make sure I hit all three all the way around on the sheath. That is why I use that much wider groove on the rosewood here. Allows me to get the top and bottom side well, not just the middle.
After edging we're gonna take a trip back over to the lathe. Again at this stage we're not going to use any gum or agent of any kind, just the dammpness already in the leather. At this stage we are really rounding the edges and getting the pieces of the sheath formed into one edge. Until recently I would have gone and sanded again at 400 grit to get some of the prep work done before rubbing. When I switched from Gum Traganath to Wyo Quick Slik the 400 sanding step ceased to be necessary. At this stage I really like to thiink of an edge as a 3 D kind of thing. So there is a top to the edge, a middle and a bottom. I take pains to make sure I hit all three all the way around on the sheath. That is why I use that much wider groove on the rosewood here. Allows me to get the top and bottom side well, not just the middle.
Last edited:
Horsewright
Knifemaker / Craftsman / Service Provider
- Joined
- Oct 4, 2011
- Messages
- 13,987
Sorry guys, tried to post more earlier, but got the spinning wheel of death. More later. Got to ride the west and north fence on the ranch. Neighbors cows are coming over and one of our bulls is over there. Course a fence is only a mere suggestion to a bull. Particularly when he's going to visit some ladies.
- Joined
- Jun 13, 2007
- Messages
- 7,743
No flies on you Dave. ")
Thanks for the explanation about the groover. Your stamping technique and process is unique. :thumbup:
Thanks for the explanation about the groover. Your stamping technique and process is unique. :thumbup:
- Joined
- Nov 29, 2013
- Messages
- 2,493
Dave ,
I'm a bit confused as to why you wet the sheath before punching the slots and edging etc ?
Ken
PS - I've done my time checking fences in the past , but it was done driving an old Toyota not on horseback.
I laugh when I see shows on TV about off road driving and guys making a sport out of trying to drive where no vehicle should ever go . They should get a job fencing and they will soon lose the enthusiasm for getting stuck and rolling their truck onto its roof down step banks
Last edited:
- Joined
- Jun 13, 2007
- Messages
- 7,743
PS - I've done my time checking fences in the past , but it was done driving an old Toyota not on horseback.
I laugh when I see shows on TV about off road driving and guys making a sport out of trying to drive where no vehicle should ever go . They should get a job fencing and they will soon lose the enthusiasm for getting stuck and rolling their truck onto its roof down step banks
Thems be fightin words in certain corners around here. Seems like every guy has an off road something or other.
Horsewright
Knifemaker / Craftsman / Service Provider
- Joined
- Oct 4, 2011
- Messages
- 13,987
Well got the fence patched up. Found a couple of three big holes and fixed several smaller ones too caused by pigs. Looks like there had been quite a few pigs running around, found a lot of rotortillaring going on. Lot of guys here do use quads or something to fix fence Ken. But where we were going it would of been upside down long before we got there. Horseback or helicopter and then you'd have to longline out of the helicopter. No place to set it down. Had a buddy come off his horse a couple of years ago while we were doing that. Snapped his femur. They could get an ambulance somewhat close on the neighbors place. We ended up cutting the fence and carrying him down the mountain on a sheet of canvas. Fortunately the nieghbors have some big young guys working for them that really helped with the carrying. That was where we found the first hole to fix yesterday.
Ken I've tried it both ways and punching that hole through three layers of leather is just better wet. Occasionaly when dry you might get a little bit of cracking on the bottom side and that never happens wet. Seems like you get a smoother even cut on the edging too. Some of it is time management too while working in batches. When the sheath first comes out of the water its too damp to do a lot of things too particularly molding. But by the time I get done what I need to do with 20 or 30 sheaths I might have to be re wetting a couple before molding. The only danger really is that in that damp sheath the leather is more susceptible to scratching so you're careful with your cutting and puching boards and to getting dirty. When working on a batch I will actually lay all the sheaths out on a towel to keep them clean. So I will punch all the slots in the 20 sheaths, then I'll edge the inside of the slot, then I'll sand etc. I do each step to each sheath before moving on. More efficient that way. So I put four sheaths in my bucket and pull them out when I they sink. I then put four more in there. I get started punching slots and trimming on the first four while the second four are sinking. Repeat, repeat and repeat. Just a time savings deal.

This is what I tried posting yesterday. Here are the tools I use to wet form the sheath to the knife. Not pictured I also have a rat tailed file close by. I will open the pocket in the sheath with the needle nosed pliars. I leave them closed for this. Its very important that the pocket of the sheath is straight when you put the knife in the fist time and I get the pliars to do this. If not straight its pretty easy to put the knife through the sheath, usually on the front side. I will hold the sheath kind of cupped in my left hand by the welt side of the sheath with the front of the sheath facing away from me. My hand goes over the top of the sheath and cups it from the bottom, my wrist is bent away from the sheath and my elbow is pointing up. While this sounds awkward it keeps you away from the front of the sheath while you are putting the knife in the damp leather. Lots of dead cow but only one left hand. So double checking the wet sheath is nice and straight, I will start pushing the knife in. When the finger guard gets to the lump in the welt you should start feeling some resistance. It needs to be tight but not too tight. When the knife goes past that lump on the welt it should make an audible "clunk" when it sets into the pocket. If it's too tight and there is too much resitance I will use my pliars by opening them against the welt and the top stitch line. This should fix er up. If still too tight after a couple of pliar stretches I will use the rat tail file to shave a little off of the welt lump. Doesn't take much and a little tight is better than too loose.

Once the knife is in the sheath I will go to wet molding. I work on the back side first and I use my stick of ligum vitae with the rounded corners. I work on each side of the handle and a little bit on the blade from the tip to the handle. Thats about it, I don't do a lot of wet molding just some, more for definition than anything else. Retention really comes with the fit of the lump on the welt, not with the wet molding. I'll then flip the sheath over and work on the front side. I do even less here because you don't want to squish your tooling. Just a little on each side of the handle and a light skimming from the tip of the blade up to the handle. This pic shows the sheath after the wet molding. On a tooled sheath I would say 90 percent of the molding in on the back and 10 perecent on the front. If its a plain sheath without tooling probably fifty fifty.
Ken I've tried it both ways and punching that hole through three layers of leather is just better wet. Occasionaly when dry you might get a little bit of cracking on the bottom side and that never happens wet. Seems like you get a smoother even cut on the edging too. Some of it is time management too while working in batches. When the sheath first comes out of the water its too damp to do a lot of things too particularly molding. But by the time I get done what I need to do with 20 or 30 sheaths I might have to be re wetting a couple before molding. The only danger really is that in that damp sheath the leather is more susceptible to scratching so you're careful with your cutting and puching boards and to getting dirty. When working on a batch I will actually lay all the sheaths out on a towel to keep them clean. So I will punch all the slots in the 20 sheaths, then I'll edge the inside of the slot, then I'll sand etc. I do each step to each sheath before moving on. More efficient that way. So I put four sheaths in my bucket and pull them out when I they sink. I then put four more in there. I get started punching slots and trimming on the first four while the second four are sinking. Repeat, repeat and repeat. Just a time savings deal.
This is what I tried posting yesterday. Here are the tools I use to wet form the sheath to the knife. Not pictured I also have a rat tailed file close by. I will open the pocket in the sheath with the needle nosed pliars. I leave them closed for this. Its very important that the pocket of the sheath is straight when you put the knife in the fist time and I get the pliars to do this. If not straight its pretty easy to put the knife through the sheath, usually on the front side. I will hold the sheath kind of cupped in my left hand by the welt side of the sheath with the front of the sheath facing away from me. My hand goes over the top of the sheath and cups it from the bottom, my wrist is bent away from the sheath and my elbow is pointing up. While this sounds awkward it keeps you away from the front of the sheath while you are putting the knife in the damp leather. Lots of dead cow but only one left hand. So double checking the wet sheath is nice and straight, I will start pushing the knife in. When the finger guard gets to the lump in the welt you should start feeling some resistance. It needs to be tight but not too tight. When the knife goes past that lump on the welt it should make an audible "clunk" when it sets into the pocket. If it's too tight and there is too much resitance I will use my pliars by opening them against the welt and the top stitch line. This should fix er up. If still too tight after a couple of pliar stretches I will use the rat tail file to shave a little off of the welt lump. Doesn't take much and a little tight is better than too loose.
Once the knife is in the sheath I will go to wet molding. I work on the back side first and I use my stick of ligum vitae with the rounded corners. I work on each side of the handle and a little bit on the blade from the tip to the handle. Thats about it, I don't do a lot of wet molding just some, more for definition than anything else. Retention really comes with the fit of the lump on the welt, not with the wet molding. I'll then flip the sheath over and work on the front side. I do even less here because you don't want to squish your tooling. Just a little on each side of the handle and a light skimming from the tip of the blade up to the handle. This pic shows the sheath after the wet molding. On a tooled sheath I would say 90 percent of the molding in on the back and 10 perecent on the front. If its a plain sheath without tooling probably fifty fifty.
Last edited:
Horsewright
Knifemaker / Craftsman / Service Provider
- Joined
- Oct 4, 2011
- Messages
- 13,987

OK now for the heresy. Kids don't try this at home etc, etc. I will take the wet molded sheath and place it on 4 sheets of card stock paper and..................................................... then...................................................................................................... and here's the part that makes me an heretic.....................................................................................I bake it in the kitchen oven at 175 degrees for 2 hours. I know, I know, heat and leather don't mix. But remember the title of this thread is how I do it; and this is how I do it.
1) The oven must be pre heated. When an oven is coming up to temp there are some very wide temp swings. I learned this the hard way tempering knives. You don't want your sheath sitting in there at 500 degrees even for a short time. So preheat your oven.
2) 4 pieces of card stock keep rack marks away.
3) 175 degrees is the lowest that our oven will go. If it went lower I would use lower.
4) Middle rack is best. When I do a batch I use all the racks but if only doing a few I will only use the middle rack and middle of the racks, not towards the edges is best.
5) At one hour I flip the sheath onto its front side and then 30 minutes later, I flip it back onto its back for the final 30 minutes
I got this oven deal from an old saddle maker who got it from an even older hoster maker. I've been doing it over 20 years and I have done thousands of sheaths and holsters this way. Done correctly it produces a nice firm, hard sheath with that wet molded definition locked into place. Done incorrectly you make jerky.

I immediately oil the sheath with warm 100 percent neatsfoot oil (don't use the neatsfoot compound). I start warming the oil when the sheath makes the last flip, so about 30 minutes prior to use. Warming the oil allows it to absorb into the leather more evenly, and sets quicker. It prevents splotching. I use the cheap dollar store paintbrush shown and will get about a year out of one before I wear the bristles away.

After the sheath is oiled it will go inside and sit on the kitchen counter over night. Won't do anything else with the sheath till the next day.
Last edited:
- Joined
- Jan 14, 2015
- Messages
- 1,312
Well, about the oven, I guess you are basically hardening the leather like in a leather cuirass. There are several theories about hardening leather that I know about, including your described method. So I guess nothing wrong. I am curious though, leather turns hard after wetting (and I guess especially after backing), so what are you using to make it smooth again? The neatsfoot oil? Would fiebings atomic wax work as well? Or is this the next part of your tutorial?
Gary W. Graley
“Imagination is more important than knowledge"
Knifemaker / Craftsman / Service Provider
- Joined
- Mar 2, 1999
- Messages
- 28,000
Very kool, stove eh? I use the dashboard of my car, in the summer time, while I'm waiting during forming sessions but I don't bake them as such.
I'd certainly say this thread is Sticky Worthy and will see if a mod will allow it to be put in the newly made thread listing all the Tutorials here in the Wild Wild Leather Kingdom")
G2
Edited to say that I see that it was already in place! excellent !!!
but I don't bake them as such.I'd certainly say this thread is Sticky Worthy and will see if a mod will allow it to be put in the newly made thread listing all the Tutorials here in the Wild Wild Leather Kingdom
G2
Edited to say that I see that it was already in place! excellent !!!
Horsewright
Knifemaker / Craftsman / Service Provider
- Joined
- Oct 4, 2011
- Messages
- 13,987
Vilepossum hmm interesting ideas on the armor. I know back in the day when armor was worn for real that a lot of "boiled" leather was used for those that couldn't afford steel. I don't know the process though. My sheaths get hard but not that hard I guess. I don't want them to get soft I want them to stay firm. No the oil doesn't soften them up I don't put that much on.. You could over saturate it and get it soft. Also and I guess I should of mentioned this earlier I'm brushing on a very light coat. Particularly on a tooled sheath as the tooling seems to absorb more oil quicker.
- Joined
- Jan 14, 2015
- Messages
- 1,312
Thank you for your answers. Between this thread and Gary's I think I will have plenty of things to try and learn.
Now if omega makes a bracelet tutorial for his famous sharkskin bracelet I will be all set.
As for the boiled leather, I was just curious. There are 3 methods that I know of which are being used today because nobody seems to know for sure which one was used... But I am not that deep into that larp/reenactment thing
Hardening your leather with molten wax, though this might turn softer again in the heat.
Boiling the leather in water or oil, this is a rather delicate process.
Heat drying wet formed leather while it is still damp/wet.
Horsewright
Knifemaker / Craftsman / Service Provider
- Joined
- Oct 4, 2011
- Messages
- 13,987
Thanks Gary. Yeah the dashboard deal a lot fo folks do or setting it out in the sun etc. I tell folks that want their sheath darker to set it out in the sun or on the dash. Oiled leather will darken up in sunlight pretty quick. I always remind them to flip it or they will have one side dark and the other lighter.
We've allowed the oil to "set" overnight and next morning we'll continue our work. Just a quick note on the oil setting. What I mean by that is the oil evens out and becomes a uniform color throughout your project. This can take several days. Don't worry if the next day you still have some uneveness in color. It'll happen. I once had one of my own holsters take about a month to even out or set. I'd had to oil the inside of the retaining strap too and so the top part of the holster was a little darker color than the rest of the holster for about a month. It evened out eventually. Not finishing up your sheath at this stage does not seem to make any difference in how long it will take for the oil to set. So I go ahead and finish it off. Around here always seems like there is some shipping deadline or other looming and other projects to get to.
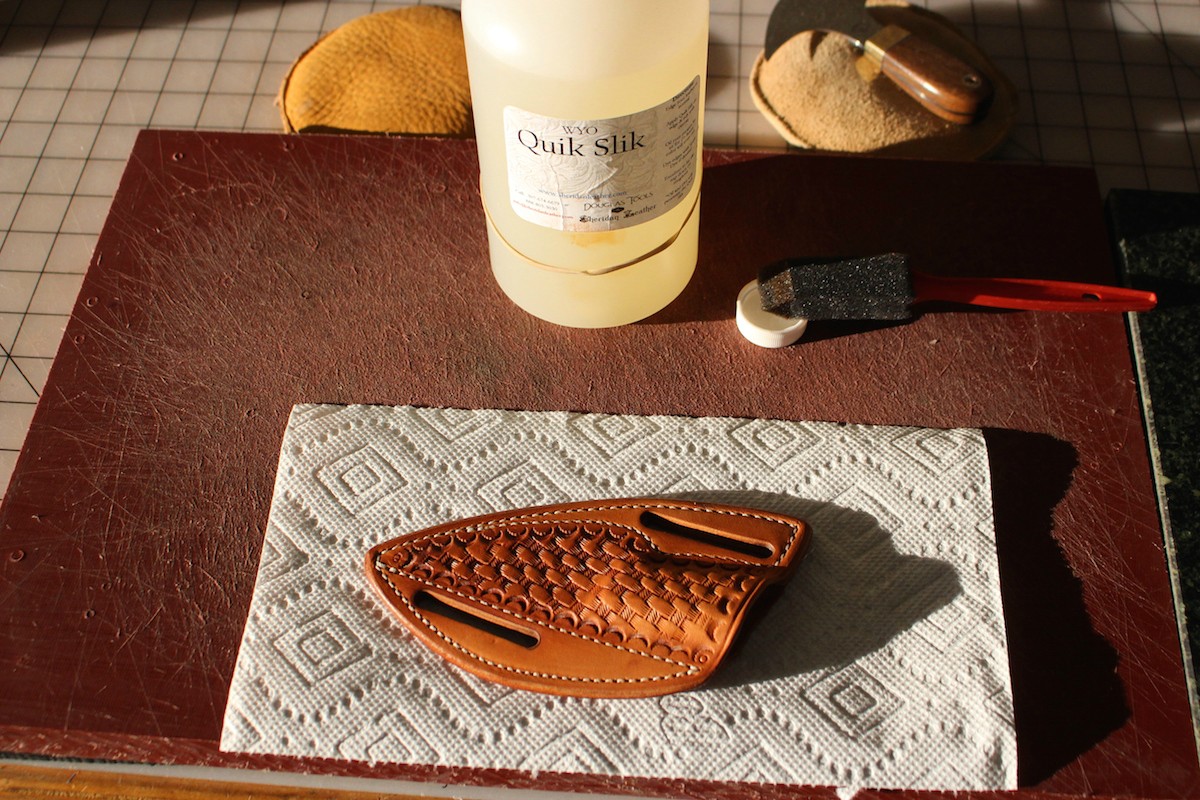
Now we're gonna rub the edges again using the lathe. This time I'm gonna wet the edges with Wyo Quick Slik. I get this from Sheridan Leather Supply. I have found this to do a better job than Gum Traganath, slicker, quicker and less messy. I've been using gum for over 30 years and I just fired it when I found this stuff, it's that much better. In fact I threw a partial bottle of gum away. Don't need it. On the sheath I will do all edges, 360 degrees. Last time we left the top alone but this final time we're hitting them all.

Here you can see how good that edge gets. I'm really sold on that Qucik Slik stuff. You can also see that oil has not set all the way on this sheath yet. See how the welt side is a little darker. No fretting, it will set. Another note. I simply don't dye sheaths. I've found that this oil finish (I call it an oiltan finish), will make the leather last longer in harsh conditions. I dye other projects but not sheaths.
I don't have a pic of applying the finish. What I do is is stretch an old t shirt tight across two fingers and then twist it holding it that way with the rest of my hand. That is my finish apllicator. There are many different leather finishes out there and it seems everybody has their favorite. I had settled on Fiebings Bag Kote and have used it for many years. Gives a nice satin finish. Recently I'm trying RTC, a leather finish made by Bee Natural, the same folks that make Pro Carv. I like the Pro Carv so much, I thought I'd give one of their leather finishes a try. I like it. Can't say that I like it more than Bag Kote but I do like it. I have used it on a few projects at this time and it seems pretty darn good.
When I apply the finish I will put a coat on the edges first. You will feel, after your rubbing, a definite grain to your edge. Going one way will be rough and going the opposite direction will be smooth. Go the smooth direction. You've spent some time getting those edges kinda glassy don't rough them up putting your finish on backwards. After the edges I'll hold the sheath by the inside and put a coat on the top. When this has dried I will hit the edges and the top or front side of the sheath with another coat. With that tshirt stretched tight and some finish on thier (not saturated) and a light touch you will get a nice even coat with out swirl marks or streaks. After this second coat has dried I'll put one coat on the backside of the sheath and we're done. Thats pretty much it from start to finish.
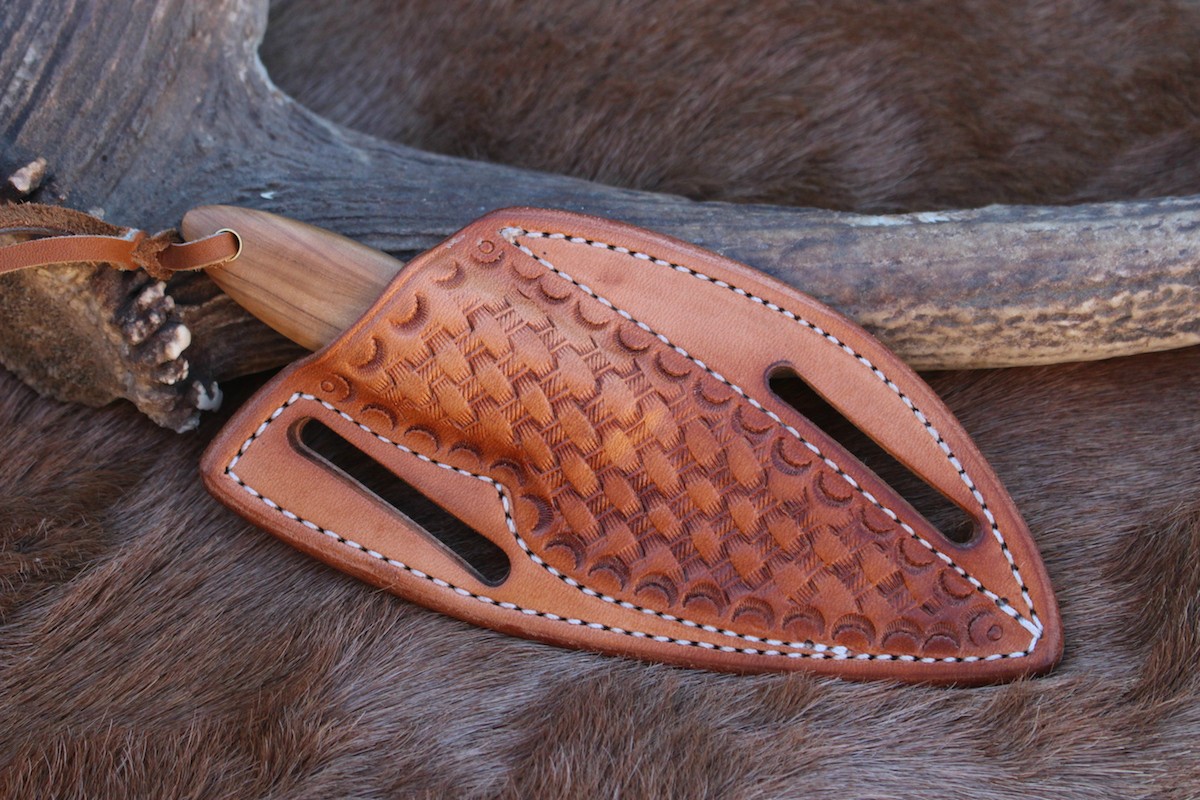
Here it is all finshed. I did use the RTC finish on this project and it gives a nice look. I'm happy with it. You can see clearly how the bottom half of the sheath is still darker. It will even out over the next couple of days. You'll always want to check your fit with the knife again. Occasionally you might have to do another pliar stretch or a little more rat tail filing but not often. If fitted correctly when you put the knife in the sheath you'll hear and feel the knife go clunk as it sits into the pocket. You should be able to turn the sheath upside down and shake vigoursly and not have the knife come out. You might want to try this over a folded up towel on your workbench so a knife doesn't go flying if you're too loose. Before we ship a knife and sheath we check this fit multiple times. I took this last pic and this knife and sheath went into Nichole's office. She boxed it up and shipped it to its new owner in NY.
I have used this pattern on all shapes and sizes of knives from Bowies to small little knives like my Gordo (5.25" oal). On very small knives you can't get the slots far enough apart for the sheath to ride at an angle. Consequently I modified the pattern shape and make a vertical pancake sheath for little knives. It is constructed the same way.

Here is a vertical pancake and its mammoth tooth handled Gordo. The only difference here is the original shape of the sheath parts before construction.
I hope this post has been helpful to you. Please don't heistate to ask any questions and comments are welcome. I'm honored to have this tagged like one of Gary's stickies. Guess if this is gonna stick around I better go through and fix my typing. I spell pretty good, my fingers not so much.
We've allowed the oil to "set" overnight and next morning we'll continue our work. Just a quick note on the oil setting. What I mean by that is the oil evens out and becomes a uniform color throughout your project. This can take several days. Don't worry if the next day you still have some uneveness in color. It'll happen. I once had one of my own holsters take about a month to even out or set. I'd had to oil the inside of the retaining strap too and so the top part of the holster was a little darker color than the rest of the holster for about a month. It evened out eventually. Not finishing up your sheath at this stage does not seem to make any difference in how long it will take for the oil to set. So I go ahead and finish it off. Around here always seems like there is some shipping deadline or other looming and other projects to get to.
Now we're gonna rub the edges again using the lathe. This time I'm gonna wet the edges with Wyo Quick Slik. I get this from Sheridan Leather Supply. I have found this to do a better job than Gum Traganath, slicker, quicker and less messy. I've been using gum for over 30 years and I just fired it when I found this stuff, it's that much better. In fact I threw a partial bottle of gum away. Don't need it. On the sheath I will do all edges, 360 degrees. Last time we left the top alone but this final time we're hitting them all.
Here you can see how good that edge gets. I'm really sold on that Qucik Slik stuff. You can also see that oil has not set all the way on this sheath yet. See how the welt side is a little darker. No fretting, it will set. Another note. I simply don't dye sheaths. I've found that this oil finish (I call it an oiltan finish), will make the leather last longer in harsh conditions. I dye other projects but not sheaths.
I don't have a pic of applying the finish. What I do is is stretch an old t shirt tight across two fingers and then twist it holding it that way with the rest of my hand. That is my finish apllicator. There are many different leather finishes out there and it seems everybody has their favorite. I had settled on Fiebings Bag Kote and have used it for many years. Gives a nice satin finish. Recently I'm trying RTC, a leather finish made by Bee Natural, the same folks that make Pro Carv. I like the Pro Carv so much, I thought I'd give one of their leather finishes a try. I like it. Can't say that I like it more than Bag Kote but I do like it. I have used it on a few projects at this time and it seems pretty darn good.
When I apply the finish I will put a coat on the edges first. You will feel, after your rubbing, a definite grain to your edge. Going one way will be rough and going the opposite direction will be smooth. Go the smooth direction. You've spent some time getting those edges kinda glassy don't rough them up putting your finish on backwards. After the edges I'll hold the sheath by the inside and put a coat on the top. When this has dried I will hit the edges and the top or front side of the sheath with another coat. With that tshirt stretched tight and some finish on thier (not saturated) and a light touch you will get a nice even coat with out swirl marks or streaks. After this second coat has dried I'll put one coat on the backside of the sheath and we're done. Thats pretty much it from start to finish.
Here it is all finshed. I did use the RTC finish on this project and it gives a nice look. I'm happy with it. You can see clearly how the bottom half of the sheath is still darker. It will even out over the next couple of days. You'll always want to check your fit with the knife again. Occasionally you might have to do another pliar stretch or a little more rat tail filing but not often. If fitted correctly when you put the knife in the sheath you'll hear and feel the knife go clunk as it sits into the pocket. You should be able to turn the sheath upside down and shake vigoursly and not have the knife come out. You might want to try this over a folded up towel on your workbench so a knife doesn't go flying if you're too loose. Before we ship a knife and sheath we check this fit multiple times. I took this last pic and this knife and sheath went into Nichole's office. She boxed it up and shipped it to its new owner in NY.
I have used this pattern on all shapes and sizes of knives from Bowies to small little knives like my Gordo (5.25" oal). On very small knives you can't get the slots far enough apart for the sheath to ride at an angle. Consequently I modified the pattern shape and make a vertical pancake sheath for little knives. It is constructed the same way.
Here is a vertical pancake and its mammoth tooth handled Gordo. The only difference here is the original shape of the sheath parts before construction.
I hope this post has been helpful to you. Please don't heistate to ask any questions and comments are welcome. I'm honored to have this tagged like one of Gary's stickies. Guess if this is gonna stick around I better go through and fix my typing. I spell pretty good, my fingers not so much.
Last edited:
- Joined
- Aug 21, 2011
- Messages
- 405
Thanks so much Dave for the tutorial, I collected so many perils. This may sound funny but I woke up early the last two nights thinking about this tutorial. I'm searching for a piece of genuine lignum vitae, apparently there are a lot of imitations.
John S.
John S.
- Joined
- Jan 14, 2015
- Messages
- 1,312
So awesome! Thanks a lot! Like I said earlier, I will try this some time in the future. Such a wealth of information.