Pancake Sheaths and how I go about them. (PIC HEAVY)

Thanks for the quick reply, Dave.
And the suggestions for different blade shapes make this worth saving, for sure...

You are welcome. Mostly you are eyeballing it through experience.

So are you saying that because this is a new knife shape (therefore no experience) I have to just go ahead and stitch it up, and if it doesn't fit, figure out where I need to adjust from there and remake?
 
Yeah kinda, but its not so much the experience with the new shape as it is with experience in the building of the sheath and what needs to go where. How bout using my experience? Draw it out with the new knife inside. Take pics and post em here. Lets see what we can come up with. Heck we can do a cardboard mark up with out ever cutting leather before we're pretty sure we're good.

I have tried fitting things up before stitching and it doesn't really work as wet molding is kinda integral part of getting this flat 2d sheath to fit around a 3d object. After stitch up and wet molding if the fit is not right there are a couple of things we can do to either tighten or to loosen. But that is a matter of degree. A little tight or a little loose we can fix. Too much either way and we start over.

I was teaching my wife Nichole, the other day how to make our Leatherman sheaths. Our sheath for the Leatherman Wave is by far the most popular. We had an order for one and so she made four. We try to keep these in stock but sometimes run out so we try to get them done in a day or two. I was tied up on other orders so she was gonna make up these four sheaths. I have a wooden block mockup of a Wave. I place that in the sheath and then draw around it to mark the stitching lines just like I do on a pancake sheath. She asked how far away from the block do I know where to draw the lines. I said imagine half the thickness of the Wave block and a "little" more. That "little" is the experience I guess. One of my horsemanship mentors use to say that: Good judgement comes from experience and experience comes from bad judgement.
 
Thanks Dave. I've already drawn up pics, played around with the 3/8" and "a little" and see a benefit for having a welt all the way around the blade instead of just on the edge. Very easy to check the fit and the cam. However, because it's only a drawn line I'm using on the spine side,
I have tried fitting things up before stitching and it doesn't really work as wet molding is kinda integral part of getting this flat 2d sheath to fit around a 3d object.
I see that I'm at the point where I have to actually sew it up to see if all my lines were in the right place.
 
Thanks Dave. I've already drawn up pics, played around with the 3/8" and "a little" and see a benefit for having a welt all the way around the blade instead of just on the edge. Very easy to check the fit and the cam. However, because it's only a drawn line I'm using on the spine side,

I see that I'm at the point where I have to actually sew it up to see if all my lines were in the right place.

Ya bet keep us posted!
 
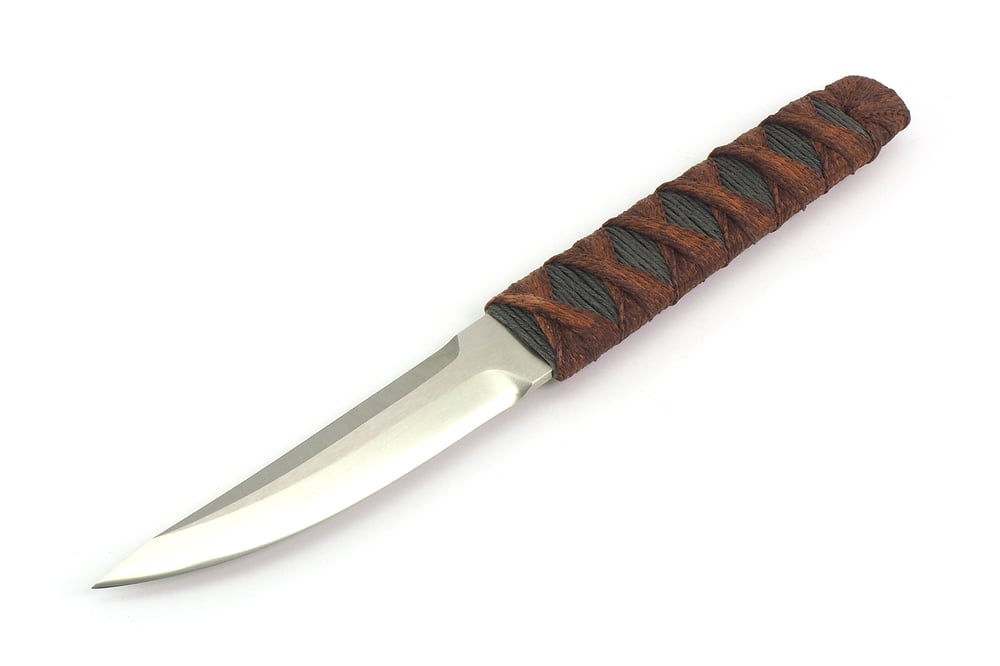
Horsewright, many thanks from Sweden, where I am attempting to stay busy with limited tools. I noticed that the belt loops are parallel to each other, and I think to the long axis of the blade but not perpendicular to the belt. Is this to keep the overall size of the pancake down? I suppose it also means they have to be a bit longer than actual belt width? I am thinking that for a 45° carry angle, knife axis and For a very pokey blade with not much of a guard (see pic below), would it help protect the stitching (and my flesh) if I ran the welt partway around the spine near the tip? Or maybe left a gap in the welt, almost like a drain chute, for the tip (green ink in second pic)? I can see how this also might present retention issues, since the upper part of the welt does not have much to grab onto as it does in your design. If I can't get this to work I'll place an order or come see you in CA!
Tusen tack!


BTK+Kwaiken+Elmax+Swedge+Grey+Brown+01.jpg

fZ2sdEn.jpg

Sorry didn't get a chance to answer yesterday. Saw this and your email but couldn't answer. We were with out power for two days due to all the fires. Back online now. Anyhoo. Yeah if you don't keep the slots as close to parallel as possible the belt can wad up behind when you are wearing it. Found this out many years ago the hard way. I use a two inch punch to punch the slots and most belts are 1.5 inches. I do try to keep the size down of the sheath as much as possible. With the knife pictured retention will be difficult to get. Here's what I would do for that knife. Yeah I would bring the welt part way along the top two , maybe a third and would cut it one piece not two. After the welt is glued in to the top layer I would reinforce it with some JB Weld to harden it in the area that is likely to get poked. After the JB Weld is hardened I'd finish sheath construction as normal. You simply aren't going to get that "klunk" noise or feel of that knife sitting into the sheath due to its straightness. Maybe consider superglueing a small piece of chap leather to the inside back piece to give it some friction on the knife too. Do this after the knife is completely shaped and dried. Hope this helps and welcome to BF Sheaths and Such.
 
Thank you Dave! If it turns out I'll post pics; otherwise I'll hang my head in shame and head back to the drawing board.
 
107driver, really love that knife design. Dave's idea about adding a piece to the back to add friction should work well. Additionally, your handle wrap gives you another option. That additional piece could be sizes to fit into the diamond shape well in the wrap. Just an idea from an old engineer. rtmind/randy
 
107driver, really love that knife design. Dave's idea about adding a piece to the back to add friction should work well. Additionally, your handle wrap gives you another option. That additional piece could be sizes to fit into the diamond shape well in the wrap. Just an idea from an old engineer. rtmind/randy
Thank you Randy! I'll think on it.
 
One question about your pancake sheath, do you not put a welt on the spine side?? To stop the tip from poking the threads on the spine side, and make it even thickness?
 
One question about your pancake sheath, do you not put a welt on the spine side?? To stop the tip from poking the threads on the spine side, and make it even thickness?

If the knife has an upswept point I will do that. But usually about a third or half of the top side. Seldom the whole thing. Occasionally, if its a very thickly handled knife I will go all the way but really have done that only a couple of times. On one of my knives, or on the vast majority of knives that I make sheaths for, it simply is not needed.
 
I learned a ton from this thread, thank you for taking the time to share your methods
 
half the thickness of the Wave block and a "little" more. That "little" is the experience I guess.

In my experience, that "little more" is equal to half the total thickness of your leather. Say I'm using 8oz(1/8" thick) for my front and back panels, I would add an 1/8" to my half thickness of knife. Essentially you're just adding the total thickness of leather to the thickness of the knife before you half it. Welts kind of throw a wrinkle in my formula as they need to be subtracted rather than added to the offset.

Chris
 
I learned a ton from this thread, thank you for taking the time to share your methods

Thanks, you bet!
In my experience, that "little more" is equal to half the total thickness of your leather. Say I'm using 8oz(1/8" thick) for my front and back panels, I would add an 1/8" to my half thickness of knife. Essentially you're just adding the total thickness of leather to the thickness of the knife before you half it. Welts kind of throw a wrinkle in my formula as they need to be subtracted rather than added to the offset.

Chris

I'll have to give that a look at next time I do some of those Chris, good to know.
 
And this tutorial saves my butt again. I haven’t actually made a pancake sheath like this, but the info in here applied to what I am working on has been invaluable.
Dave, you’re ever in or around Fallbrook down south let me know cause beers on me!
 
And this tutorial saves my butt again. I haven’t actually made a pancake sheath like this, but the info in here applied to what I am working on has been invaluable.
Dave, you’re ever in or around Fallbrook down south let me know cause beers on me!

Good deal. Haven't been down that way in years. Use to put on horsemanship clinics there years ago.
 
You mentioned that you thin the weldwood cement with water, any particular ratio or consistency I should be shooting for?
 
You mentioned that you thin the weldwood cement with water, any particular ratio or consistency I should be shooting for?

I don't think it that often as I don't need too, Unless its been sitting around for a while then it will thicken up. No not really, like milk is what I'm looking for I guess.
 
This is my first time to see this post and I just wanted to say Thank You for taking the time to make it. It is very informative and educational, and I learned a ton of good stuff. Or in your words, I picked up nearly enough pearls to make a necklace.

Do you have any plans to make additional tutorials?

Loved the story of your dog guessing at the rock to fetch. I have a nephew who had a yellow lab who would do that. He would wear you out bringing a rock for you to throw. We always thought he was cheating too, so one day I put a mark on the rock with a permanent marker. He wasn't cheating because he would bring back the marked rock every time. Perhaps he could smell our scent on it or something but he came back with the correct rock time after time.
 
Last edited:
Dave, Thank you so much for taking the time to create this thread. I will try to share some pics in this sub forum as my projects get under way.
 
Back
Top