How To Spyderco Manix LW Screw Conversion Guide

UhOhShizah YOU THE MAN!:thumbsup:
Such a facinating design, always wondered why Spyderco has not revised the Manix lightweight with these mods?

Thanks ScottC3, such high praise! Yeah I am not sure. They have to know how big a market there is for people to disassemble their knives and tinker. They can say not to. But people will want to regardless.
If I'm not mistaken the PM3 LW has screw construction too. So I'm not sure what the difference between the two LW knives are.

Very nice job. It is easier with the right tools.

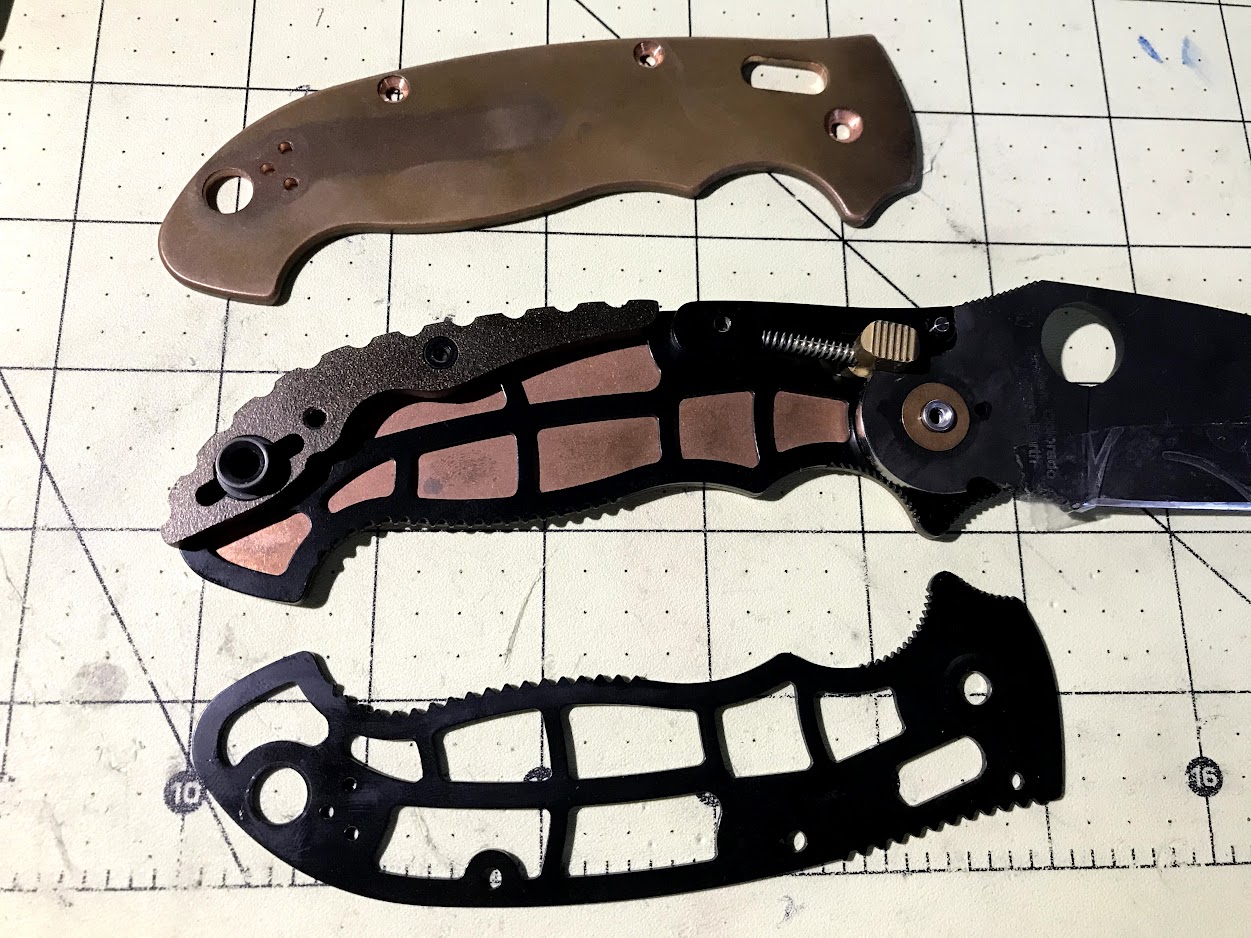
Thanks rpttrsn! Totally agree. If I had used the drill press from the start it could have been a 1 day project, if not a half day.

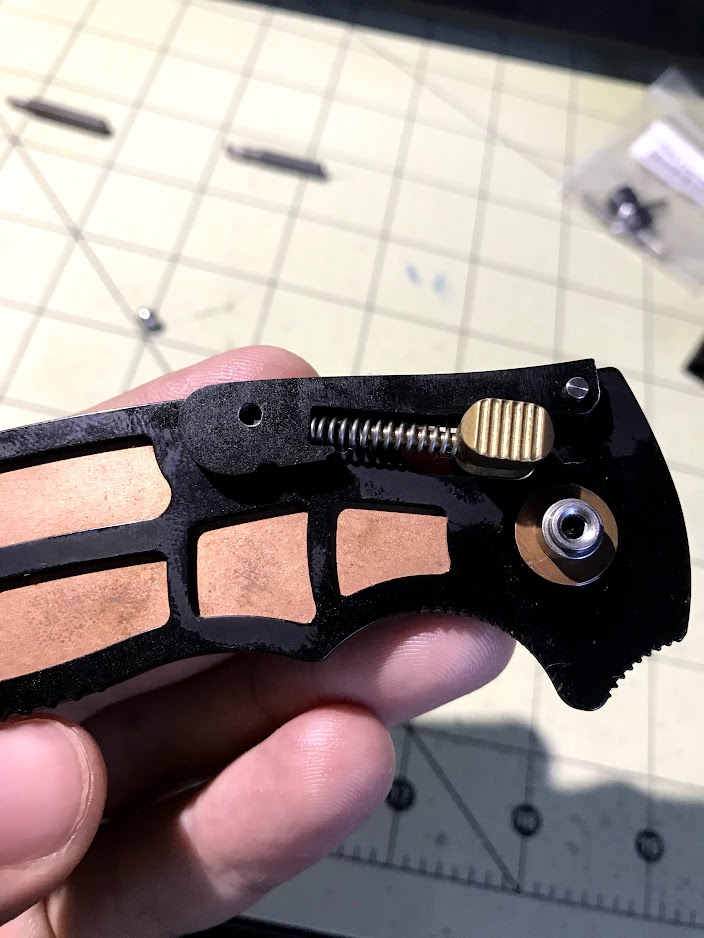
I'd rather doubt it. Aftermarket scale makers tend to be imprecise at best. In order for good functioning of the knife, the molded handles of the Manix 2 LW need to be PERFECT.

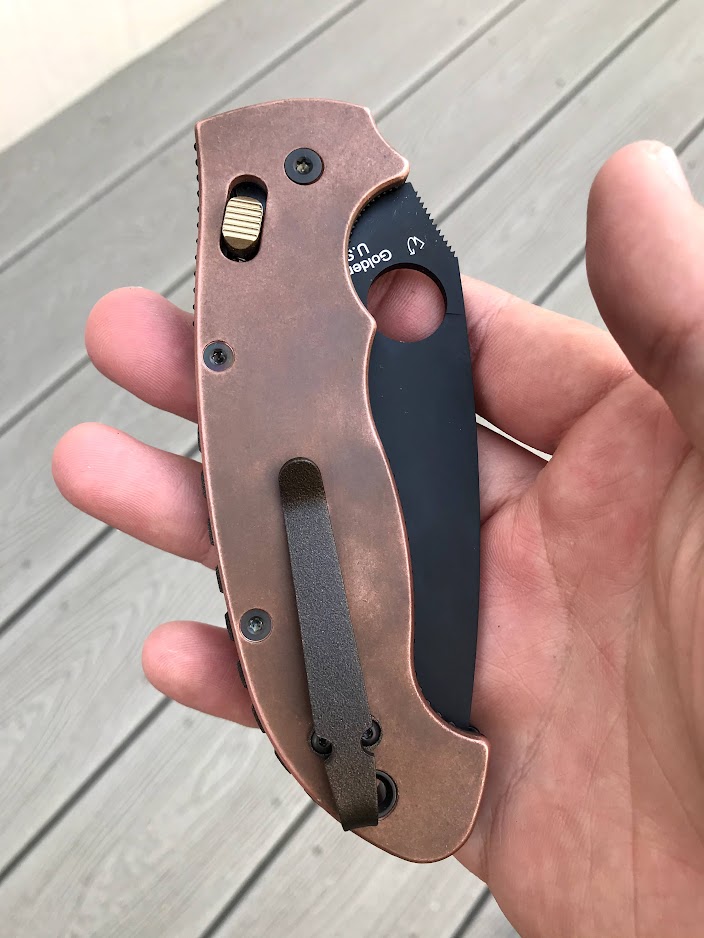
RustyIron, totally agree. I got some scales that I had to sand out the lanyard hole to make them fit. Luckily they were copper and easy to sand. If it was titanium I might have been screwed.
 
Thank you for the inspiration. After reading about your project, I decided to take the plunge myself. Mine differed primarily that I reassembled with rivets, rather than screws. Before, every time I'd use the knife I'd be disappointed with the action. Now it's spectacular, just like a new knife ought to be.

Here's a picture. Posting inline pictures here is a chore.
http://www.dropbox.com/s/e43m4jfsipehah3/IMG_9794.jpeg?dl=0

p.jpeg


Holy crap! That is CLEAN! Those rivets fill the gap so much better than the screws and washers. Did you have to drill out the barrels or were the rivets you bought the OEM diameter?

Would you have to drill out the rivets again if you needed to disassemble? I'd love to see the procedure of the rivet replacement if you have photos.
 
Realized that I didn't take any photos for the addition of the ceramic ball. I had a Manix XL I wanted to work on and do this mod to. So I took some photos. I will put them in the next post.

First of all, some back story. I love copper patina on knives but it adds a ton of weight. So for this Manix XL I decided to embrace the weight and make it as chunky as possible. The opposite of the Manix LW.

Added Copper scales, brass thumb stud, titanium hardware, titanium lanyard tube, titanium pocket clip and titanium backspacer.

Fresh out of the box weight.
ACtC-3fmnrvzMemdmz0T0z9jyNlQHVqUffkkLoje7jyZjzMjk_NvDCE6yoX9mQSInRsSwxNM-HAN0PZbdiPseJBzF_EWz2uaT6-TJOlCuB4UTBjjZkGj7a7ibkHWicAPVXa7CyC2BuJBgGNCv0QVvdSlD0Vkwg=w1251-h938-no


Post mod weight. Almost doubled the weight, reaching over half a pound.
ACtC-3fHy0-IleL1tlYI9yW8d-nkFlnuz-AlBSenhEgsDeoMWYm2pyIAYhKjp_HR7a4cQtkbp2qSCq2vTP1s0rIfO7dhpT5FayQl3QCnHHy3SjaVChZN0odRh9FY5VIbk1W0vlNW378KRu4tui1SdB_YLh8jpw=w1251-h938-no


I love this thing.
ACtC-3dVq9KbMidwg9gUqst9AqiGXn-oUVAVz5vCEP--hzSqLjNlnAcBi8TgR7xjjn2fXPeC9yR2jbbmF2-KpY_8UN9j6fKc52DEbazOGodxlha4mqponi26cQp9pYJMTgb80UEq4Imme-IhFX4ht74EFxo4HA=w704-h938-no


ACtC-3ck1dhx0bIWQ2MGwOdhP4E2e7zZR4aRt5_BjorJJWmR19CjP1ObA0DmKlpCQwa3PmdIGyN8EZbu7PGrpLLmdKDwgsBtEyc1hFMbWv49jIEHz7s0Bm_MaDlQEgO8XJIBVXyzqvjsNb9GoybGj0SuW0yb-w=w704-h938-no


ACtC-3cCQrU91rpcaljp3XrwnqnUKReJAyUpFe-uFZczFdtL557NkhDrBO3g3RPemti68lfGjoh0PKJXw31SfLPCRJN41w2ydGF_FaTtH0nr8NPAbfWSYnlkAEyxqlNDbl1WU0_Fj2SHjRey2AjsTjmDJ5oq5A=w704-h938-no


This thing is a guillotine. Drop shut like crazy.
 
Last edited:
Back to the ceramic ball lock mod with ball cage removal instructions.

Pop those screws out.
ACtC-3dTqi5kzE9PdpBcAVA6GejdV91TJlMx3IbAVchmSzRj9yOIZLlNa87h9OgS14MNU5OTnFzwQ53qNXawKvBF0_i_4wSiR4l_Te8wOxwfcreVMtKIsdvg_GSX4xnHNVa9DzFRl-dF69A-F9ncBgH3jHVZxg=w1251-h938-no


Pop off the scale and liner. Disassemble knife. To get the knife blade out. Pull back on the ball cage and pull up on the blade. Be sure to tape your blade edge before removal.
ACtC-3d3CoY7mUYyKlVEFckejhGXYeX3qpDJmpZ4O8ncZFX5UrJFQ2nJWIqFYD-I-ViTW1B9sJD3S2BBojr3L3ithEJ6F7o9maHHcpIILkuY340GY09OzgPW7VV5V_2uWTUozOO8q2GuSOWdVOFQbVySd87uBQ=w1251-h938-no


Take note of how the ball cage rests in the knife. The flat side faces down and the bowl faces up.
ACtC-3erug8OJ6Glsm7Bh7ET-aDDWjxVSOuglhV2dRaoUkQHUlR_VF--OzNmIP2y_lQkVLk_48xqEfwTdX7OOfVqUNTDHuknnxKUP76g4EJVb2yXHp7KSmBJ-DstX_3YWe7mVuBBZsfYNiA2VO-HZTn_b8jE0w=w704-h938-no


Gently pull the column/spring side out to one direction before removing the back spacer. Remove spring and set aside.
ACtC-3eSdW7a2BRGqTYViPIRJjGOUXJfYUDohmBG-JI1g0KEW0UOEhEkitzV_NsG5YVzfVI6_rbg0wRid92ggfNa4okyHGOlxypLWIqiorAZl_N00l2A3weEC-t1FAybNcgKkJAYYvOiIlfIB7XKZIYbNSQpwA=w704-h938-no


Remove back spacer via taking out the screw on the show side. Remove ball cage. Don't lose the backspacer pin.

ACtC-3c3FJmvL6N6Wc6FVrQgZrMv5G1oIRFjC91v97tvMbll2oHKcUd_4zxfe045St1djmSOZW1XmcQWuNlml_3elt63Q8NxPaRQ-jVBVLwLCCOTIqar9N3n_RkXRVo7LVb7BongWyF764Xlmvb0rxbm__9KHw=w1251-h938-no


Old and busted. New hotness.
ACtC-3cnhY1lPNfO6x5Xb3y_XHck-hXW9RQ-0Z8kN95JZc1-HQwzYiykon59JrGXnRkBEv6JpR7UZ9IP56_HgQVv8PI1IHSvQV--OaV6EvCDONmB0YfvWyXcmZ4dLNhXn4djZYF2I-n9JVYiVFSPwBc_mOzvxQ=w704-h938-no


Set new ceramic ball into the bowl side of the ball cage.
ACtC-3dHHvOAISXdrLkm8puq7fw5sxw3zuYjpKRyCOXcgA6svp0FS2DVa8pq9Rx71nLcAmP_wzFcLyrgf_gJkyv4-RZto7oIPy9jepLFc9eQHm4oyFG_7woFqBlpaqVwRWCFH4_Y6_FmSFTN3Gx9ab_G0VKWBg=w704-h938-no


Rest ball cage in the scale/liner with the bowl facing up.
ACtC-3f-L25QVS8WgAeMfXdJgD_HiIhApQ2RhD3Y5cGH1A2KNcF2bch4Tv0_iR35dYa_4S_kZZRsw0GX_A4sqL3o6_epWmFasv2pVmxb1D-CGFHVuQc3m7UIrJJxY-JvvgyeEhicXTTVF4EvRvMAVjG2mSgUcw=w704-h938-no


Place the backspacer on top of the ball cage, locking it in place. Screw in the backspacer from the show side and replace the backspacer pin. Pull the ball cage out to the side.
ACtC-3fbdDR8H_WG5WlBpJnrVlmrzA1uil7SnuLqk9TNPcJzP9oxnizIRc61Wjldz7-BlDwf2z4J7F1Mbj4Bx0cSkeY649k_qwbAPU7ngHi0LNvzbnVRqEe35UeftqUwqPYNpuA26HPHlP7uR-mZDSNHPFnAIQ=w704-h938-no


Place the screw back over the ball cage stem. Compress the spring and push into place. Be sure to lube up your washer on the show side before putting the blade in.
ACtC-3dVZJU-0sqPpvH9l3RUOLkOKn9AudEZkArdxZ7he-pZzjT0pPM7VAEndoiwKSBEBqnV_slBP9pJ5MSk4cKbi3yJlxwzu2rWw_QyiFJQT-b1kmAqyXSp9CV6rpYEtmZn0SOXyaKGenVLNG_KWQ9n9nEqmA=w704-h938-no


To get the blade back in, set the blade as close as you can get it into the pivot and rest the knife on top of the backspacer.

Pull back on the ball cage with one hand and twist/press the blade so that it sits flush against the backspacer.
ACtC-3eM33TozyFEOaXOZNdPhqudluX6uZDiFn9Bwgy2VKB6ZQHcd_wD1mUs2jCUY4NwieedrOR-7ubrcvB13-iMXb1hTeKk2Y-TXrUAo8b6CHZmw928AGnvYatO2oawrd3N-PV_hNSgKdjCVIW2GHf3uUVrZA=w704-h938-no


After knife pops in. Release the ball cage. Blade is now set in place.
ACtC-3cENefMga3HF6jPY8pS1itViXO4Pyb9KSNpK0ZcJy9l10jSojgOO8qXuYlTORgIQm-cMcrKIhJsYnV9heWhZ12R0IA9BTaffVDiT7zMdta7EWEVlgp8cthqN0Uzk37gTLaN9u-ciRn4hXRHpTl-GomGLg=w704-h938-no


Lube up the clip side washer. Replace lower backspacer, lanyard tube, threaded tube, liner and scale. Blue thread locker and tighten up all the screws.
ACtC-3d4e9yNL-40DeJ-8QRNBUrwH8XHdcsYu1XGSxPpGqurVDkRbItWn1CnJtbBaUhUdTKtWpdMAPr-AU9vZnxnf5b2C8dKIwO9pKYhEvIQr4c7NwdYMEg3hSHUSfebgAQ1XNfgONmokUNqJTBOVGU1mjIu9Q=w1251-h938-no


Then you're done.
ACtC-3eu74T4EkdPgZ3xD3P1pWDssqpC90lPMWZ3vStEJrY7765XFrHtYjfWBrz4T4X0-PQZITaNQzmWDRCIO8WerrkCzOzG58c16tQiqdE-yHxW7je7uB36aP-kkdf9okXAGAd5qQStETVEXqpx0bQD1pbm_g=w704-h938-no


ACtC-3cyQ_HRvXjkNBGhvv7MQYc9pMqx5HmtFatZR-yD_d55e479Mdnbt5nPynWVsvR3DFzE1S8xSMxBQhZPIV2KYGxbF62PLRJc-c0QaqmcbLj1jeuD-TShgm7JBweShMwRbRMN5Bu4-sR52fTsXph_ZjHDMg=w1251-h938-no


ACtC-3dgpfZIEqPpo9b1WeZSbhRr-wXSvV_tj5WkTJfHXgJfs4gSIp3AEcz9DqGLazg4R8E-WY72AtfW027YdnyZWhwrSi9ejnnIkJkDR950BsNnLK8qP8vgdw9HGjQxeCR7dZioLksvcmas3s5k83Lk7lh5NQ=w704-h938-no

Is there any noticeable difference in the action with the ceramic ball in there?
 
Is there any noticeable difference in the action with the ceramic ball in there?

I mean... It feels smoother to me, but I am fairly sure that a portion of that is placebo/new mod feels. I can see there being minuscule improvements due to reduced friction, but not enough to really feel a huge difference. It's a different yet super easy project and we will see how it is long term but it didn't change my experience much.

One thing I can say for sure is that the sound of the action is different.

The steel ball has more of a sharp echoey ting. The ceramic ball has more of a dull thud. I made a video to show you what I mean.


This may have easily had something to do with the difference in scales and knives used. But you can check out the two videos in this thread on my Manix LW action. The first video post screw conversion has a steel ball and the second video after screw mod is ceramic. You can still hear that similar difference in lock sound between those videos as well.
 
Last edited:
p.jpeg


Holy crap! That is CLEAN! Those rivets fill the gap so much better than the screws and washers. Did you have to drill out the barrels or were the rivets you bought the OEM diameter?

Would you have to drill out the rivets again if you needed to disassemble? I'd love to see the procedure of the rivet replacement if you have photos.

Thanks for the kind words. If I recall correctly, the rivets are 0.112", so I drilled everything out to 0.116". The rivet heads are 0.188", and just a bit smaller than the holds in the handles. They're not perfectly centered, but close enough.

If I needed to disassemble again, I would have to drill the rivets out. Since they're brass, they'll be a lot easier than the factory rivets. And now I have seventeen spare rivets that will probably last the rest of my life.

Yes, I took photos. Since you posted your project here, I put mine up over on the manufacturer's forum. Since completing this project, it's been in my pocket every day. It's way better than it came from the factory.

http://forum.spyderco.com/viewtopic.php?f=2&t=88053
 
Awesome! DIY CQI, or perhaps Community Quality Improvement, in wonderful form here. Thank you for sharing, so hopefully a lot of others don't have to do this as a complete shot in the dark.

Cheers,

--Fox
 
Awesome! DIY CQI, or perhaps Community Quality Improvement, in wonderful form here. Thank you for sharing, so hopefully a lot of others don't have to do this as a complete shot in the dark.

Cheers,

--Fox
Thanks for the kind words Fox. I’m glad you enjoyed it and I hope people do find a good use for this guide.
 
Step 3 - Prep 1/8" Dia. x 3/8" Long Barrel Pivots and Screws

The barrel pivots I received arrived like the one on the bottom. The screws were a bit long and wouldn't allow for a snug fit with the scales. I filed the screws down to make a tight fit with the existing washers. I made sure the screws had at least one diameter length of engaged threads to achieve maximum strength. The final product is seen on the top.
yUfcVM8cV8fSrUUQrahuyCik5k6nFeL5YGi3rPeaoFmgfHUt-cN1URPmRtcR-VcVYFr5UOssnG_21dIDmsXtf6pjrPVF4ibPQjjEJVOK4xwsGeyTBQmAwz6MaRF4BEZcXN6FQ0AFos6aoOl358OdlYRSoSDkgunnGBOmdIFCcAcwELvxdZ4PZH4kJFw7ymqLFCH3hNtm2htq_rNS0g4JOxFNULf6hb8tGAaCn81KiZcBfCWNlekgtq9JpY3jn6mx9s2cXhpSwvqDsAaReERidBtAZ2GWdOHgcWMdwCOq7CYIPh9LmJ2xgowvKXDbNmeN_jyw8NsQZ10cHr0DGz7nGjfOttF391ydFk1sHwvucKti6LvXpmac1-GLkFakaUTdx6H-dZz_1UU2wFNxnTuz6C0BRxlzwyrYx-qU4pQQSHkCgGZoKjJxYdOyBDhVRVJ0Jl58lxZI0EcbU0V9j4DSwlPUbZnDnPQx-jspACJc3bN9vpC3zSvhVzbl_a5lXO5h5jRtnSo6Ogaoh2HEkGEpIihLTaRPuhD74IpsAqGjdnvdiZN91XvpGVkS_-X9CJTYwgZVbfwjTdCgygV3c57jTQOXTSlFk9UmOQisUdBKhExaXPLMQDW7S6YYp48WzIa7vYqJw3whJX6qUq558NeHyqybbzZhXP8VInophw1efG7MJSO_7fL3xYWKntOXMg=w1251-h938-no


To keep the screws steady while filing I used a threaded screw thread checker. I threaded the screw into the 2-56 thread hole and filed to the desired height.
-PDr0OHlRJ3kNipAHKBbvTgbNai5kPexJVDVXkstu5_GEk5uXwax0tzBgTslKNnxia4ZQ8Z1vkDTSyWEWtgQsTIzA0lDlq6kRRxbTHV3mhLaTGsNUzNA8syi3GeFtCnQ16Z4hdFrV8HlsB8xMbgHOBnbaKV90NJPvwdxhn4RKYhK_V8ypRSHXXTqIrr0bR1QWIfk_puPk0N4PFHEAgwBUbUMogwN48SiHSuRuZpcIttFmmKCFLFOExYIIUm3IxGFrqYdmp2TqS0ShhmxIZjo8B8OAUMJke4auDMj1cRPkfgEizJz8zc2n-DG1I2zZGldA5z30dJyn1c6Eb-mVW7YKO5obZJOaT-z2TzEAm7nf2UZcfNtv2UyT4wT54dWygOuGhcgy005K6KjQOULcE9GHQCYP_TsuZVaOKQL5CWTkdVzqcr6cACjEUbHDXNtsbQ2ej8jtgGVKEuT0mBqpd4xuFk-8FjX3JF1HbIF7iqpQHQestB_vKLTZjQOWMppSQuCCARVIJrw7pTEyCOPsYjuhnsQwqwlTVGwhXnsUZ_Ngq5bDpi3iwCPwCfXodKBf0XVphwyANZAzmaEcjvRny6u3fjIvHpHN2lMpFYu479zWo7Ny0NnG_ohlsfO8AVZxXwWPSCE-tmVeZKWLPRYkFG5XJXrPf6WCeninz3agMtqwtiz-oQRc5JwHBUOk7U88Q=w704-h938-no


Looked like this. Used a magnet to catch the shavings and frequently checked the screw with the barrel to make sure I didn't take off too much.
XhlwCq6JhvvczUw6c3oJ7ndM6mSjz8x-7g9l6muJXTF7XOxH-o2JlAOt499X5A_zN1H8HfNx_Fr1__KvqQr09CFgc0tF7qNsK0BOyrRJ93xh3lpBKLoUVOoUW0wE6zOhsvhcoQN1w0mT7okH0Cbi9vLXARgtVhdMm_gMxBPM45HkpuoKOAzfmNT269TwMCXqLD9Bb4k4m_qr4QSDT1aL3y3WfDCJG1eV25v9EuSD2jWKAGd_QmeGvVUkv2kzHtT1MpSOS0yX6J2TPF9YnDNDsyRo1VpuBY58ASPaDp4ibPWlKRn5l8E0zAqhzxXYvG3mRqfuAeJseExoR3_HEiVwsToa3IId7jo7vaIGrAd0_rohv8zEipArZf2Bokv29WLXuCsSEJyk5620fd8QvqXVHB0q-t5JL-HpgyVOacsrHJ8zpsC3hcn7TFI_qyCzzpNTbrjGUhSVhvkn2uWuuPbeYc7adYTbugxr9RCm9XBXPTs7-9cX_wTj7ctvOKMHvczrB1B_KRG3Y2EphGF1kythrOtLim7kptfcbycCQLx_DsIsF1OiWtl1NyhNp3IgU6u_tFv8OgjStZBQF6PAzLLDauFjXVBY2FHw-uaN5HSsAzTGroKc5jM3Sn9YcM6V5bXKAwrZCc9dQLujFwkaE1QaAJPWP3ANQ3Lg5zSt9AlSJkOuWNIZxTiYwNNPuaLDeg=w704-h938-no

I also had to shave down the barrel a bit as well because 3/8" was a bit too long. Used the unthreaded #2 hole in the template to keep the barrel steady.
J9QYVpUxuOCBmRL-k1OmwoPz4uiZPz6y8dFzMe4qnSXaql23Ce010INLwWMqZ8GR4LQ5KARgHaw4IaHkmGKpKT9LEYDd0Wbqvpvl81jwd1HeVQXQ5PI2eqbnlDoajTvvWgoEMgDoEMhlSt59yY5NDasKLopM2g7LRGHHYBZLmA7EdRzpfC-IPSSNv-8jEK_TC8FVGRv4Xzawblhmxrac5vHs9_qe0lvcckLyysTLP0lDDhJsqTvyce89JcfXEsJTNtpQ2ezJOLmYrecmRhjSMlXTYlAM7JofZVEOcuvrcXt9CIuav1Ac7xQnrTTGvnN3hsAk6Cc1wmK3O5GjBq9M6X_1thekliPudbO0KugCNjgDH3igcnTESh_H_qu0TFjj8klIW_YlcfGe8BkDYuc6POMoITWogoW_WZdKv9SOB_51OYlwob7xqRwD6ooIwCJ-42RFKINcjdMD2vDU7te5zC09bXOkWJyOXp3zNIaCK9kx8hRgtf-jpjLuP7sXuzZY_Zu0gul5d2teIqPNAmHUFBMhS4MYjpjb-3UW4VGIRiOs31EYZo9uM7ZXRl2u2q1jpukkBebmzifylBfokCvaROevnTIPxJt91QZJ80lM1mElowM_Kl9qyvbK0SBkJGuGan4sjKENm0cHWMsIMdYT3IWxM3ePU29Wk2hn_Zb_RrvTk4vG1F1XLLQGgTApCQ=w704-h938-no


Test fit the barrel to make sure it was flush on both ends.
PlKdKj2oEOyzNb0iwmh7GYTsARYBDYrz2n0GgP4fDWpye4QASLcTXbDnfpxg6PLQJnIo63FooHrr8N0SpSKxik4ia4PA39I9bx5Ia2FCvhKpNg69i-__vgoItaZUacIdDigmQpc4BCc33zuGv0W7hXNL1ezqyH1Xnz6DyoL-vf88b1I0JuZH2n1oAohH360S5qe83AHftz6HqRB5pkrS3Q8VsnkgIamjd_Ld3Su9Mf7cAVmNtjBm-PxNJKrvzXqF8-CsUdv5NDL44vvgy6JF695Sab-Mc49gf4PJ6i6taGZo-GIXsBQZF8AUdtc5TZ7qadogZqjFdm7rsFvaIOT-Omadh1med6252368roM3TQLWkfVDj3-akWyRZNw8puqC6dh6C8ikk-JKgqNBWebs4sdsddtG5qKcKCNFuU0Sv85HEH71ACMs3Gkk4_zi_wQPHnkH_RQbOg2w5g_Uz3cip4nJmzDnda19xBj_cFPWfAKtlusD8V35q2WdEqWiIADJRhhRHGn0ZHcfnWv9p5AYbbK2odbNrTg0HLBPbXum3FX2NO3q6Hcz6drQ_2sUiLShmZzXL47do387r-P4diy8v45PaT0pX-G2WtVUEGQlfgSR2COwD2wRSYY7_drcHd_meesyhAWt3CHfYBPui46tFA_7tf3Y562UutyUD4jalVVp-zwxepQ82Pp6lUMwHg=w704-h938-no


Lastly test the fit with the salvaged washers, screw and barrel. Make sure the screw is applying pressure to the washer and keeping the scales tight. Also be sure to de-bur all your screws and barrels before finishing.
KuPKqYRKRmiAne7jz0lOf1dreAHZVLVisCj7dTl0Nu7inUpI6zxPFiWwYKk0pwiNZjQSCJLKLo4d5Twyey77qkl0q5OPSjR6ggWhKZ8rARaUk-dBHG8c6Dcsq1hJMrFHv0BN6nBlXBoBlu82nAz_Paobkm8AbZUPe1roJB2ZBrLvs5Fvg9EPLJiSQyJ2K_kLY-n3Nfo0Io8eDcy0gHZxm_bN6z0kimiO1_O6RsXMVXneLV3psdcgs42-02w6oLpPxNB6fKX8UoCkL50DLYJ9rgcj7PTnuhlWPw4HwgFHX7pqvQPdLsTD9ZY5x-Ck4IWgtqoDfieiWTBYlGYx-OTGVNad2d9lGJ7HzRTrpsMbMew1h9UFezICCKjl6SqenIHPLLR3LRNxJTchYVIhUljYtnxaTm8D-91QFY7bt65Es2g-pNejdMwRcJwJL7r_AVIMyCAbrPZMm_A1lF5TjgNCC3T_O7HnIfJl67yQFU7ouzsW7WFut7X_uF3jPI58ztJFN7LmuD0AIC82FXdd2qtvO7KFBvicTbWHzKpYts6u3amE3ZiuRU8ySVPeK0BAZBnnBJqH_3aYPt1ZZbdFjB0laJAJKdWPjGtfkIcJWC_1ZBblglO_5i2h_4JZy3zT78aeFtR3KEzC0sLyy35k3fIFq_cJ6OalVvaq7jP6A6k_Y89KJ7ejzvdpEvMHUTzddA=w704-h938-no


This procedure went way smoother than the drilling of the rivets. Took a couple hours of hand filing and test fitting but the end result was pretty clean IMO.
Do you happen to know what was the final length of the screws and barrels were after you filed them down?
 
Hi all - quite new to the whole nice knife game/community & recently picked up a Manix 2 Rex 45 & Manix 2 Lightweight Rex 45 as my second and third knives (liked the look of the LW scales more, but didn’t realize that the difference was quite considerable & after handling a regular Manix 2 I got myself one figuring the LW can be more of a daily use kinda guy).
The OP does a fantastic job of laying out the mod, wish I had seen it before I had done mine! Figured I would add a couple things that I found/picked up that might help others (like the right size washers which I just stumbled upon - no need to turn your own!)

I wasn’t too thrilled with the action on the LW or the fact that doing a full thorough cleaning is neigh impossible + with Rex 45 drying it would be a pain too. As per Spyderco I added some Silicone oil to the knife and immediately the action got worse. Adding more oil just made thing worse to the point where the lock was almost frozen - I figured residual oil of a different type was the issue (bathed it in 99% isopropyl then dried it with a blow drier for a bit and still some slight rust spots developed so I was determined to make some changes).

I did see a few posts on this with my biggest concern being getting the right hardware. Here’s what I got and the results worked out quite well (this was also my second time opening a knife ever & it was honestly pretty easy IMO. Swapped out parts on both and I never had any issues with springs flying around or needing a ‘third pair of hands’ - just plan how you’re gonna do things & don’t rush):

- 1/8” center boring mill bit and/or 1/8” spade drill bit. If you have access to a press (highly recommended & a something light duty can be acquired for a bit over $100. If you muck about with things you’ll probably find other uses for it as well) the mill bit prolly is better I think, but the spade bit should work fine
- 1/8” reamer. These are made to much tighter tolerances than drill bits which aren’t really made for enlarging holes anyway. With a reamer bit you can actually enlarge the holes in the FRN by hand quite easily - I was checking the sizes n such and ended up just doing it that way.
- Some punches, I used a 3/16”
- For the ‘annoying rivet’ I didn’t want to mess things much more than I already had so I just put a small grinder disc on my dremel and ground it down rather than using a cutting wheel as the rivet is very close to the back spacer thing

The Hardware:
(Did this based on the first post I found and it worked out quite well)
- 1/8” Pivot screws and barrels. I used a 1/8” pivot screw set with a .250” long barrel (comes with #2-56 size screws that are about .125” long) from TiConnector.com (hardware was titanium)
- generic M2.5 washers from BoltDepot.com. I hadn’t planned this ahead as I figured I’d play the washers part by ear. I have a bunch of Metric hardware that I’ve gotten over the years from BoltDepot and as it happens the M2.5 washers are a perfect fit. Nice and tight around the #2-56 screws

I ground the rivet heads down nice and slow without doing anything to secure them from spinning. Generally by the time the rivet would sling it could be knocked out easily with a punch (might have to remove some remaining metal with a pick).
Definitely best to cover the knife up while working on it, but careful when securing it. I smushed a bit of the FRN when I tightened the vice too much & didn’t notice this b/c of the tape covering it up.
For the difficult rivet - if you don’t have a grinder/don’t want to use this method a small file can be used as well. It wouldn’t take long - just remember that the back spacer thing & double-washer guys are set fairly tight on the rivet so don’t expect them to just slide off. Light taps with a punch will do the trick once enough of the rivet is removed.

Oh - and for the pivot screws: the way I secured them was by screwing one screw in (with a washer and tiny amount of Loctite) ~2.5 turns (I believe 5 turns would bottom the screw out), then inserted the barrel into the grip, and then added the other screw/washer combo.

Hope this is helpful to others - I’ve seen fairly recent stuff where people aren’t using the best type of hardware b/c they couldn’t find the right stuff & don’t be discouraged by the mod!
 
Wow that was a lot of work it seems but good job there and excellent pics and explanations, kudos!
 
I vote for all of us to boycott the LW variant entirely, until Sal and Eric finally do the right thing with their LW builds. I have 2 G-10 variants at the moment (purchased many others as well over the years), but I absolutely refuse to buy any riveted LW variants. No exceptions... What were they thinking/smoking? Disassembly is no more complicated than most others, so I just don't get it. There are lots of other knives and makers out there. Even those with proprietary hardware have easy enough work arounds to make disassembly a reality for most. Come on Sal and Eric...
 
So this is an awesome thread. Op and comments are great.
Here's a person using a dremmel on the rivet heads might be better than drilling as the plastic gets hot and rivets spin.

Combining both posts here and the Drexel idea ill be doing mine later this week when I have all parts here.
If you keep your original ball lock consider cutting or snipping off 1.5 coil to ease action. If you take off more you can stretch spring a bit to make up difference in length.

Happy moding
 
Great writeup! Sorry if I missed it but what type of screw & size is the wire clip screw? I can't find an answer, anywhere. No clue why it's so hard to find.. I bought a deep pocket clip but can't figure out how to replace it, lol. Thanks in advance!

EDIT: Found it, mine is a T8.
 
Last edited:
Back
Top