Leather Bare necessity tools for leather sheath making

Great tips, love your work 😍. Interesting a pro like you are skipping the groove lines, ....
Forgot to mention, that while I enjoy sheath making, for folders both belt carry and pocket slip, I would not fall under the title of Pro since I don’t do this for a living, there are many here that are Pro status for sure.

and on the groove cutting, back in the day when I use to make fixed blade sheaths, when I would sew up the belt loop, the area inside the sheath where the stitching is, I would dig grooves along the lines there so the stitching would be well below the leather level so when the knife was inserted it wouldn't rub against the threads and wear them down. The glue would keep things in place but better safe than sorry.

Here's a sheath I made for a friend a few years back, cross draw style. I used a piece of paper to figure out how to make the belt strap that wraps around the sheath so it would ride at the angle he wanted while still having the leading edge of the strap parallel with the opening. And I mounted a metal concho on the belt loop.

crossdraw_welt by GaryWGraley, on Flickr

crossdraw_gluing by GaryWGraley, on Flickr

welt was layered and tapered down to the middle layer of the welt, needed to do this since the handle and guard were quite thick

crossdraw_cam by GaryWGraley, on Flickr

the arch of the welt provides a cam action that the guard rides along on until it drops into the end section and stops at the cut off point, so the knife snaps into place securely.

crossdraw_cam_stop by GaryWGraley, on Flickr

crossdraw_out by GaryWGraley, on Flickr

crossdraw_angle by GaryWGraley, on Flickr

crossdraw_done_ by GaryWGraley, on Flickr

crossdraw_done by GaryWGraley, on Flickr

It is tricky to get that cam just right, as I have to keep shaping the curve so it allows the knife to go into the sheath but still retain it once it snaps into place.

I don't take on fixed blade sheaths but occasionally I'll get snagged into making one, but it just isn't something that I like doing for a few reasons. So I leave the fixed blade sheath work to those guys that excel in that area and they are very good at it!

G2
 
Last edited:
Forgot to mention, that while I enjoy sheath making, for folders both belt carry and pocket slip, I would not fall under the title of Pro since I don’t do this for a living, there are many here that are Pro status for sure.

and on the groove cutting, back in the day when I use to make fixed blade sheaths, when I would sew up the belt loop, the area inside the sheath where the stitching is, I would dig grooves along the lines there so the stitching would be well below the leather level so when the knife was inserted it wouldn't rub against the threads and wear them down. The glue would keep things in place but better safe than sorry.

Here's a sheath I made for a friend a few years back, cross draw style. I used a piece of paper to figure out how to make the belt strap that wraps around the sheath so it would ride at the angle he wanted while still having the leading edge of the strap parallel with the opening. And I mounted a metal concho on the belt loop.

crossdraw_welt by GaryWGraley, on Flickr

crossdraw_gluing by GaryWGraley, on Flickr

welt was layered and tapered down to the middle layer of the welt, needed to do this since the handle and guard were quite thick

crossdraw_cam by GaryWGraley, on Flickr

the arch of the welt provides a cam action that the guard rides along on until it drops into the end section and stops at the cut off point, so the knife snaps into place securely.

crossdraw_cam_stop by GaryWGraley, on Flickr

crossdraw_out by GaryWGraley, on Flickr

crossdraw_angle by GaryWGraley, on Flickr

crossdraw_done_ by GaryWGraley, on Flickr

crossdraw_done by GaryWGraley, on Flickr

It is tricky to get that cam just right, as I have to keep shaping the curve so it allows the knife to go into the sheath but still retain it once it snaps into place.

I don't take on fixed blade sheaths but occasionally I'll get snagged into making one, but it just isn't something that I like doing for a few reasons. So I leave the fixed blade sheath work to those guys that excel in that area and they are very good at it!

G2
Oh but I think the terminology may apply a little wider than that, for most people professionalism means being highly skilled, which you (and a few fellow forum members) obviously are. And although you may not do leather work for a living, I understand you have paying customers - another tick in the box I would say. But we may think of other titles too, master scabbard maker? Leather Jedi? ;)

What kinds of thread are you using? You mention glue. I have so far sewn with gutermann synthetic thread, using a lighter to burn the ends, hoping that will sort of weld the threads together or somehow make the stitching hold. I also ordered waxed linen thread, for which I assume I should use glue. The gutermann thread I ordered was a recommendation on the website but I believe it is too thin... The linen thread is "18/3" and is supposed to match the stitching groover I ordered...
 
I agree with you baxtrom baxtrom - G2 has credentials as a sheath maker - no qualifiers. :thumbsup:

My thread set up for 98% of my work has been - A blunt tip #517 harness needle with size .035" light-medium weight MAINE Thread Co. twisted waxed thread. There must be other product and weights I can use, but so far this seems to do the job very well. Would be happy to hear from others on this subject.The technique I use for ending off my 2 needle saddle stitching is to come back through, front to back, for at least twice from the last holes of my run. I leave 1 thread out the back and then come through again, one more hole, front to back and leave that thread out the back too. Now I have 2 strands of thread coming out of 2 different holes - I snip and burn and press those.

Have been using a water based leather glue. Dries quite fast and hold securely - at least - until I've done my stitching or rivet. The thing is I need to be careful to clean any excess off soon with a wet cloth or like in woodworking, the glue lights up when you add any finish/wax. I tried Wildwood contact cement on my last project and will say that I preferred the extra and very secure immediate hold. Of course you need to be well prepared for very precise alignment of your parts. There is no forgiveness with contact cement. It does seem to make a much better finished seam.

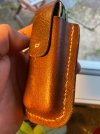
My last effort ~
 
Last edited:
We'll agree to disagree on the definition of Pro ;) for me it indicates that the person is making a living with that work, but I do like to make things that are neat and tidy and sometimes I get in orders that brings in some money which goes into my knife buying discretionary fund.

As to glue, for leather bonding not used on the thread, as most first time makers will tell you, they picked the Barge Cement to do the job, but boy that is a costly brand, so like Ray I also use the Weldwood which I like a great deal and is far less expensive.

Thread wise I will also second the Maine Thread company thread, good people, good service and the thread is pretty strong. But I also really like the Tiger Thread 1.2mm the colours seem to stay better and are brighter longer than the Main thread.

At one point I had the most lovely white thread from Weaver leather, but, they changed their source and I can not find that thread any more, searched high and low but no joy.

closeup_ck_sheath by GaryWGraley, on Flickr

and like Ray, I bring the ends of the thread out the back side, trim them short and using a lighter I'll light em' up and melt them down pressing with the lighter to flatten them up against the sheath.
G2
 
Last edited:
Just an FYI. ITY is possible to get very clean hole while drilling if you follow a couple of simple steps. First, use a sharp bit and don't just plunge it into the leather. That will fray the leather at the opening. Bring the bit down until it just touches and slowly lower it until it has entered the leather, then you can speed it up a bit (not too much or it will deflect). Second, have a solid backing your drill can enter, such as a piece of scrap wood. Just like drilling in metal, you will get a ugly exit hole if the material is not supported so there is resistance to allow the bit to cut, not just push out.
I know it sounds time consuming but, with a bit of practice, it goes pretty fast. This is not to suggest this is the best approach to hole making, but it can be done with good results.
The holes in this holster were done using that approach and I think you will find both sides look clean.
Randy

 
Cleaner stitching is a high priority for my part. I thought the fork chisels would improve my stitching, but not so much. But at least now the seam looks equally poor on both sides, that’s half a step forward I guess 😌

My chisels make these slotted diamond shaped holes and since I wasn’t paying enough attention apparently the thread played tricks on me, naughty thing. But I persevere, trying the 18/3 waxed linen together with the stitching groover on the next project. I just need to find something that needs to be holstered. Hmmm

83E01C58-DE7B-4638-9A31-16A0668BE5AB.jpeg
 
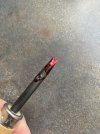
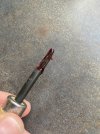
My order was delivered today, the stitching groover works great but what the * * * * is wrong with the edge beveler? It can’t be some protective waxing can it? It looks like crap

C8A97875-35D1-433A-9285-4D9ED697DD5A.jpeg
17B0DA55-C381-428F-A568-CF8B8C2B6F45.jpeg
 
Have you tried peeling it off? Looks like a protective film to me. That is an edge tool, after all.
Might need some stropping to get it just right.
 
Have you tried peeling it off? Looks like a protective film to me. That is an edge tool, after all.
Might need some stropping to get it just right.
I first thought so too but it looks horrible. Like a kid used it to dig into a burning candle.

I’ll try to peel it off. Just wondered if any of you guys saw something similar

EDIT: peeled it off, it works fine! Turned out it was a protective film masquerading as red goo
 
Last edited:
Sorry - can't really help from here. The photo is too small for my old eyes to see anything other than the red wax. Which might have been applied by poking the tips into a pile of warm wax. I would have been a bit careless with that process too. Surprised they didn't ship with a plastic tube for a sleeve.

Hopefully it will come off clean and the tip itself is in good condition. That's my expectation. Good luck.
Yes it came off! And it works fine! Thanks for the mental support 😄
 
… and on the topic of stitching groovers, do you guys use it on both sides? I assume it is going to be challenging to get the holes to align with the groove on the back?
 
P Lackey says in his WIP tutorial that - of course you groove the back side too. :rolleyes: This likely works well for him because he has learned to create nice crisp square edges along his seams. That has been elusive for me so my back grooving days are still ahead. He also use a drill press to bore his stitching holes.
For now I think about the back groove and then move on. ;)

You are right, at least going by my experience, "it is going to be challenging to get the holes to align with the groove on the back".
 
I groove the back after putting all the holes in. If you use a freehand groover (just one without a guide) and keep a finger on the edge for guidance, you can readily guide the cutter through the middle of the holes. Just take your time and move from one hole to the next. It gets pretty fast after a few tries. The back of the holster shown above was done freehand. Practice on some scrap. If you try to do it before the holes, you really need absolutely square edges and great technique in hole making.
Randy
 
CUTTING TOOLS??

• Are Leather Round knives essential? They are too expensive but am I making work harder for myself without it. I use a retractable rotary tool now but that seems best for straight lines and along a plastic edge. Metal edge rules can damage the somewhat flexible rotary blade.
Scissors are hit or miss. Cutting curves are a challenge - worse as the dia. gets smaller. How to ?

* Especially challenging is cutting waste leather away from a seam before stitching, especially a back stitched puukko seam. I use a very sharp Spyderco free hand but that has an element of risk that is a bit daunting. Not so much cutting myself as for having the leather grain pull the knife in too close/off the line. Keeping an even 1/8" to 3/16" of a margin from the stitching line is challenging. So how do you do it?

Thanks.
I don't think I would call them essential, but they are a useful tool. But then I am still learning how to use mine. What I would say is essential is that whatever knife is used, it needs to be sharp. A lot of people use razor knives, or exacto knives. Before I got my round knife my favorite was the coping blade of my Boker Carvers Congress. Tandy sells some leather cutting scissors, that work well, at least on thinner (4 to 5 oz) leather. I have never tried them on thicker leather. Mostly now, I use my round knife for thicker leather, and my scissors for thin stuff.

O.B.
 
Round knives come in many sizes and shapes and they all have strengths. Most can cut decent curves if you practice and learn to not lean the knife as you turn. I also turn the workpiece to make things smoother. Smaller ones with highly pointed ends do curves the best. For straight lines, just lean the knife forward into the edge and it helps a lot to cut straight lines. I am not sure trimming a Puukko seam would be a good use for one. If you had some way to make a good backstop maybe but I suspect there are better tools.
I use mine on every piece I make for most, but not all, cuts. Great for outlines and long cuts. A bit harder for radius cuts depending on size and can skive and trim very well in most situations. Like all cutting tools, a sharp one is essential. A dull round knife is one of the most dangerous tools you can have.
I have used them for years and could not do without them any more but there is a learning curve and they can be expensive for well made ones.
Randy
 
I’ve only dabbled in sheath making with a few completed so far.. But one tip that I absorbed(most likely from these forums) was to use a large sewing needle instead of a drill bit when using a drill press or in my case a dremel. Instead of potentially ripping and removing material with a drill bit, it separates and pushes through while maybe burnishing the holes a little bit.
 
Back
Top