- Joined
- Jun 26, 2012
- Messages
- 163
Hey everyone,
New member here. I posted this on another forum last summer and though maybe some of the DIY'ers might get some use out of it here.
I've really gotten into making sheaths the last summer so I thought I'd make a tutorial of how I have been doing it.
Disclaimer - Like I said, I am a total rookie. There are probably far better ways of making this sheath and doing leather work. If you have tips please let us know!
Tools I used:
-Dremel - sanding cylinder, cutting wheel, buffing wheel
-Heat gun
-Drill - 1/4 and 7/32 bits
-Homemade kydex press
-Box cutter or xacto blade
-Vise grips
-Eyelet setter from knifekits. Don't get the cheapest hand setter. It sucks. Get the one thats around 20 bucks.
-Spring clips for paper
-Dusk mask and safety glasses
-Light work gloves
-Time
Materials:
-Blue masking tape
-Kydex (I used .93 for the liner and .125 for the carry attachments)
-Veg tan leather - I used scraps from Tandy Leather. I think it's about 4oz? Not positive but the kydex makes up the structure of the sheath so the leather can be pretty thin.
-Nail polish remover
-Eyelets. I have the ones meant for .125 kydex from knifekits.com
-Leather dye - I used Fiebings Spirit dye (I didn't use the Pro Oil version. I didn't realize it was better until after I had purchased it but it seemed to work just fine.
-Chicago screws or post screws
-Some sort of waterproofiing stuff - I used SnowGuard. It says it's made of a mixture of bees wax and such.
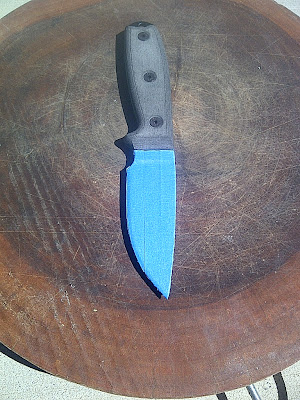
Step 1 - Kydex forming
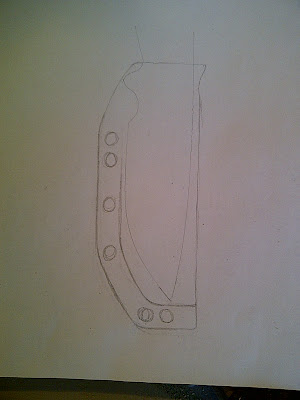
-Sketch your sheath and use your drawing as a template to keep your vision fresh and to measure out the leather and kydex
-Tape the blade of your knife with masking tape. I only put 2 layers of tape on the first sheath I made. I must have gotten better at pressing the kydex and because the last sheath I made was too tight on the blade. I tried 3 layers of tape on this sheath and it was better. The tape allows some clearance, especially if your blade is going to get dirty and gummed up. You want a close fit on the handle so, don't tape the handle or scales.
-Cut out a rectangular peice of kydex that leaves plenty of room for error. You will cut out the sheath later so there's no need to attempt to press it dead on balls accurate. To cut the kydex, you only need to score it with a box cutter and then snap it.
2 stage Kydex pressing
1st stage
-For the first stage I fold the kydex in half and secure it with screws. This makes it easier to get a good position when you put the blade in for stage 2. I don't need to heat the entire piece, only the middle where the spine of the knife is going to be. Heat up the kydex with the heat gun. It doesn't have to be sloppy soft. Just soft enough to fold it in half. Use gloves.
-Next, I drill a hole (7/32) in each corner of the folded kydex and secure the fold with Chicago screws. This step is for us rookies using heat guns. It has two purposes:
1) It makes it easier to get the kydex hot enough using a heat gun.
2) It makes putting the blade in the correct position and pressing the hot kydex faster/easier.
2nd stage
-Put on the work gloves. The gloves shouldn't be so heavy that they impede your dexterity but heavy enough to protect your hands from the heat. I use old mountain biking gloves.
-Prepare your kydex press. Be sure everything is ready to go as the hot kydex needs to be formed fairly quickly.
-Get your knife in a good spot to grab. It sucks scrambling to find/grab your knife. The quicker you can place the blade, the better the impression will be.
-Heat up the folded kydex. As it heats up, the fold will open up like a canoe which makes it much easier to get the kydex up to a good temperature and uniformly heated.
LEARNED IT THE HARD WAY - Don't hold the heat gun too close. If the kydex gets too hot, you'll see it melt/scorch. Use a nice uniform back and forth motion.
LEARNED IT THE HARD WAY - Keep heating the kydex until it is very rubbery. On my first sheath, I heated the kydex hot enough to form a mold but not hot enough to form a GREAT mold. Make sure it's hot!
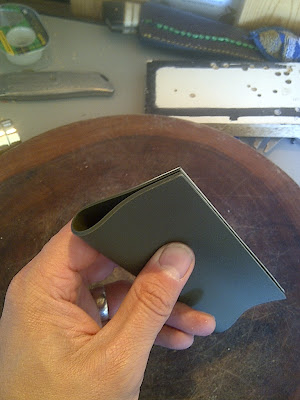
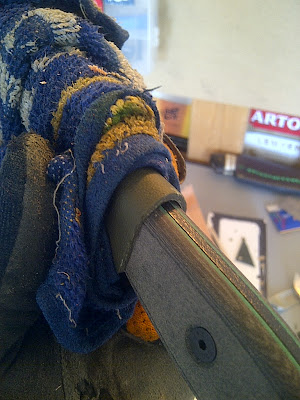
-Once the kydex is hot enough, grab your knife and insert it into the 'canoe' to the desired depth. For this sheath, I made sure to press the spine of the blade firmly into the fold before inserting it into the press. Put it in the press and cinch it down tight. The tighter the better in my opinion.
Here is my homemade press. It's made out of garage junk and some foam I bought from knifekits.com. I throw the knife between the two pieces of foam and stand on it until I can tighten down the bolts. It should only take a few minutes to set:

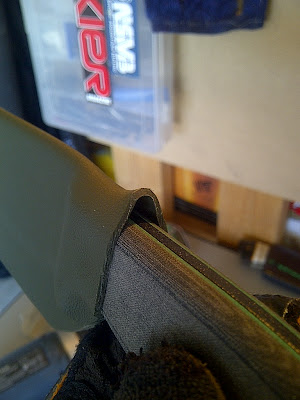
I was pretty happy with this impression. It's the first time I nailed it on the first try! If it doesn't turn out, you can try again. Supposedly kydex can be formed over and over again but I noticed the results get less predictable over 2 attempts.
Shaping the liner
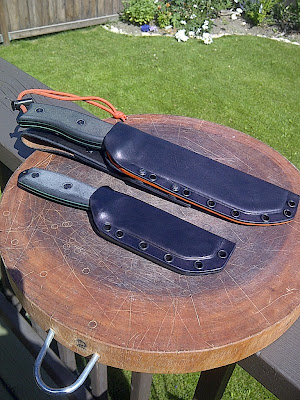
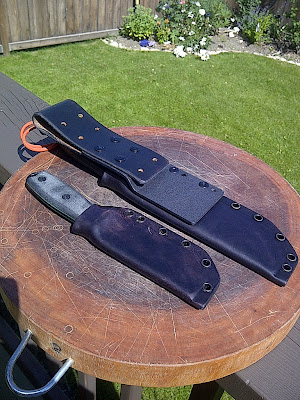
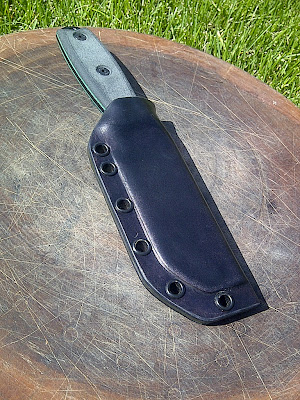
At this point, you could simply cut out the shape you want, install the eyelets and adjust the retention if you just wanted a kydex sheath. I wanted to cover it with leather. I can't find any fault with the stock sheaths that ESEE blades come with but I want to pass my knives on to my children and I just think leather is better at telling stories than plastic.
There are 2 features to this kydex liner:
1) The layer of kydex that is going to extend to the edge of the leather and
2) The kydex ramp that is formed to secure the blade retention.
-Using your sketch, cutout the basic shape of the sheath using the Dremel and cutting wheel.
-Next trace out the area that is going to house the blade. You only need to leave about 2-3mm between the edge of the blade and the edge of the kydex.
LEARNED IT THE HARD WAY - Using a dremel is slow, messy and tedious. It definitely sucks. Use a dusk mask and eye protection when using the dremel on Kydex. I forgot one day and sucked in a mouthfull of kydex bits and was hacking for 5 minutes straight. I wish I had a belt sander.
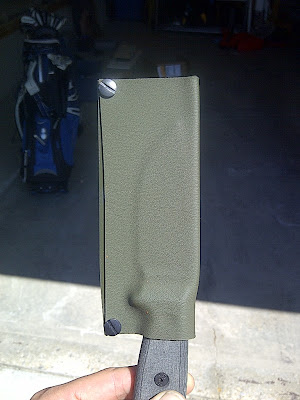
-Cut out the top layer of kydex, leaving the layer below to extend to the edge of the leather.
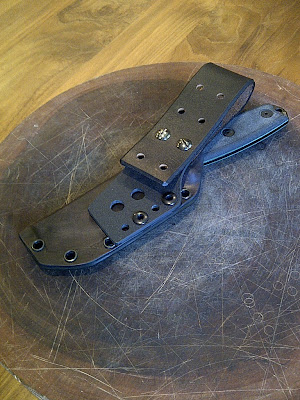
***The reason I leave this kydex tab is to increase the stiffness of the carry attachment and to add a bit of colour to the sheath (if you use coloured kydex). Most kydex lined leather sheaths use only the leather to attach carry options. This usually means that additional leather straps are needed to prevent the carry attachment from twisting.
-Use a piece of scrap leather or cardboard to separate the 2 layers of kydex when using the dremel to cut out the top.

LEARNED IT THE HARD WAY- Be sure to cut out the correct side of the kydex depending on whether or not you want right hand or left hand draw! I screwed up on my second sheath and cut out the wrong side....back to step one.
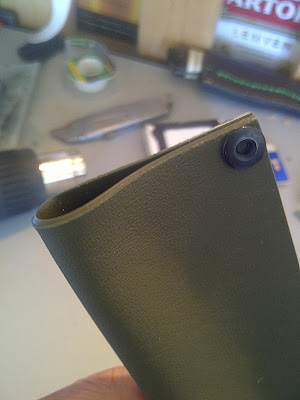
-Once the liner is cut out, you can use the sanding drum on the dremel to form the ramp which will secure the knife retention. The ramp might not be necessary but I want my sheaths to last and if the leather is the only support to the blade retention, I don't feel like it would stand the test of time.
-You are going to want to put at least 1 eyelet on the ramp; 2 for larger knives like the ESEE 6. Just my opinion. Err on the side of caution. You can always shorten a ramp that is too long when adjusting the retention. This was my first small knife sheath and I came dangerously close to making this ramp too short.

You'll also need to cut a slot for the drain hole.

The last major step before moving to the leather work is forming the thumb ramp.
-You need the heat gun, a pencil and a wet cloth or towel.
-Insert the knife into the kydex and wrap the portion of the sheath that you want to remain unchanged in the wet towel.
-use the heat gun to heat up the area of the thumb ramp and use the pencil to form it.
Note: For forming small features such as thumb ramps, the kydex does not have to be super hot, just hot enough to mold to shape.
Leather Wet forming
Now that the skeleton of the sheath is done, it's time to form the leather. The kydex liner does not have to be 100 percent finished before wetforming. The outside edge of the kydex will be refined once the sheath is covered in leather and the retention will be adjusted while waiting for the leather dye to dry.
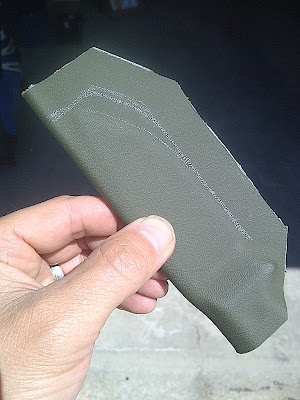
-Cut out your leather. You should leave a tiny bit extra but you won't need too much. The outer edge of the kydex should already have a bit of a buffer zone left from when you cut it out.

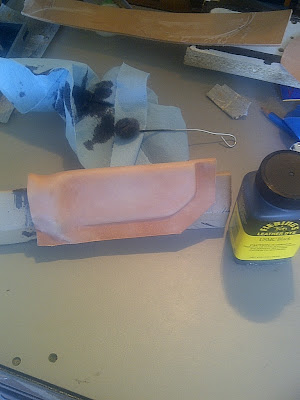
-Soak the leather in water. I put mine in the back of the toilet for about 5 minutes. I have no idea if it needs to be that wet or not but I thought the wetter the better.
-To wetform the more detailed areas, I use a spoon. If there's one piece of info that I learned to keep the leather looking nice it's that aggressive and fast leaves more scars in the leather than slow and gentle. Take your time and it will slowly come together.
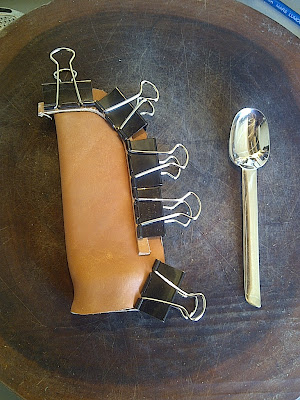
-Use paper clips to hold the leather in place while it dries. I used a small strip of leather under the clips to keep the lines of the sheath smooth and straight. Let it dry over night.
LEARNED IT THE HARD WAY - The paper clips will turn the leather black! I don't know why but if you don't want black stains from the clips on your sheath, you have to find something to put in between.
Dyeing
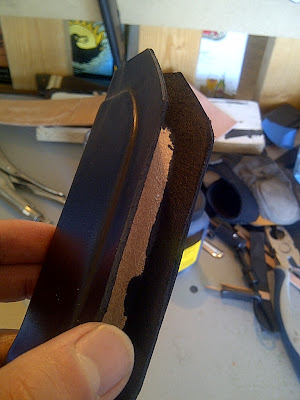
Once the leather has dried from wetforming, you can remove the kydex.
I used Fiebings Spirit dye in USMC black. It's a really cool color - Black with an underlying tone of dark blue.
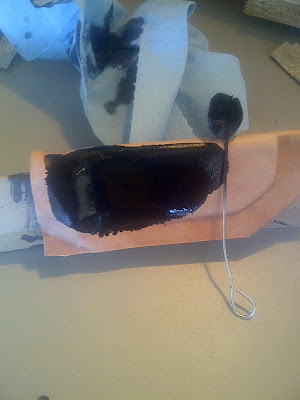
-Rub the outside of the leather down with nail polish remover. Do not skip this step. The finish on the veg tan leather prevents the dye from penetrating properly. The more seriously you take this step, the less exccess dye you'll have to rub off in the next step, which is desirable.
I don't really have any tips for dyeing properly. I found that applying it in a circular motion leaves less streaks and that the less dye you use to get the desired color, the less you have to rub off in the end.
I dye the inside edge of the leather as well.
Retention
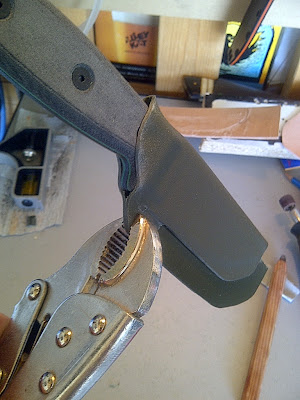
While I am waiting for the dye to dry, I refine the kydex liner and adjust the retention. With the kydex liner removed, use a pair of vice grips to clamp various spots on the edge. Test the retention of the blade and plan for final shaping and polishing. The highest spot you decide on will become the spot for the first eyelet. This spot should be somewhere on the liner ramp.
Once I've decided where the top rivet should go, I use the dremel to refine the retention and shape of the upper sheath.
When the retention is how I like it, I make the edges of the kydex look pretty with 600 grit sand paper and the buffing wheel on the dremel.
Note: You don't have to finish the outer edge of the kydex yet. This will be done after the leather is in place during the final touches.
Make sure you wash out the liner before installing the eyelets.
Prepping for the eyelets
-Once the dye has dried for a few hours, you have to rub it down with a dry clean cloth. By 'rub down' I don't mean a quick spit shine. You have to rub the leather until no more dye comes off. I hate this step. It's dirty and tedious BUT if you don't want dye rubbing off on your clothing, it must be done.
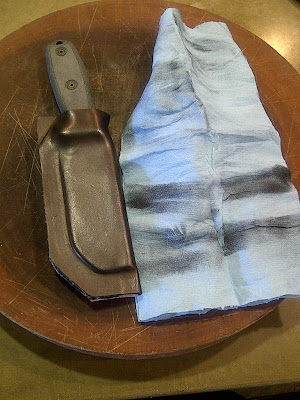
-The next step is to apply the waterproofing to the inside of the leather. I basically cake the stuff on. The more the better in my mind. Once the kydex liner is installed, the leather will have a lifetime to soak up any excess waterproofing goop.
New member here. I posted this on another forum last summer and though maybe some of the DIY'ers might get some use out of it here.
I've really gotten into making sheaths the last summer so I thought I'd make a tutorial of how I have been doing it.
Disclaimer - Like I said, I am a total rookie. There are probably far better ways of making this sheath and doing leather work. If you have tips please let us know!
Tools I used:
-Dremel - sanding cylinder, cutting wheel, buffing wheel
-Heat gun
-Drill - 1/4 and 7/32 bits
-Homemade kydex press
-Box cutter or xacto blade
-Vise grips
-Eyelet setter from knifekits. Don't get the cheapest hand setter. It sucks. Get the one thats around 20 bucks.
-Spring clips for paper
-Dusk mask and safety glasses
-Light work gloves
-Time
Materials:
-Blue masking tape
-Kydex (I used .93 for the liner and .125 for the carry attachments)
-Veg tan leather - I used scraps from Tandy Leather. I think it's about 4oz? Not positive but the kydex makes up the structure of the sheath so the leather can be pretty thin.
-Nail polish remover
-Eyelets. I have the ones meant for .125 kydex from knifekits.com
-Leather dye - I used Fiebings Spirit dye (I didn't use the Pro Oil version. I didn't realize it was better until after I had purchased it but it seemed to work just fine.
-Chicago screws or post screws
-Some sort of waterproofiing stuff - I used SnowGuard. It says it's made of a mixture of bees wax and such.
Step 1 - Kydex forming
-Sketch your sheath and use your drawing as a template to keep your vision fresh and to measure out the leather and kydex
-Tape the blade of your knife with masking tape. I only put 2 layers of tape on the first sheath I made. I must have gotten better at pressing the kydex and because the last sheath I made was too tight on the blade. I tried 3 layers of tape on this sheath and it was better. The tape allows some clearance, especially if your blade is going to get dirty and gummed up. You want a close fit on the handle so, don't tape the handle or scales.
-Cut out a rectangular peice of kydex that leaves plenty of room for error. You will cut out the sheath later so there's no need to attempt to press it dead on balls accurate. To cut the kydex, you only need to score it with a box cutter and then snap it.
2 stage Kydex pressing
1st stage
-For the first stage I fold the kydex in half and secure it with screws. This makes it easier to get a good position when you put the blade in for stage 2. I don't need to heat the entire piece, only the middle where the spine of the knife is going to be. Heat up the kydex with the heat gun. It doesn't have to be sloppy soft. Just soft enough to fold it in half. Use gloves.
-Next, I drill a hole (7/32) in each corner of the folded kydex and secure the fold with Chicago screws. This step is for us rookies using heat guns. It has two purposes:
1) It makes it easier to get the kydex hot enough using a heat gun.
2) It makes putting the blade in the correct position and pressing the hot kydex faster/easier.
2nd stage
-Put on the work gloves. The gloves shouldn't be so heavy that they impede your dexterity but heavy enough to protect your hands from the heat. I use old mountain biking gloves.
-Prepare your kydex press. Be sure everything is ready to go as the hot kydex needs to be formed fairly quickly.
-Get your knife in a good spot to grab. It sucks scrambling to find/grab your knife. The quicker you can place the blade, the better the impression will be.
-Heat up the folded kydex. As it heats up, the fold will open up like a canoe which makes it much easier to get the kydex up to a good temperature and uniformly heated.
LEARNED IT THE HARD WAY - Don't hold the heat gun too close. If the kydex gets too hot, you'll see it melt/scorch. Use a nice uniform back and forth motion.
LEARNED IT THE HARD WAY - Keep heating the kydex until it is very rubbery. On my first sheath, I heated the kydex hot enough to form a mold but not hot enough to form a GREAT mold. Make sure it's hot!
-Once the kydex is hot enough, grab your knife and insert it into the 'canoe' to the desired depth. For this sheath, I made sure to press the spine of the blade firmly into the fold before inserting it into the press. Put it in the press and cinch it down tight. The tighter the better in my opinion.
Here is my homemade press. It's made out of garage junk and some foam I bought from knifekits.com. I throw the knife between the two pieces of foam and stand on it until I can tighten down the bolts. It should only take a few minutes to set:
I was pretty happy with this impression. It's the first time I nailed it on the first try! If it doesn't turn out, you can try again. Supposedly kydex can be formed over and over again but I noticed the results get less predictable over 2 attempts.
Shaping the liner
At this point, you could simply cut out the shape you want, install the eyelets and adjust the retention if you just wanted a kydex sheath. I wanted to cover it with leather. I can't find any fault with the stock sheaths that ESEE blades come with but I want to pass my knives on to my children and I just think leather is better at telling stories than plastic.
There are 2 features to this kydex liner:
1) The layer of kydex that is going to extend to the edge of the leather and
2) The kydex ramp that is formed to secure the blade retention.
-Using your sketch, cutout the basic shape of the sheath using the Dremel and cutting wheel.
-Next trace out the area that is going to house the blade. You only need to leave about 2-3mm between the edge of the blade and the edge of the kydex.
LEARNED IT THE HARD WAY - Using a dremel is slow, messy and tedious. It definitely sucks. Use a dusk mask and eye protection when using the dremel on Kydex. I forgot one day and sucked in a mouthfull of kydex bits and was hacking for 5 minutes straight. I wish I had a belt sander.
-Cut out the top layer of kydex, leaving the layer below to extend to the edge of the leather.
***The reason I leave this kydex tab is to increase the stiffness of the carry attachment and to add a bit of colour to the sheath (if you use coloured kydex). Most kydex lined leather sheaths use only the leather to attach carry options. This usually means that additional leather straps are needed to prevent the carry attachment from twisting.
-Use a piece of scrap leather or cardboard to separate the 2 layers of kydex when using the dremel to cut out the top.
LEARNED IT THE HARD WAY- Be sure to cut out the correct side of the kydex depending on whether or not you want right hand or left hand draw! I screwed up on my second sheath and cut out the wrong side....back to step one.
-Once the liner is cut out, you can use the sanding drum on the dremel to form the ramp which will secure the knife retention. The ramp might not be necessary but I want my sheaths to last and if the leather is the only support to the blade retention, I don't feel like it would stand the test of time.
-You are going to want to put at least 1 eyelet on the ramp; 2 for larger knives like the ESEE 6. Just my opinion. Err on the side of caution. You can always shorten a ramp that is too long when adjusting the retention. This was my first small knife sheath and I came dangerously close to making this ramp too short.
You'll also need to cut a slot for the drain hole.
The last major step before moving to the leather work is forming the thumb ramp.
-You need the heat gun, a pencil and a wet cloth or towel.
-Insert the knife into the kydex and wrap the portion of the sheath that you want to remain unchanged in the wet towel.
-use the heat gun to heat up the area of the thumb ramp and use the pencil to form it.
Note: For forming small features such as thumb ramps, the kydex does not have to be super hot, just hot enough to mold to shape.
Leather Wet forming
Now that the skeleton of the sheath is done, it's time to form the leather. The kydex liner does not have to be 100 percent finished before wetforming. The outside edge of the kydex will be refined once the sheath is covered in leather and the retention will be adjusted while waiting for the leather dye to dry.
-Cut out your leather. You should leave a tiny bit extra but you won't need too much. The outer edge of the kydex should already have a bit of a buffer zone left from when you cut it out.
-Soak the leather in water. I put mine in the back of the toilet for about 5 minutes. I have no idea if it needs to be that wet or not but I thought the wetter the better.
-To wetform the more detailed areas, I use a spoon. If there's one piece of info that I learned to keep the leather looking nice it's that aggressive and fast leaves more scars in the leather than slow and gentle. Take your time and it will slowly come together.
-Use paper clips to hold the leather in place while it dries. I used a small strip of leather under the clips to keep the lines of the sheath smooth and straight. Let it dry over night.
LEARNED IT THE HARD WAY - The paper clips will turn the leather black! I don't know why but if you don't want black stains from the clips on your sheath, you have to find something to put in between.
Dyeing
Once the leather has dried from wetforming, you can remove the kydex.
I used Fiebings Spirit dye in USMC black. It's a really cool color - Black with an underlying tone of dark blue.
-Rub the outside of the leather down with nail polish remover. Do not skip this step. The finish on the veg tan leather prevents the dye from penetrating properly. The more seriously you take this step, the less exccess dye you'll have to rub off in the next step, which is desirable.
I don't really have any tips for dyeing properly. I found that applying it in a circular motion leaves less streaks and that the less dye you use to get the desired color, the less you have to rub off in the end.
I dye the inside edge of the leather as well.
Retention
While I am waiting for the dye to dry, I refine the kydex liner and adjust the retention. With the kydex liner removed, use a pair of vice grips to clamp various spots on the edge. Test the retention of the blade and plan for final shaping and polishing. The highest spot you decide on will become the spot for the first eyelet. This spot should be somewhere on the liner ramp.
Once I've decided where the top rivet should go, I use the dremel to refine the retention and shape of the upper sheath.
When the retention is how I like it, I make the edges of the kydex look pretty with 600 grit sand paper and the buffing wheel on the dremel.
Note: You don't have to finish the outer edge of the kydex yet. This will be done after the leather is in place during the final touches.
Make sure you wash out the liner before installing the eyelets.
Prepping for the eyelets
-Once the dye has dried for a few hours, you have to rub it down with a dry clean cloth. By 'rub down' I don't mean a quick spit shine. You have to rub the leather until no more dye comes off. I hate this step. It's dirty and tedious BUT if you don't want dye rubbing off on your clothing, it must be done.
-The next step is to apply the waterproofing to the inside of the leather. I basically cake the stuff on. The more the better in my mind. Once the kydex liner is installed, the leather will have a lifetime to soak up any excess waterproofing goop.
Last edited:


")
