DIY Sharpness Tester

Joined
Nov 19, 2014
Messages
2,633
Just for fun, I have been trying to make a tester for edge performance.
I think I finally made something which might work.

Tester1.jpg


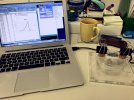
Basically, it is a DIY version of Edge-on-up.
Fish line (0.28 mm) is placed in the slits in two corks and secured with clips.
The styrofoam is just a cushion to prevent the edge to hit the plastic.

Tester2.jpg


I just but a blade on the fish line and push down until it cuts the line.
Since the scale I have does not register the max weight, I videotape the display to read it.


I have do a lot of testing to check the reproducibility and with thinner fish lines.
But so far I got quite consistent numbers with Feather Hi-Stainless razor.
 
my kitchen scale is a +1g.
yours a +0.001g.
would cost 100$ nowadays
how much does BESS cost
we need to talk about cost
if the BESS cost 10$
nobody would bother diy
 
my kitchen scale is a +1g.
yours a +0.001g.
would cost 100$ nowadays
how much does BESS cost
we need to talk about cost
if the BESS cost 10$
nobody would bother diy

I see 0.001g scales for sale online for $20. How would you use a small digital scale like this to achieve results on a Bess Scale with their test media?

Is it just a matter of adding their test media harness to the scale, tare the scale with the test clips added, then measure the force in grams using this chart? https://www.edgeonup.com/eou_new_2016_008.htm
 
The 0.001g scales for 20$ are made in the chinas. I had one, plastic :poop:. And way too small for building a BESS scale. I am not going to build a diy sharpness tester, just saying.
 
my kitchen scale is a +1g.
yours a +0.001g.
would cost 100$ nowadays
how much does BESS cost
we need to talk about cost
if the BESS cost 10$
nobody would bother diy

Good point.

I am just using a good scale available to me at the moment.
The scale does not have to be super accurate.
To the first decimal point should be sufficient.

It needs to be fast, if it does not have a register circuit for max force.
I am currently searching a good economical scale for this.
 
I see 0.001g scales for sale online for $20. How would you use a small digital scale like this to achieve results on a Bess Scale with their test media?

Is it just a matter of adding their test media harness to the scale, tare the scale with the test clips added, then measure the force in grams using this chart? https://www.edgeonup.com/eou_new_2016_008.htm

Yes.
Basically, you just need an apparatus to secure test media on a scale.

My main goal is to test a variety of test media to have consistent results.
I guess I will try the BESS test media down the road, but am not planning to cross validate the results with Edge-on-up at the moment.
 
My long term goal is to build a test system for initial edge quality, edge retention, and sliceyness.
I hope that this tester can report edge quality reliably and thus can be used for edge retention test.
 
Good point.

I am just using a good scale available to me at the moment.
The scale does not have to be super accurate.
To the first decimal point should be sufficient.

It needs to be fast, if it does not have a register circuit for max force.
I am currently searching a good economical scale for this.
Great to hear. miso2 miso2 please let us know if you find an appropriate scale. I wonder if there is a model available that has a "max" or "hold" function available that would keep the heaviest reading.

Or some type of scale that allowed data logging on Phone/Computer. Automatic logging would let you see the max force and also help keep a database of readings. sort of like this project: https://learn.adafruit.com/data-logging-iot-weight-scale/overview
 
That looks interesting.
I need to investigate how much sampling rate I can get with that.

I am thinking of going to an analogue route.
 
After looking a while for an appropriate scale for this project, I found none.

So I decided to build a DIY scale with a load sensor, AD converter/amp, and Arduino (<$40 total).
I hope this will allow me to stream data to PC at a high enough rate.

But I accidentally ordered a cheap AD board with 10 Hz data rate.
Hopefully, this is fast enough.
If not, I will buy a better one with 80 Hz rate.

Stay tuned!
 
Last edited:
If I can hold a single sheet of newsprint or telephone book paper, and "push cut" straight down and side to side, it's sharp.

My most used test is to take the blade into the bathroom and see if it will DRY shave my cheek in one pass with very little discomfort.
 
I am almost done with making the device.

Tester3.jpg


I am going test a set of test media (fishing lines) with Feather razor blades to see which one is consistent.
I am also testing how angle and speed of cutting affect the result.
Then, test with a knife with different edge angles and finishes.
After that, I plan to examine edge retention (probably repetition of cardboard cutting -> edge test) and sliceyness (with styrofoam) using the device.

In the mean time, I would like to share how I built the DIY sharpness tester for those interested in building one.


First, required parts.

Scale parts:
- Load cell (sensor). I used a 2 kg sensor. I also tested a 10 kg one, which was too noisy and not accurate to a gram. ~$5.
- AD converter/AMP (with HX711 chip) available from $1.
- Arduino or a compatible board. I used an Arduino Uno R3 clone. $20.
- Wires. $1
- Base plate and the top plate. I used acrylic plates, but wooden plates should work. $1 ~ $20.
- Screws. $1.
Alternatively, you can buy a cheap kitchen scale ($10) and use its sensor and the case. Also, I have seen a kit containing a sensor, a chip, and a case from Amazon at $10.

Holder parts:
- Solid corks. If you drink wine of have friends do so regularly, free.
- Base plate. Anything sturdy and flat. Few bucks.
- Binder clips. A box from a dollar shop.

Total: ~$50 (Can be done at around $30).
 
Next, assembly of the tester.

Scale:
1. Secure the load cell to the base and top plates. Use nuts to make space in between.
2. Connect the sensor to HX711. This may require soldering.
3. Connect HX711 to Arduino. This may require soldering.

Tester4.jpg


Holder:
1. Cut the sides of a cork so that a binder clip can fit.
2. Cut a slip at the center of the cork.
3. Cut the cork horizontally to reduce height.
4. Glue the cork to the base plate with super-glue.
5. Repeat for the other cork.

Tester5.jpg
 
Now, you need a computer (Windows).

Computer prep:
1. Download and install Aruduino IDE software (free) from the official site.
2. Download PLX-DAQ v2.11 (available freely from Arduino forum). This is an Excel worksheet with macros.
3. Connect Arduino to a computer. Driver should be installed automatically.

Tester_Arduino1.jpg


4. On Arduino IDE, Connect to your Arduino (keep the serial port number).
5. From Manage Libraries, download HX711 library from GitHub.

Tester_Arduino2.jpg
 
Back
Top